IMPORTANT NOTE ON SAVING & CHECKPOINTS: Checkpoints are the spots in each level where the game auto-saves. These are noted in blue and numbered in the walkthrough text to correspond with PC, Macintosh, PSP & Wii savegame files available for download. (Please note that the number and location of checkpoints vary slightly for the Nintendo Wii game.) Although it is also possible to save manually, the save system in Anniversary is very different from the older Tomb Raider games and differs in several ways from the TR Legend save system. Please see the Anniversary Controls page for details. This may save you a great deal of frustration as you make your way through Lara's latest adventure.
LEVEL 6: THE COLISEUM | Updated: 8/11/11(†) |
Kills: 21 Supplies: 10 Other: BALCONY KEY, 50-CALIBER PISTOLS (also 1 COG - Wii version only)
Artifacts: 1 Relics: 0 Rubbing Rewards: 1(*)
Time Trial: 11:00(**)
RUINED COLISEUM ENTRANCE: CHECKPOINT 1 registers when you finish the previous level. Turn left and follow the hallway to CHECKPOINT 2. Kill the 2 rats and enter the room ahead. This looks like it once may have been the front entrance to the coliseum, but it's now just a jumble of broken stone ledges. You'll have to find another way in.
Run up the small sloping chunk of marble to the left of the doorway and jump to grab the ledge above. Pull up, turn around and jump to grab the top of the fluted column. Pull up and get a small medipack. From here, you can shoot another rat on the wide, ledge across the room. Hop back down to the lower ledge, go to the right and running jump to grab the next ledge. Pull up, cross over it and jump to grab a handhold on the wide ledge with the columns below. Climb up and kill that rat if you didn't before.
Cross to the far end of the ledge and hop down onto the ledge below. From there, climb down near the small pool. Jump across the water and vault up onto the ledge to get a box of shotgun ammo (if you have room in your inventory for it). Now hop into the water.
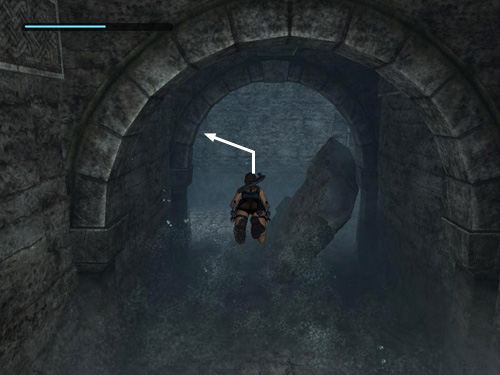
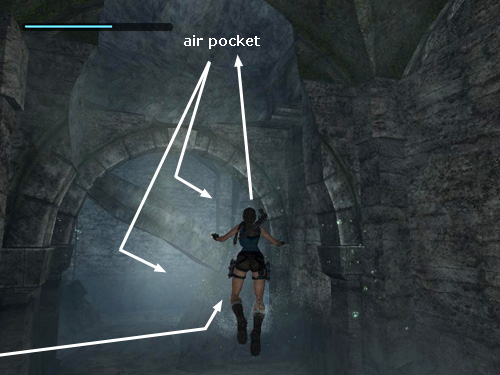
To more easily navigate the underwater tunnels, begin with Lara treading water facing the small, square ledge that juts out into the pool. The ledge where the shotgun ammo was should be on her left. Swim down then forward. (There's another passage leading in the other direction but it's a dead end. Swim through the man-made stone archway above the fallen rock that's partially blocking the way (as shown in this screenshot). Beyond this archway is a passage running left to right. Head to the left and swim upward to an air pocket where Lara can breathe (shown here).
When Lara's lungs are full, swim downward and through the next man-made archway, either above or below the stone slab partially blocking the way. Beyond that slab, turn right (the previous screenshot also shows the way to go) and continue forward along the underwater passage. Here you'll probably want to follow the on-screen instructions and tap Interact (or, if you're playing on the Wii, shake the nunchuk) to make Lara swim faster. When you come to a rough vertical shaft, swim upward to the surface and CHECKPOINT 3.
ROOM WITH POOL AND CAGES: When you climb out of the water 2 bats and 2 rats attack together. Shoot them all.
In the Nintendo Wii game, you'll find a RUBBING REWARD (3/12), entitled "Centaur Awaits," on the wall opposite the pool. (Perhaps some sort of warning?) Approach the mosaic, press Interact to examine it, and then use the Wii remote to make the rubbing.
Climb onto the low wood-and-metal box to the right of the pool when facing it. Jump and grab the handhold on the wall above. Climb to the right, jump and grab the next handhold. Climb around the corner and jump and grab another handhold. Then jump onto the cage to the right and get the large medipack.
Hop down to the floor and again use the low box to reach the nearest handhold. This time, climb to the left and jump to grab the square protrusion above the pool. Climb all the way around to the other side and jump back to grab the next rough handhold. Jump back to grab the vertical pole. Climb to the top and jump from there to the top of the metal cage. (Here it may help to point the camera toward the cage and jump forward, rather than attempting a backward or sideways jump.)
Take a running jump over the wooden wall to land on the box on the other side. Follow the sloping passage up to CHECKPOINT 4. (In the Wii game, this hallway is dark and strewn with rubble. Use the flashlight—control pad Left—to navigate.)
As soon as you enter the coliseum proper, a cut scene shows a huge gorilla clambering down to meet Lara. It picks up a chunk of rock and hurls it at her, but she manages to dodge and draw her guns.
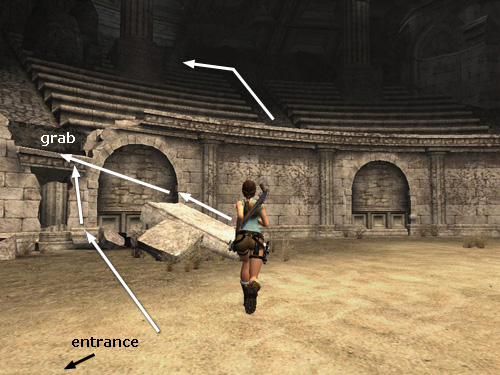
THE FLOOR OF THE ARENA: The first ape is joined by a buddy. You have a wide open space in which to fight the 2 gorillas, but if you prefer a less hands-on approach, run to the left and head for the sloping chunk of rock where the ledge above appears to have broken off. Run up the slope and jump to grab the broken wall ahead. Or, run straight to the wall in front of the ramp, hop up onto the small chunk of broken column and jump straight up to grab the ledge. (Both methods are shown in this screenshot.) Pull up and shoot the gorillas from above. You may need to move off to one side or the other to get a clear shot. Just be ready to dodge in case one of the gorillas decides to throw another boulder.
NOTE: In the Nintendo Wii game, there's an extra CHECKPOINT when the gorillas have been defeated.
After the gorillas are dead, you can find a box of shotgun ammo on the floor of the arena near the wall below and to the right of the SPECTATORS' BOX.
If you didn't already climb up to the seating area to shoot the gorillas, do that now. (One of the rocks shown in the previous screenshot will give Lara a boost.) When you climb up, Pierre's voice rings out from some hiding spot telling Lara to pick up the pace.
CLIMBING TO THE BALCONY: If you have room in your inventory, you can get more shotgun shells at the far right end of the curved ledge surrounding the arena. Now you're headed for the upper level of the larger building—the one with the statue of Athena and the big wooden doors on the lower level. To get there, go up the ramp between the tiered rows of seats. (Again, that same screenshot shows where to go.)
At the top, turn left to face the large fluted column. Shoot the 2 bats that fly out of the dark area ahead then climb up behind the column and jump to grab the horizontal crack in the side of the column. Climb around to the left, jump to grab the crack above, climb around some more and then jump back onto the flat rock behind. Take a running jump to the next wide, flat ledge, where you'll find a small medipack.
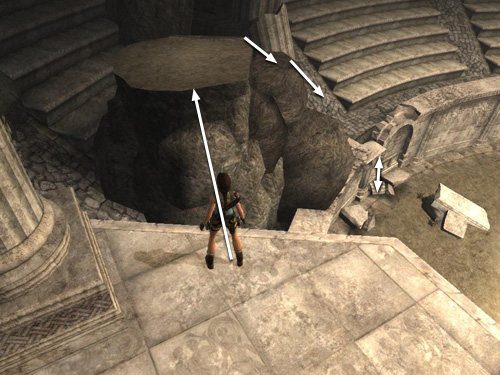
Turn left and roll through the vertical crack in the rocks (shown in this screenshot) to land on the stone platform on the other side. Pick up another small medipack. Then turn right and jump down to the flat rock below. From there, take a running jump to grab the edge of the balcony. Pull up. (This screenshot shows the path from the ledge with the medipack to the balcony.)
NOTE: If Lara falls while trying to reach the balcony, you don't need to go all the way down to the arena floor and make your way back up to the stone ledge. Instead climb the steps below the lower of the two flat rocks, slide down the sloping rock and jump onto the flat rock (as indicated by the broken arrows in the previous screenshot).
BALCONY WITH LOCKED GATE AND LEVER: At the back of this room is a closed gate with a keyhole for which you don't yet have a key. In front, surrounded by huge fluted columns, is a lever. Use it to open one of the doors at the base of this building. (The other door is where you entered the arena earlier.) CHECKPOINT 5 registers and dramatic music plays, though there are no visible enemies. . . yet.
In the Nintendo Wii game, the lever is replaced by a gear puzzle. The COG needed to repair the mechanism is lying on the balcony floor to the left, if Lara is facing out over the arena. Pick it up, approach the gear box and press Interact. Select the COG from inventory and use it. Now rearrange the gears to complete the puzzle and pull the switch. In the Wii version, along with the combat music, you get a long view of the gate below opening, as well as a glimpse of the enemies inside.
ARENA FLOOR (again): Do not attempt to drop down to the arena floor from the balcony; it's too high and Lara will die. Instead climb over the low wall and go to the edge of the balcony where you climbed up earlier. Now, if you like, you can drop down to the ledge below and then drop from there to the arena floor. When Lara hits the ground, 2 more gorillas and 2 lions emerge through the door you just opened. (I wonder what these guys have been eating for the last 2,000 years.) As before, you can make a run for the broken ledge and climb up to safety. Or just do your best to run and dodge as you take down first the lions, which are faster and thus more dangerous, then the gorillas.
If you'd rather not put Lara in harm's way, try this alternate approach: After CHECKPOINT 5, go to the edge of the balcony where you climbed up earlier, but instead of dropping down, take a running jump from the balcony to the flat rock where you found the medipak. Hop down onto the smaller flat rock ahead on the left and then slide down to the ledge where you first climbed up from the arena floor. Now you can hang from the broken section of wall, drop down into the arena to trigger the appearance of the lions and gorillas. Then immediately hop up onto the small chunk of broken column, grab the ledge above and pull up again. (This screenshot shows the sequence.)
If you happen to be on the floor of the arena when the last of the four creatures die, CHECKPOINT 6 registers. If you've climbed up to the seating area, this won't occur.
GLADIATOR CAGES: When the coast is clear, go through the door where the animals came out. Follow the ramp down and around. (In the Wii game, this is a dark, rubble-strewn hallway. You'll probably need your flashlight to navigate.) At the bottom is a room with more cages. There's something shiny on top of the cage to the left, but you can't reach it from here. So head to the right. Get some shotgun ammo in the alcove just beyond the doorway. Then continue around and over the sloping planks. While standing on these planks, face the second larger cage and use the grapple to snag the smaller metal box on top of it. (If this isn't working, head for the smaller cage on the far side of the room, stand on top of it and grapple the box from there.) Pull it down and across the room toward the ramp. Step back and pull it up the sloping planks and off the edge. Or, get behind it, grab and push it. Once you've maneuvered the box over the ramp, drag or push it all the way across the room and use it to climb onto the cage with the shiny object. Pick up the BALCONY KEY and trigger CHECKPOINT 7.
Return up the passage to the ARENA. There are 2 more lions waiting for you. If you choose to run out into the open, there's plenty of room to fight, and combat is a little easier with just two enemies. But if you like, once you get a lock on one of them, you can back down the tunnel shooting. Just take care to move fast so Lara doesn't get cornered at the bend. Then repeat the process with the second lion. Or, run to the sloping rock and climb back up to the seats where it's safe. Then, you can shoot the lions from safety. Or, if you don't care about getting all the kills, just go on about your business. You won't have to descend to the floor again.
CLIMBING TO THE BALCONY (again): Climb back up to balcony the way you did before. Go to the back of the room and use the BALCONY KEY to unlock the gate. Enter and climb the ladder to CHECKPOINT 8. (Tap Interact as Lara climbs to make her go faster. Or, if you're playing on the Wii, shake the nunchuk.)
BALCONY ROOF: If you want all the kills go forward to the far end of the roof and shoot the 2 bats that fly toward you. Then return toward the ladder.
NOTE: At this point, you may want to take a moment to climb back down the ladder, walk out onto the balcony to trigger CHECKPOINT 7 again, and then climb back up the ladder to CHECKPOINT 8. This will save you having to remember to kill the 2 bats again should Lara die before reaching the next checkpoint.
Now head for the left end of the roof (left when facing out over the arena). Take a running jump to grab the edge of the large, table-like rock ahead; pull up. This ledge is directly above the one where you found the second small medipack earlier. Cross the table-like rock to the far edge.
GRAPPLE SWINGING: When looking out across the seating area, you can see two metal grappling rings. If you look just beyond the second ring and a little to the left, you can glimpse the telltale shine of an artifact in a small alcove. You'll be getting it soon. The 50-CALIBER PISTOLS are also hidden in that area. You may notice their glow on the ledge above the second ring.
Get ready to take a running jump off the right side of the table-like ledge. This particular jump-and-grapple sequence can be a bit temperamental. (These screenshots may help.) Notice how the edge of the ledge is perfectly straight? It seems to help if you make the jump at the right side of that straight section then release the Forward and Jump keys and quickly press Grapple once Lara is out in mid-air.
Once Lara is hanging by the grapple cable, adjust her position left to right and lengthen the cable if necessary. Then swing and jump to land on or grab the top of ledge that has the second grapple ring underneath. Cross to the other side of the ledge. From here, you can see two goodies: a small medipack on the ledge ahead and a silvery glow from behind the rocks to the left. If you shift the camera, you can see the 50-CALIBER PISTOLS in a little niche. You'll get those momentarily.
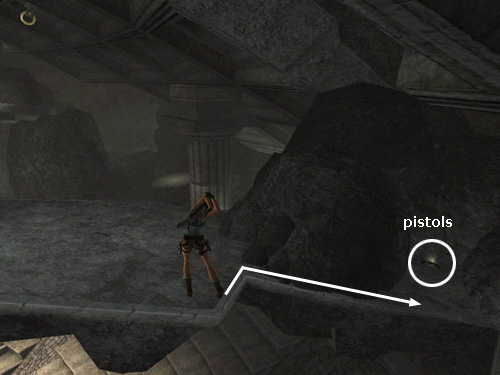
NOTE: If you prefer, you can get the pistols before going after the medipack—or even skip the medipack altogether. Just drop and hang from the short, flat edge of the ledge above the second metal ring. Traverse to the right to get the guns (as shown in this screenshot), then traverse back to the left and continue along.
50-CALIBER PISTOLS: Below are two different ways of obtaining first the medipack, then the pistols. (These are also explained on a page with screenshots.) From the top of the ledge with the second metal ring mounted below, take a running jump off the pointed part to grab the horizontal handhold below and to the left of the ledge with the medipack. It's a long jump, so press Interact for a saving grab if necessary. Then jump straight up to grab the ledge, pull up and take the small medipack.
Alternatively, take a running jump off the short, flat edge of the ledge toward the broken column. Lara should hit top of the column, slide back and grab the horizontal crack below. Climb around the column to the right as far as you can. Then jump back to grab the handhold behind. Climb to the right and jump up to grab the edge of the ledge with the medipack. Pull up and take it.
After picking up the health pack, turn around, position Lara near the wall on the right and take a running jump to grab the crack on the side of the fluted column. Climb around to the left and jump to grab the ledge. Pull up next to the DUAL 50-CALIBER PISTOLS. (The secret chime sounds showing you've found something important.) After getting the guns, drop back and hang from the ledge and traverse along the ledge to the left.
THE ARTIFACT: (This set of screenshots shows the path to the artifact.) When Lara is hanging from the ledge just in front of the second metal grappling ring, let go and immediately press Grapple to snag the ring.
NOTE: If you are having trouble doing this, see the footnote at the end of the walkthrough for alternate strategies. If you accidentally fall or drop down either before after getting the artifact, you'll have to return to the balcony and swing across to this point again. (You can swing from the first ring to grapple the second, as suggested in the alternate strategy.) This is one of the few sequences in the game where I cursed the designers for not including a couple of extra save points.
Once Lara is hanging by the grapple cable from the second metal ring, turn to face the alcove containing the artifact. Lengthen the grapple cable (Interact + Back/Down) so Lara can get a good long swing going; otherwise she'll miss grabbing the ledge and you'll have to start over from the BALCONY ROOF. Swing as high as you can and jump to grab the edge of the alcove. Pull up and take this level's only ARTIFACT (23/44). Hang from the edge of the ledge but do not drop down.
When Lara is hanging from the artifact alcove, instead of dropping down, climb to the right and jump straight up to grab the ledge above. Pull up onto the narrow ledge. Step onto the slope ahead, slide and jump to grab the next ledge; pull up. Now grab onto the crack in the fluted column. Climb around to the left and jump up to grab the top of the column. You can't pull up, so climb farther around to the left and jump back to the top of the next column. From there, running jump onto the roof.
SPECTATORS' BOX: Cross the roof and jump forward to land on the flat rock below. Do not hang and drop off the edge or you'll miss that rock. There's no way to climb back up so you'll have to repeat the entire grapple-swing experience from the BALCONY ROOF. Take a running jump from the flat rock into the spectators' box. Cross CHECKPOINT 9 and pick up more 50-caliber ammo if you have room in your inventory.
Follow the hallway down a series of ramps to a landing. The passages ahead and to the right are caved in. (Maybe this is the other side of the collapsed entrance at the start of the level.) Go to the left. Continue down a long flight of spiral stairs, killing 2 more bats on the way to the bottom. Continue toward a room with a huge statue to end the level.
†UPDATE HISTORY: 6/15/07 - First draft of walkthrough posted online.
11/05/07 - Revised a few sections for clarity, including adding alternate path to small medipack near 50-caliber pistols. Also added a few screenshots.
2/8/08 - Added Nintendo Wii edition info, as well as a couple of minor additions to the section following checkpoint 5 and the alternate strategies for reaching the artifact.
2/11/08 - Changed the numbering system for artifacts, relics and rubbings, as explained in the note below.
4/29/08 - Added Macintosh save files and info. Thanks to Andrew W. and Chris H.
6/7/08 - Noted extra checkpoint in the Wii game, which occurs when you defeat the first two gorillas.
10/8/08 - Fixed a left/right mix-up in the "Climbing to the Balcony" section, thanks to Mark L.'s eagle eye.
8/11/11 - Fixed the name of the rubbing reward in the Wii game, which I'd listed incorrectly. Thanks to Marjolein for the correction.
ACKNOWLEDGEMENTS: Many thanks to ac_troll, Chris M., Laura C., Native New Yorker in Texas and Rayne for their help with this level.
*ABOUT ARTIFACTS, RELICS & RUBBING REWARDS: Finding artifacts and relics (formerly known as "secrets") unlocks various extras like outfits and concept art. The Nintendo Wii game also includes "rubbing rewards" in some levels. I have numbered each of these bonuses in the walkthrough. So, for example, "Artifact #2 (10/44)" means that this is the second artifact in this particular level and the 10th out of 44 artifacts in the whole game. Please see Anniversary Rewards page for more info on all of these.
**ABOUT TIME TRIALS: After completing a level, you will be able to replay it in Time Trial mode to unlock cheat codes. For more info, please see the Time Trials and Rewards pages. For help beating this level's time trial, see Eldin's Coliseum - Time Trial Tips.
ALTERNATE METHODS FOR RETRIEVING THE ARTIFACT: If you are having trouble dropping from the ledge and grappling the second metal ring, here are two alternatives: (1) After obtaining the 50-caliber pistols, traverse back to the left and pull up onto the ledge above the second metal ring. Take a running jump off the ledge and grapple the first metal ring again. Turn around, lengthen the cable and swing back toward the second ring. This time, instead of grabbing the ledge, jump and grapple the second ring. Now proceed to the artifact as described in the main walkthrough.
Or, similarly, after getting the 50-caliber pistols, instead of traversing to the left toward the metal ring, traverse to the right and drop down onto the base of the fluted column. Return across the seating area and climb up to the balcony the way you did before. Walk out onto the balcony to trigger CHECKPOINT 7 again. Then climb the ladder to CHECKPOINT 8. (Now, if Lara dies, you can continue from here and not have to replay too much.) From the balcony roof, jump over to the table-like ledge, just as you did before. Take a running jump off the edge and grapple the first ring. This time, instead of swinging over to the ledge above the second ring, swing, jump and grapple the second ring. Now continue following the main walkthrough to reach the artifact.
WAS THIS WALKTHROUGH HELPFUL? If not, I apologize and invite you to contact me with any questions. If you need help right away, I recommend the r/TombRaider subreddit. Other fan-run forums are listed at tombraiders.net/stella/community.html. If this site was useful, please consider supporting it financially or in other ways. For details, visit tombraiders.net/stella/support.html. As always, I welcome your corrections/suggestions. Thank you!
Copyright © 2007- - Stellalune (). All rights reserved. The screenshots and videos included here were made using Fraps. Feel free to copy or print this walkthrough for personal use. By all means, share it with friends, but please include this credit line so people can send me their feedback. No part of this walkthrough may be reproduced on another site without permission. Follow this link for details about this site's advertising and privacy policy.
Stella's Tomb Raider Site: tombraiders.net.