TOMB RAIDER: CURSE OF THE SWORD - SUBWAY PART 1
This walkthrough covers Subway maps 1 through 9, up to the point where you ride the elevator down to the sub-basement/generator room. Part 2 continues from there.
NOTE: Letter designations for switches (S#), doors (D#), save crystals (C#), etc., in the text refer to labels on the corresponding level maps. The switches are numbered to match their corresponding doors (e.g., switch 1 opens door 1, switch 3 extends ledge 3, etc.). All pickups are marked on the map (I hope). Enemies and hazards are noted in the walkthrough but not on the maps.
Subway - Map 1 (click for printable map/map key)
You fall into this level at the upper left. The sign on the wall says "Sector 1." First go to the left. Jump to grab the ladder on the left wall and climb up to get a small medipak. Climb to the bottom, let go and immediately draw weapons to kill 2 rats. Go into the small room to the right and pick up rapid bullets and a FUSE (F1). Climb back up the ladder and backflip to the ledge on the right.
Return to the right, past where you started. Beyond the two soda machines, climb down two ledges and continue right over a closed trapdoor (D1). Shoot the bad guy on the next ledge before climbing up. Pick up the small medipak and shoot the ceiling switch (S1) to open the trapdoor you just passed. Return there, jump across and climb down the ladder.
At the bottom, let go to land on a ledge with a black-and-white door (D7). To activate the fuse box, you'll need 3 more FUSES (4 in all). Jump to grab the ladder to the right and climb down. Drop to the floor. Crouch and shoot the thug to the right. Climb onto the ledge to the right. Walk through the spikes to avoid taking damage as you get the small medipak and use the save crystal (C1).
Jump from the left edge of the ledge to grab the ladder above. Climb up, take the large medipak and use the switch (S2) to extend the bars on the ceiling (B2)—actually more like loops of wire. Monkey swing across to the right. When you drop down, the bars retract. Go to the right and exit through the "Track 2" doorway (D3a on the map).
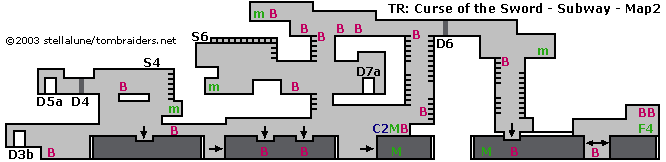
Subway - Map 2 (click for printable map/map key)
(NOTE: This map is wider than a standard 8½" x 11" sheet of paper. Unless your printer automatically scales images to fit the paper, be sure to print it using landscape (horizontal) orientation, or the edges will be cut off.)
You enter this map at the bottom left (through doorway D3b). Hop down on the right, but don't run forward until the falling boulder (B) has landed in front of Lara.
Go to the right and climb onto the abandoned subway car. You don't have to drop into the hole in the top of the car unless you want to shoot the thug lurking inside. There are no goodies. But, if you do go down inside, watch out for another falling boulder on the right side. Otherwise, just jump over the hole and climb onto the ledge above.
Pick up the small medipak hidden behind the rubble and climb the ladder above. Shoot the ceiling switch (S4) to open the black-and-white door (D4) off to the left. Backflip from the ladder to the ledge below the switch. Walk forward carefully to avoid another falling boulder. Then jump to the next ledge to the left, shoot a rat and go through the door (D4) you just opened and then the purple doorway (D5a).
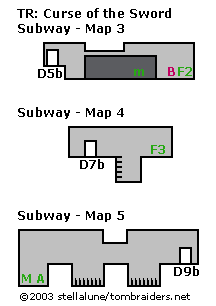
Subway - Map 3 (click for printable map/map key)
(NOTE: The maps for the small side areas numbered 3, 4 and 5 are combined in one picture.)
You enter this small map on the left (through doorway D5b). Shoot the bad guy below on the right. Go into the train car and pick up the small medipak. (You can see a tiny sliver of it at the base of the broken window.) Walk out slowly to the right, allowing the boulder to fall in front of Lara before picking up the SECOND FUSE (F2). Return through the doorway (D5b) to the previous area.
Subway - Map 2 (again)
Safety drop off the end of the ledge to the right of the doorway (D5a) where you re-enter this map. (Or, to avoid health loss, jump to the ledge on the right and then jump down on the right to land below the ladder.)
Walk under the ledge below the ladder to the right. Hop down off the end of the train car, crouch and shoot the thug who emerges from the subway car to the right. Walk slowly through the car to the right, so the 2 falling boulders land in front of Lara instead of on her. Climb out through the second hole in the ceiling and continue to the right.
Hop down onto the tracks, crouch and shoot another thug to the right. Then pick up the large medipak inside the rightmost subway car. Climb on top to use the save crystal (C2). Wait for another falling boulder to land and then pick up another large medipak.
Climb onto the ledge to the right. Climbing the ladders is made more difficult by a series of falling boulders. If you have extra medipaks to spare, you can dispense with the acrobatics and just take a few hits on the way up. Each boulder shaves off nearly ½ Lara's health. If you want (or need) to do this without injuring Lara, here's how: Stand facing the ladder on the right. Jump up to grab onto it and then immediately let go (tap B) to land at the bottom. (Note the hiss-blip sound that precedes the boulder.) The first boulder will land right behind Lara. Now climb to the top of the ladder on the right, jump and grab the ladder on the left (Left + B). Climb up three rungs and when you hear the hiss-blip of the second boulder, jump to grab the higher ladder on the right (Right + B). Again, climb up until you hear the noise, then jump and grab the left ladder again. Repeat this for the next three boulders. You'll need to jump right then left immediately to avoid the last two boulders.
At the top, walk to the left, shoot a rat and watch out for 2 more falling boulders. Take a standing jump across the gap, wait for another boulder to fall, and then climb up on the ledge with the red-and-white sawhorse. Advance slowly so another boulder falls in front of Lara. Pick up the small medipak concealed in the rubble to the left. Backtrack to the right to the first ladder you see. Climb down and, when you hear the sound of falling rocks, let go to land below between 2 boulders.
Shoot the bad guy on the ledge to the left. Climb up there and then jump to grab the ladder overhead. Climb up and grab the wires on the ceiling and monkey swing across to the left. Shoot the ceiling switch (S6) to open the black-and-white door (D6) off to the right. Safety drop off the ledge. Pick up a small medipak hidden behind some junk below and then return over the low wall to the right.
Jump the gap with ladders above and below and go through the doorway (D7a) to another area.
Subway - Map 4
(NOTE: The maps for the small side areas numbered 3, 4 and 5 are combined in one picture. See Map 3, above.)
You enter this small map on the left side (through doorway D7b). Take a running jump across the gap to the right. (If you want to, you can climb partway down the ladder and shoot the rat first.) Pick up the THIRD FUSE (F3) and take another running jump back to the left. Exit back to the previous area.
Subway - Map 3 (again)
From the doorway (D7a), go left and jump the gap. You can't reach the ladder above, so climb down. When you hear the falling boulder, let go to drop onto the subway car. Go to the right, hop down and climb onto the next car. Use the save crystal (C2) again and climb the ladders to the top right. (No boulders this time.)
Go through the black-and-white door (D6) you opened earlier. Continue right, drop down one level and take a running jump across the gap. Pick up the small medipak and jump back to the left.
Climb down the ladders, jumping to grab the opposite ladder when you hear each of the 3 boulders fall. Drop into the hole in the subway car roof and move to either side to avoid another falling boulder. Crouch and shoot the thug. Then pick up the large medipak hidden on the left.
Exit the car on the right, but go slowly; another boulder drops between this car and the next. Climb onto the rightmost car. Walk forward toward the FOURTH FUSE (F4). Two boulders fall—one on each side of the fuse.
If you've followed this walkthrough, you should now have the 4 FUSES you need. If you're missing any, check the maps and walkthrough above to find the one(s) you need.
Now make your way back to the doorway where you entered this map. To get there from the fourth fuse (F4), climb down off the train car and go left. Go into the next car and climb onto the roof. Climb the ladders and go left. Climb up one level, continue left and then climb down the next set of ladders. Continue to the left past the save crystal (C2) and over two subway cars. At the bottom left corner of the map is the doorway (D3b) where you entered. Go through to get back to the previous map.
Subway - Map 1 (again)
You re-enter this map at the middle right (through doorway D3a). To get back to the fuse box, climb up to the left and then continue left and down. Walk through the spikes near the save crystal (C1). Continue left past two columns. Climb the ladder above and jump to the ledge with the fuse box and black-and-white door (D7).
Press A to use your 4 FUSES and activate the fuse box. This opens the door. Go through to the left. Pass over 2 trapdoors (D8a and b). Pick up a small medipak. Shoot the ceiling switch (S8) between the 2 trapdoors to open them both.
Climb down through the left opening (door D8b). Shoot the rat from the ladder and then drop down. Go to the left through the "Track 1" doorway (D9a).
Subway - Map 5
(NOTE: The maps for the small side areas numbered 3, 4 and 5 are combined in one picture. See Map 3, above.)
You enter this small map at the right side (through doorway D9b). Take a running jump across the spike pit to the left. (Or, safety drop into the pit, walk through the spikes and climb out on the other side.) Do the same for the second spike pit. Use Look to check the third pit. When the rat starts walking to the left, draw guns, hop down and shoot it before it can get back to Lara. Pick up rapid bullets and a large medipak. Climb out of the pit and return across the 2 spike pits to the exit. Go back to the previous map.
Subway - Map 1 (again)
From the "Track 1" doorway (D9a), go right and climb the ladder to the top. Jump the gap (D8b) to the right and climb down through the next open trapdoor (D8a). At the bottom of the first section of ladder, tap the B button and then quickly press it again to fall and grab the next section of ladder. Jump into the alcove behind to get a small medipak. Then jump back to the ladder. Drop and grab the ladder below and climb down the rest of the way. Let go to land near the "Track 3" doorway (D10a). Go through to a new area.
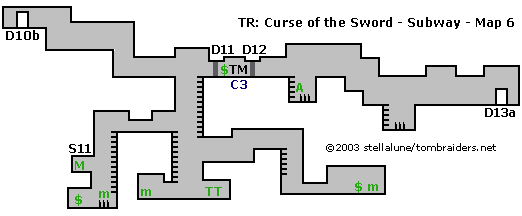
Subway - Map 6 (click for printable map/map key)
You enter this area at the top left corner (through doorway D10b). Hop down on the right, crouch and shoot the thug with the stick. Continue right past the two bathrooms. Drop down again and kill a rat. Take a running jump across the gap to the right (where there's a "Sector 2" sign). The black-and-white door (D11) doesn't open yet, so climb down the ladder. (Make a mental note of the DOLLAR, ticket machine and save crystal behind the door. You'll be back.)
When Lara is even with the ledge to the left, look that way to trigger a rat. Shoot it from the ladder and then backflip to land on the ledge. Roll through the low tunnel to the left and climb down the next ladder. About halfway down, backflip and grab the ledge to the left. Pull up, take the large medipak and shoot the ceiling switch (S11) to open the black-and-white door (D11) you saw earlier. Safety drop to the floor, or jump back to the ladder and climb down. Walk through the spikes as you pick up the small medipak and DOLLAR ($).
Climb back up the ladder, roll to the right and climb down the ladder below. When Lara is level with the ledge to the right (with the "Drive it! Live it!" sign), draw your gun and shoot the thug on the ledge. Then jump over there. Go to the right. Climb up on a low wall and down the ladder on the other side. Drop down, roll to the right, shoot a rat and pick up another DOLLAR ($). There's also a small medipak hidden behind the column to the right of the dollar.
Return to the left, up the ladder and on to the gap. Take a running jump to grab the ladder and climb up. When Lara's hands are at floor level, jump and grab the ladder behind. Climb all the way to the top to the door (D11) you opened earlier.
Pick up another DOLLAR ($) and use the save crystal (C3). You can't use the machine until you get a TICKET. So, climb back down the ladder. At the bottom, jump to grab the ladder on the left. Climb down to the bottom and drop to the floor. Grab the small medipak to the left and then use your 3 DOLLARS at the machine on the right to buy a TRAIN TICKET (TT).
Climb back up the two ladders to save crystal (C3). Use your TRAIN TICKET at the machine to open the black-and-white door (D12) to the right. Go through.
Climb down the ladder into the spike pit to retrieve some rapid bullets. Climb back out and take a running jump across the pit. Continue to the right and down. Take a running jump across the next spike pit, crouch and shoot another thug. Go past the bathrooms and through the "Track 2" doorway (D13a) to another area.
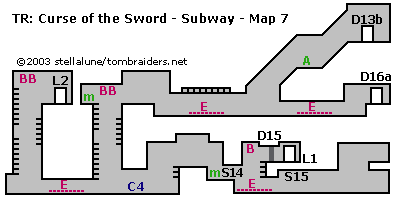
Subway - Map 7 (click for printable map/map key)
You enter the next area at the top right (through doorway D13b). The signs say "Sector 3." Slide down the ramp. Pick up rapid bullets hidden behind the pillar and slide down the next ramp to land on the tracks below.
You can't pass over the electrified tracks (E) to the right yet, so go to the left. Use the wires on the ceiling to monkey swing over this section of electrified track. Climb up to the ledge with the bathrooms and take a running jump across the gap to the left. Pick up a small medipak. Climb down the ladder and, when you hear the boulder drop, jump to grab the ladder behind. Climb down a little farther and again jump to grab the opposite ladder when the next boulder falls. Climb down some more and backflip to the ground when you hear the third boulder.
Avoid the electrified tracks to the left for now and go right past the save crystal (C4). Climb the wall ahead, hop down on the other side and get a small medipak. Use the electrical panel (S14) to turn off the juice to the tracks. Hop down on the right and continue to a ceiling switch (S15). Shoot it to open the black-and-white door (D15) above. Return to the left a few steps and climb the ladder above. Shoot the boulder (B) to make it fall on the tracks. Return to the electrical panel (S14) and turn the power back on. The boulder causes the tracks to short out, so the power is on but the tracks are safe to walk on.
If you don't care about getting the rest of the pickups, you can exit this area now. Climb up to the black-and-white door (D15), go through and ride the first lift (L1) down to the next area. (Pick up the walkthrough with the next section Subway Part 2, Map 10.) If you want everything, continue below.
From the electrical panel (S14) backtrack to the left. The electrified tracks just beyond the save crystal (C4) should be off now. Go through and climb the ladder on the left wall. This is another one of those falling boulder gauntlets. Climb until you hear the boulder, jump and grab the opposite ladder. Repeat for two more boulders until you reach the landing at the top right.
Ride the second lift (L2) down to a new area.
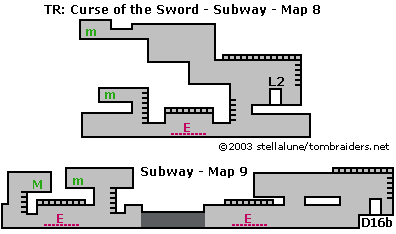
Subway - Map 8 (click for printable map/map key)
(NOTE: The maps for the areas 8 and 9 are combined in one picture.)
You enter this small area at the middle right (via lift L2). Climb the ladder on the right wall, grab the wires on the ceiling and monkey swing to the left. Drop onto the ledge, shoot the rat and climb up to the left. Shoot another rat and climb up again. Roll under the low overhang and pick up a small medipak.
Return to the ledge below the ceiling wires. Safety drop and grab the ladder that starts a few feet below. Climb down and drop to the tracks. Go left and use the next set of wires to monkey swing over the electrified track.
Climb the ladder and backflip to the ledge with the small medipak. Climb back down, monkey swing back over the electrified tracks and climb the ladder above. Backflip to the ledge and ride the lift (L2) back up to the previous area.
Subway - Map 7 (again)
Return down the ladders from the second lift (L2) and go to the right past the save crystal (C4). Climb the wall ahead and hop down on the other side near the electrical panel (S14).
Once again, you can choose to go to a side area to make a few more pickups or climb the ladder to the right and ride the first lift (L1) down to the next area. (If you do this, pick up the walkthrough with the next section Subway Part 2, Map 10.)
If you want the extra items, first use the electrical panel (S14) again to turn off the power. Climb back over the wall to the left. Go past the save crystal (C4) and climb the next set of ladders. (No boulders this time.) At the top, go to the right. The first set of electrified tracks is still on, so monkey swing across. The next set of electrified tracks will be safe if you turned of the power down below. Walk through to the right and go through the "Track 3" doorway (D16a) to a new area.
Subway - Map 9
(NOTE: The maps for areas 8 and 9 are combined in one picture. See Map 8, above.)
You enter this small area at the right side (through doorway D16b). There are no goodies up above, so you can skip the ladder and monkey bars above. Head down and left. Monkey swing across the first set of electrified tracks. Go through the tunnel and climb the ladder beyond the tunnel exit. Jump across to the left and pick up a small medipak. Climb back down and continue to the left. Monkey swing across the second set of electrified tracks. Climb the next ladder to get a large medipak. Return all the way to the right to the doorway (D16b) where you entered. Go back to the previous area.
Subway - Map 7 (again)
From the doorway where you re-enter this map (D16a), go left, past the de-activated electric tracks, over the next set of live tracks, and on to the ladders leading down. Climb back down and once again go right, past the save crystal (C4).
Use the electrical panel (S14) again to turn the power back on. Hop down on the right and climb the ladder to the first lift (L1). Ride down to the next area.
WAS THIS WALKTHROUGH HELPFUL? If not, I apologize and invite you to contact me with any questions. If you need help right away, I recommend the r/TombRaider subreddit. Other fan-run forums are listed at tombraiders.net/stella/community.html. If this site was useful, please consider supporting it financially or in other ways. For details, visit tombraiders.net/stella/support.html. As always, I welcome your corrections/suggestions. Thank you!
Walkthrough and maps copyright © 2004- - Stellalune (). All rights reserved. Feel free to copy or print this walkthrough for personal use. By all means, share it with friends, but please include this credit line so people can send me their feedback. No part of this walkthrough may be reproduced on another site without permission. Follow this link for details about this site's advertising and privacy policy.
Stella's Tomb Raider Site: tombraiders.net.