TOMB RAIDER: THE PROPHECY for GAME BOY ADVANCE - PART 1 - SWEDEN
NOTE: Letter designations for buttons (B#), switches (S#), doors (D#), etc., in the text refer to labels on the corresponding level maps. The buttons are numbered to match their corresponding doors (e.g., button 1 opens door 1, switch 3 disarms trap 3, etc.). All pickups are marked on the map (I hope). Enemies and some hazards are noted in the walkthrough but not on the maps.
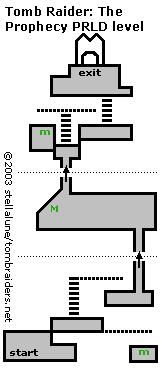
Prelude (start new game or enter password PRLD) - click for printable map/map key
From the starting point, head right. Be careful not to step off the bottom or left edge. It's a deadly drop. When Lara approaches the ledge on the right, a cut-scene shows the way. However, it doesn't show the first pickup.
Climb onto the ledge (face it and press A to grab + Up to pull up). Go to the right, again being careful not to step off the bottom edge. Carefully approach the bottom right corner. When the 'B' icon appears at the bottom of the screen, press B to make Lara lower herself off the edge and hold on. Traverse to the right (control pad Right) and drop (control pad Down) to the ledge with the small medipak. Press B to pick it up. Face the ledge again, jump to grab it (press A) and traverse back to the left. Pull up.
Climb the ladder of carved cow skulls. (Approach it and press Up and Lara climbs automatically.) At the top, traverse to the right. (Lara holds onto the shelf automatically.) Drop onto the ledge below and run up the path off the top of the screen.
Go left and grab the large medipak. Exit off the top of the screen.
Climb the ladder ahead and traverse to the left. Drop down to get another small medipak. Traverse back past the ladder to the far right. Drop down. A cut scene shows the entrance to the plateau. Climb the ladder to the left of the stone face and go through the doorway.
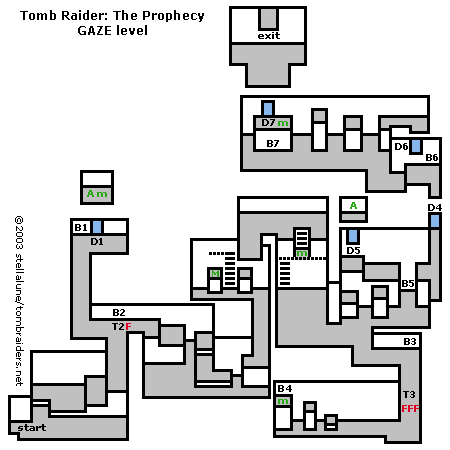
Level 1 (password: GAZE) - click for printable map/map key
Go right a few steps and then climb onto the lowest ledge above. Climb the ledges to the right. Go up toward the flame trap, then turn left and continue up. Vault up two ledges and use the button (B1) to open the door (D1) next to it. Enter and pick up Uzi ammo and a small medipak. Return down and right to the flame trap (T2). Use the button (B2) to turn off the flames and continue right.
Hop down one level, jump the narrow gap and climb down two more levels. In this game, Lara can't shoot targets below her, so hop down if you want to kill the wolf to the left. Then climb back onto the ledge. Take a running jump to grab the ledge above/right. Pull up and follow the hallway up the map.
Climb the ladder of carved cow skulls and traverse to the left. Drop down to get the large medipak. Jump to the ledge on the right and vault up onto the higher level. Go up and around the corner to the right. Climb down the ladder to the small medipak. Drop down from the ledge and shoot the wolf. Go down then right to the next button (B3). Press it to deactivate the flame traps (T3) below. Go down the map, past the deactivated trap, kill a wolf and go left. Climb onto the lowest of the three blocks and jump to grab the middle block. Pull up and then jump to grab the tallest one. Pull up and pick up the small medipak. Use the button (B4) to open a door (D4) elsewhere. (The cut scene shows how to get there.)
Climb down and head that way—first right, then up past the flame traps, left at the button (B3) then up and around the corner to the right. Use the button (B5) between the two high ledges to open another door (D5) above and to the left. Go left and climb onto the ledge with the green hanging moss. Jump to the next ledge on the right. Climb onto the ledge directly above and then go left. Climb up and go through the door you just opened (D5) into a tiny room with some Uzi ammo. Hop down out of the room and go right. Jump the gap above the button (B5) and head up through the door (D4) you opened earlier.
At the top of the hall, use the next button (B6) to open another door (D6) just to the left. Before entering, head left, shoot a wolf and use another button (B7) at the far left to open the door above (D7). Return to the door on the right (D6) and climb up through it. Now go left again, taking a series of running jumps across the high ledges. Pick up the small medipak and go through the doorway (D7). Another wolf attacks. You can back up a bit while shooting, but if Lara falls off the ledge, you'll have to do all the jumping again.
Follow the hall at the top of the room to the next area.
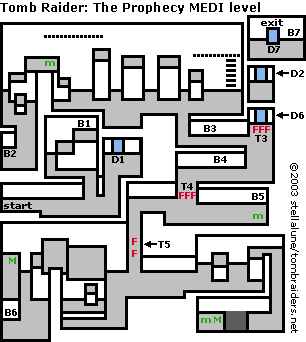
Level 2 (password MEDI) - click for printable map/map key
You begin at the middle left of the map. Go right to a fork with two passages leading up. Take the left passage. Climb the ledges and press the button (B1) to open the door below/right (D1). Head down, right then up through the door you just opened.
Kill 2 wolves—one to the left, one to the right—and continue right. Climb the carved ladder and traverse to the left along the zigzag-patterned molding. Drop onto the top of the pillar. Take a series of running jumps across the pillars to the left. At the fourth pillar, traverse along the zigzag molding to the left and drop near a small medipak. Climb down the ledges on the left and use the button (B2) below to open the middle door (D2) in a series of three near the top right corner of the map.
Climb back up the ledges and drop down on the other side. Go right, past the tall pillars you jumped across earlier. Before the carved ladder, take the passage down. Use the button (B3) to turn off the flame traps (T3) to the right. Go right then down, then left to another button (B4). Use it to deactivate another set of flame traps (T4) to the left. Go down past the deactivated traps and to the right. Kill a wolf and use the next button (B5) to turn off yet another set of flame traps (T5). Head left then down past them.
Beyond the flame traps, turn right, shoot another wolf and continue right. Climb onto the block and jump to grab the higher block on the right. Pull up and follow the hallway down to the bottom right corner of the map. Take a running jump over the deep pit to get small and large medipaks. Jump back across the pit, return up the hallway and climb back down the blocks.
Go left and then down. Shoot a wolf, climb the ledges and shoot another wolf. Climb over the ledges to the left and jump the gap to get the large medipak. Safety drop off this ledge and use the button below (B6) to open the first of the three doors (D6) at the top right of the map.
Climb back up the ledges and down the other side. Follow the hallway upward, past the deactivated flame traps (T5). Turn right and then up, past the next set of flame traps (T4, also off). Then turn right then up and to the first set of traps (T3, also off). Continue straight up, passing through the two doors (D6 and D2) you opened earlier.
In the room at the top right corner of the map, use the button (B7) to open the door (D7) and exit the area.
Level 3 (password HAXE) - click for printable map/map key
You start at the bottom left corner of the map. Climb/drop to the floor and go right. Kill 2 wolves and backtrack left to the ledges just before the passage turns downward. Climb onto the lower step and pull up onto the higher one. Pull up onto the ledge with the zigzag molding and small medipak. Then carefully approach the edge and press B to drop and hang. Traverse to the right and drop onto another ledge with a small medipak. Climb back up and follow the passage leading upward. Run past the flame traps when they go off.
Turn right at the corner and continue to the right, avoiding the pits and flame trap. On the other side, hop down and use the button (B1) to open the door (D1) above/right. Climb up the carved ladder and go through that door. A wolf attacks. You can back up while shooting, but be careful not to fall off the edge, or you'll have to run all the way around to the left side of the map and climb back up to the door. Beyond the doorway (D1), go to the far left and climb onto the lower of the two stone pillars. Jump over the flame trap to grab the taller pillar and pull up. Use the button (B2) to deactivate a spike trap (T2) off to the right.
Exit through the door at the bottom left (D1) and step off the edge (with the carved face). Head down the map, carefully timing a run past the flame trap. Just beyond that, go left then down, then right to a room with 2 flame traps and a button (B3). Use this to open a door (D3) above and to the left.
To get there, head back to the left. Shoot a wolf and continue to a low stone pillar below a carved ladder. Climb to the top of the ladder and jump to the pillar on the right. Grab the zigzag molding and traverse to the right. Climb down the next carved ladder and go right and up through the door (D3) you just opened. This leads to a new area, which is shown at the upper middle of the map.
Inside two hallways, both lined with fire traps, lead upward on the left and right. At the top of each hall is a button (B4a and b). Go up either hall, staying to the side of the traps. Press the button and vault up onto the ledge above. Cross around behind the closed door (D4) and hop down on the other side. Push the other button and climb back up. There's a small medipak on the ledge above the left button. Pressing both buttons opens the door. Go through and pick up the DECORATIVE BATTLE AXE (DBA). Return to the bottom of the room and exit back to the main area.
Drop off the ledge and go right, but before reaching the room with the 2 flame traps and button (B3), turn into the hallway leading upward. Follow it up and right to the edge of the map. Carefully run past the fire trap into the dead end at the bottom of the hall. Pick up the small medipak and run back past the flame. Continue straight up, passing 2 more flame traps. Climb 4 ledges and go past the spike trap (T2), which should be deactivated if you pressed the button (B2) earlier.
Enter the big, open room with eight square pillars. There are 4 wolves lurking inside. Advance carefully to draw them out one at a time. Then back up shooting. When all the wolves are dead, head for the door at the top center. Approach the statue to the left of the door and press Select. Choose the DECORATIVE BATTLE AXE and press A to use it. This opens the door (D5). Go through.
This new area is shown at the top left corner of the map. Use the switch (S6) to open the door to the tomb (D6) at the top of the map. It's timed to close after a little bit (hence the ticking sound), so hurry. Vault onto the ledge directly above the switch. (No need to go around to either side.) Pick up the small medipak and climb the carved ladder. Traverse to the right until Lara is directly below the next carved ladder. Pull up and run forward. Climb this ladder and run through the open door. If you don't make it the first time, climb down and try again. Continue straight upward and through the exit door.
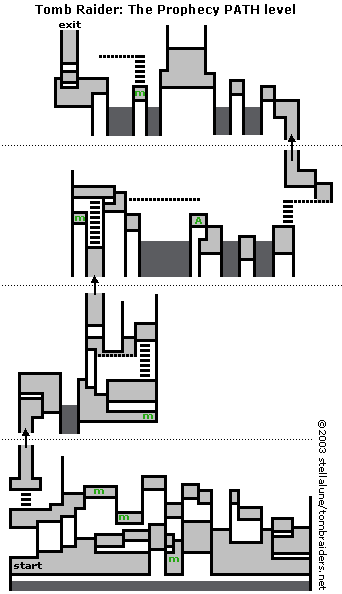
Level 4 (password PATH) - click for printable map/map key
You begin at the lower left corner of the map. All along the bottom edge is a deep chasm. So be careful not to fall off. Go to the right, shoot a wolf and climb the three low ledges to get a small medipak. Vault onto the ledge to the right and hop down on the other side for another small medipak. Climb back up using the low block for a boost. Jump across to the ledge on the right. Drop down on the other side and kill 2 more wolves.
Climb the ledges on the right. Then make your way back to the left across the higher ledges. Remember to use running jumps by pressing the left control pad button, tapping A, and continuing to hold the control pad button to get more distance. Lara will grab automatically. There's another small medipak on the sixth ledge. After that, hop down and continue to the left past a carved column. Climb the short carved ladder and follow the path up off the screen.
In the next area, climb onto the first ledge and take a running jump across the gap to the right. Carefully follow the narrow ledge along the edge of the chasm. At the right end is a small medipak. Vault onto the ledge above and kill the wolf. Climb the carved ladder to the ledge above. Then hop down on the left. Drop and grab the bottom edge of the ledge and traverse to the left in front of the carved stone head. Climb up and follow the path up off the map.
In the next area, go forward (up) and climb the carved ladder. Take a few steps to the left and step off onto the ledge with the small medipak below. Take a running jump to grab the ledge to the right of the ladder. Pull up.
Safety drop off the right side of this ledge. Again, go carefully so Lara doesn't fall into the chasm. Grab the thin horizontal ledge and traverse to the right. Drop onto the ledge with the Uzi ammo. Hop down to the ledge below and take a running jump to the next ledge on the right. Take another running jump to grab the next ledge and pull up. Climb the carved ladder and traverse along the narrow ledge to the right. Pull up. Follow the path off the top of the map.
In the next area, go forward (up) and climb onto the ledge to the left. Take a running jump to grab the next ledge; pull up. Again, be careful jumping so Lara doesn't fall into the chasm. Repeat to get to the next ledge and immediately draw guns to kill a charging wolf. Take a running jump off the left side of the ledge to land on the ledge with the small medipak below. Climb the carved ladder and traverse along the narrow ledge to the left. Drop onto the ledge below. Again, follow the path off the top of the screen to a new area.
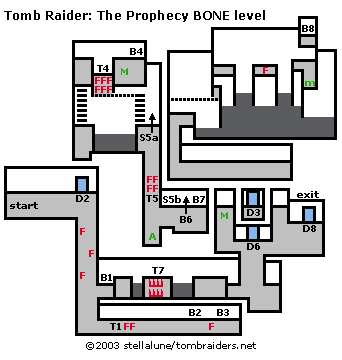
Level 5 (password BONE) - click for printable map/map key
You start the level at the middle left of the map. Go right and kill 2 wolves. Follow the passage downward, avoiding the 3 fire traps. Press the button (B1) on the right to turn off another set of fire traps below (T1). Head down and right, past the deactivated trap to a pair of buttons separated by flame traps. Press the left button (B2) to open a door (D2) up near the start of the level. Run past the trap when the flames are off and press the right button (B3) to open another door (D3) elsewhere. Return to the left and up the hallway with the staggered fire traps to the first door you opened (D2). Go through.
Watch out for the chasm on the right. Climb the carved ladder and, when the flame trap (T4) cycles off, take a running jump to the other side. Pick up the large medipak and use the button (B4) to turn the flames off permanently. Hop down near the flame emitters and drop and hang from the zigzag molding. Traverse to the right and climb down the carved ladder.
Se the switch (S5a) to turn off the flame trap (T5) below for a short time. Run down past it. In the room below, pick up Uzi ammo and use the 2 buttons (B6 and B7) to open a door (D6) in the room to the right and deactivate the spike trap below (T7).
To get to this door, first use the switch (S5b) to the left of the buttons. This turns off the flame trap (T5) above for a short time. Run past it and climb the carved ladder. Traverse to the left and pull up. Climb out of the pit with the burners on the left and then climb down the next carved ladder. Continue down the map through the doorway (D2). Keep going downward, past the staggered flame traps, to the button (B1) you pressed earlier.
The spike trap (T7) you just deactivated is on the other side of the pit to the right. Take a running jump across. Take another running jump over the next pit to grab the ledge and pull up. A skeleton warrior rises up in the next room. If you advance slowly, you can destroy it from the doorway. Go into the alcove to the left of the open doors and get a large medipak. Then go through the 2 doorways (D6 and D3).
A wolf attacks from the left. Shoot it, go left and then climb up near the deep chasm. Traverse to the right along the zigzag molding and pull up. Climb onto the ledge above. Take a running jump across the gap to the ledge on the right. When the flame trap cycles off, take another running jump to grab the next ledge. Pull up. Pick up the small medipak and climb onto the ledge above. Press the button (B8) to open the exit door (D8).
To get there, return across the ledges to the left. Traverse back along the zigzag molding and return down, right and down again to the room with the doors. The door you just opened (D8) is off to the right. Go through to the next level.
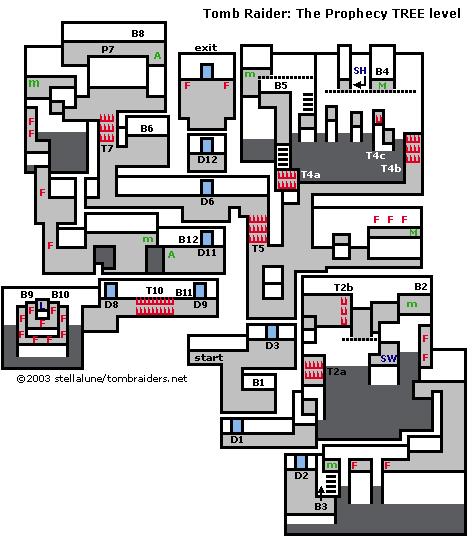
Level 6 (password TREE) - click for printable map/map key
You start near the center of the map. Go right and down into a room with a button (B1). Press it to open the door (D1) below and go through. Head to the right toward a deep pit, The door (D2) below doesn't open yet, so climb onto the ledge at the top of the screen. Climb up again and go past an inactive spike trap (T2a). Climb up two more ledges and go right, along the top of the pit, past another inactive spike trap (T2b).
Continue right, but before climbing up onto the ledge with the small medipak, drop down onto the ledge below to get the SWORD (SW). To get back up, traverse to the left along the zigzag molding and pull up. Climb back up on the right to get the small medipak. Press the button (B2) to open the door (D2) you passed earlier. This also arms the spike traps (T2a and b) you passed before, so you'll have to get back another way.
Hop down on the lower right, taking care not to run into the flame traps or fall into the pit to the left. Make your way down past the flames as they cycle off. Hop down onto the ledge below and then continue down along the right side of the map. Be careful not to run on into the chasm at the bottom of the map. Turn left there and take a running jump past the first set of flame traps and over the gap. When the next set of flames turn off, take another running jump across the next gap to the ledge with the small medipak.
Climb down the carved ladder and destroy the skeleton. Press the button (B3) to open a door (D3) elsewhere. Head up through the door (D2) you opened previously. Then go left (the first pit is to the right) and up through the first door (D1) you opened. Continue upward, past the first button (B1) then right and up to the door (D3) you opened most recently. (The start of the level is just to the left of this door.)
There are 2 wolves lurking inside this room—one to the right, the other straight ahead beyond the intersection of passages. Advance carefully to take them out one at a time. Climb onto the block to the right and jump to grab the edge of the high ledge with the flame-shooting gargoyles. Pull up. Carefully run past each flame trap to the end. (Or, drop and hang from the edge and traverse to the right below the flames.) Get the large medipak, jump down off the ledge and make your way back to the left.
Of the two exits from this room in the top left corner, a spike trap blocks one. Go through the other toward another spike trap (T4a) and a deep pit. Turn right and follow the perimeter of the pit to another spike trap (T4b) that's currently disarmed. Jump to the ledge on the right. Climb onto the ledge above, which also has a disarmed spike trap (T4c). Take a running jump to the next ledge on the left. Take another running jump to grab the next ledge. Pull up.
Grab the zigzag molding and traverse to the right to the small alcove with the SHIELD (SH). Pull up and take it. Drop and grab the zigzag molding and traverse farther to the right. Pull up in the alcove with the large medipak. Press the button (B4). This disarms one of the spike traps (T4a) below and to the left of the pit. It also raises the spikes on the other 2 spike traps (T4b and c). So, don't drop down from this ledge. Instead traverse back along the zigzag molding to the left. Drop on the leftmost ledge and take a running jump to the ledge near the carved ladder.
Climb the ladder and traverse to the left along the next bit of zigzag molding. Drop near the button (B5) and press it to lower the other set of spikes (T5) below. Climb onto the ledge to the left for a small medipak. Then climb back down and cross the bridge across the pit to the carved ladder below. Climb down, cross the deactivated spike trap (T4a) and hop down on the other side.
Continue downward and then make a U-turn and head up and left over the next disarmed spike trap (T5). Turn left and run down a long hallway past 2 closed doors (D6 and D11). At the end, head upward and fight another skeleton warrior. (If you advance slowly into the room and angle Lara to the right, she can shoot the skeleton without attracting its attention.)
Press the button (B6) on the upper wall to open one of the doors (D6) you just passed.
Exit the room at the top, over the retracted spikes (T7). Go left and climb onto the lowest ledge. Be careful Lara doesn't fall into the pit below. Climb onto the next ledge and pick up the small medipak. Climb onto the highest ledge and go to the right. Lara will pass over a pressure pad (P7) that arms the spike trap (T7) you passed over earlier. If you traverse along the ledge, this won't happen, but it's not necessary since you'll be returning a different way. Pick up the Uzi ammo and press the button (B8) to open a door (D8) elsewhere.
Return to the left side of the ledge. Climb down one level and go to the left wall. Hop down onto the ledge below, but watch out for the flame traps. Run past each one as it cycles off. At the bottom, step off the ledge on the right side, so Lara doesn't fall into the pit. Continue down past 2 more flame traps. Then head right toward a square pit. Stop before it and shoot 2 wolves on the other side. Cross around the top of the pit and pick up the small medipak ahead. No need to jump across the other pit. Instead, go through the door (D8) below.
There's a spike trap (T10) to the right, so head left. Take a running jump across the gap to land between two of the flame traps on the lowest of the white ledges. Climb onto the ledge above between the flames and then onto the top tier, where you'll find the LIBRA (L) symbol. Press each of the 2 buttons (B9 and B10). These open another door (D9) and deactivate the spike trap (T10) off to the right. Jump back across the gap to the right. Cross over the retracted spikes and press the button (B11) to open a door (D11) in the room with the pits, above.
Go through the door (D9) to the right of the button. Pick up the Uzi ammo near the pit and press the next button (B12) to open one of the doors (D12) blocking the exit above. Leave through the door (D11) to the right. Continue straight up through the 2 doors (D6 and D12). Continue up and out the door flanked by flame traps.
Level 7 (password LINK)
This is the final area in this part of the game. It's just one room, so I haven't made a map. Approach the writing below the golden horse on the left and press B to read the inscription: "A good king is a fair judge who punishes the guilty and protects the innocent."
Approach the altar at the top of the room and place the items from your inventory. (Press Select, use Control Pad left/right to choose the item, and A to use it.) Place the items, from left to right, following the words in the clue: LIBRA (fairness), SWORD (punishment), SHIELD (protection). Then press the button (B1) to the left.
If you place the items in the wrong order, then press the button, the flame traps are activated. Press the button again to turn them off, collect the items and try again.
Placing the items correctly and pressing the button summons a black-robed apparition. It raises a pair of skeletons then disappears. Back away while shooting each skeleton and Lara will take minimal or no damage. When the second skeleton is destroyed, the apparition returns and you'll have to fight it. Dodge the energy bolts and use medipaks as needed while shooting. When the apparition is destroyed, another cut scene follows.
Cut Scene: Lara investigates the tomb and finds some symbols, which she believes she's seen previously in the Tome of Ezekiel. She races back home to decipher them. The clue leads her to Angkor Wat and the next phase of the game. . . .
WAS THIS WALKTHROUGH HELPFUL? If not, I apologize and invite you to contact me with any questions. If you need help right away, I recommend the r/TombRaider subreddit. Other fan-run forums are listed at tombraiders.net/stella/community.html. If this site was useful, please consider supporting it financially or in other ways. For details, visit tombraiders.net/stella/support.html. As always, I welcome your corrections/suggestions. Thank you!
Walkthrough and maps copyright © 2004- - Stellalune (). All rights reserved. Feel free to copy or print this walkthrough for personal use. By all means, share it with friends, but please include this credit line so people can send me their feedback. No part of this walkthrough may be reproduced on another site without permission. Follow this link for details about this site's advertising and privacy policy.
Stella's Tomb Raider Site: tombraiders.net.