Rise of the Tomb Raider - Prophet's Tomb Collectibles
Updated: 7/3/20(†)
If you missed anything the first time through this level, you will be able to return via fast travel only after you have beaten the game. If you are playing through for the first time, you may want to follow the main walkthrough instead. This guide, along with the annotated level map, should help you find any collectibles you missed. Weapons, Equipment, and Outfits are covered separately.
Relics · Documents · Archivist Map · Murals · Coin Caches
The Hang 'em High Challenge is covered on a separate page.
RELIC 1
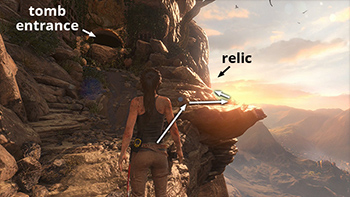
The first relic is located on the path leading up to the tomb entrance. To reach it after completing the game, fast travel to the Syrian Cliffs Base Camp and follow the passage to the northwest. Once you're on the path outside, turn around to spot the relic on a ledge to the right. (Click screenshot to enlarge.)
RELIC 2
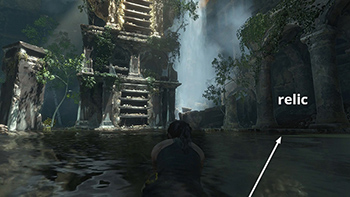
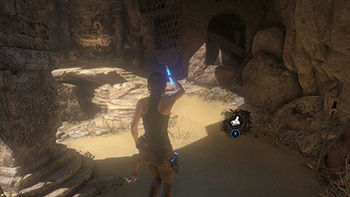
The second relic is in the room with the pool below the central tower. To get it after completing the game, fast travel to the Syrian Tomb Base Camp, climb down from the tower, and jump into the water. The relic is on the ledge on the right side of the pool when facing the tower. (Click screenshot to enlarge.)
DOCUMENT 1
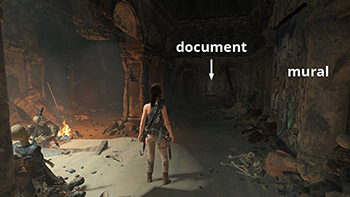
This is located along the passageway between the hidden oasis and the tomb proper. To reach it after completing the game, fast travel to the Syrian Catacombs Base Camp. The document is in the northwest corner of the room with the campfire. (Click screenshot to enlarge.)
DOCUMENT 2
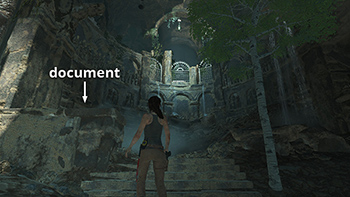
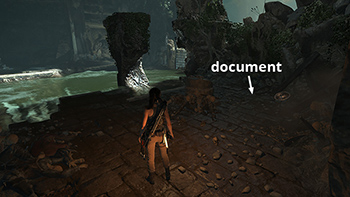
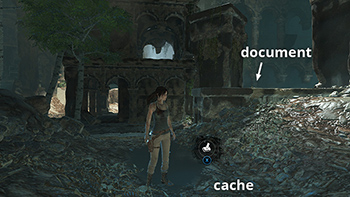
This is located in room with the pool below the central tower. To get it after completing the game, fast travel to the Syrian Tomb Base Camp, climb down from the tower on the north side, and you'll find the document sitting on the low stone wall to the left of the stairs. (Click screenshot to enlarge.)
DOCUMENT 3
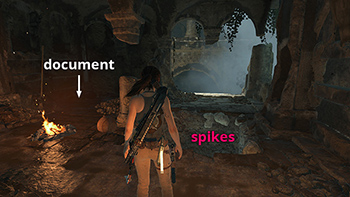
This document is on the middle level of the tower, just around the corner from the spike pit. After beating the game, fast travel to the Syrian Tomb Base Camp and you'll find the document sitting on the floor beside the campfire. (Click screenshot to enlarge.)
DOCUMENT 4
This is in the room to the north of the main pool, where you solved the second water puzzle. To get it later on, fast travel to the Syrian Tomb Base Camp and follow the original path back to that side room. Check the walkthrough if you need help. The side room is flooded now, but the document will still be there. (Click screenshot to enlarge.)
ARCHIVIST MAP
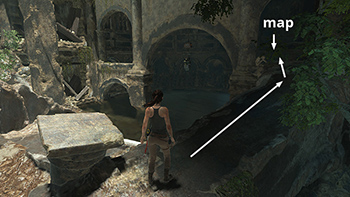
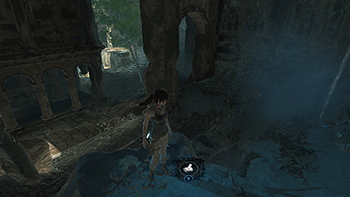
The Archivist Map is in the room with the pool and central tower. After completing the game, fast travel to the Syrian Tomb Base Camp. Move up the angled pillar on the south side of the tower and jump onto the ledge with the desiccated corpse to find the map. (Click screenshot to enlarge.)
MURALS 1-4
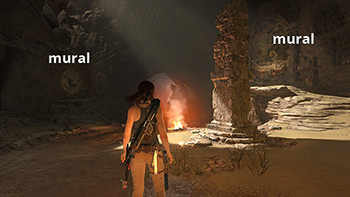
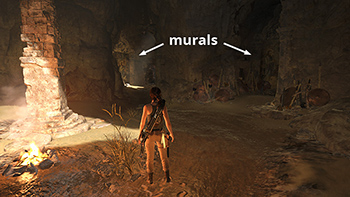
The first four murals in the level are just inside the ruins. To find them after completing the game, fast travel to the Syrian Cliffs Base Camp. When standing near the campfire and monolith, all four murals are visible. Here are the two on the west side. (Click screenshot to enlarge.)
MURAL 5
Found in the same room as document 1, along the passageway between the hidden oasis and the tomb proper. To reach it after completing the game, fast travel to the Syrian Catacombs Base Camp. The document is on the wall opposite the campfire. (Click screenshot to enlarge.)
COIN CACHE 1
The first coin cache is next to the monolith in the first indoor area, near the Syrian Cliffs Base Camp. Once you've examined the murals and deciphered the monolith, all of the coin caches will be revealed on your map. See the main walkthrough for details. (Click screenshot to enlarge.)
COIN CACHE 2
The next cache is in the room with the pool and tower. To reach it after completing the game, fast travel to the Syrian Tomb Base Camp. Climb down from the tower and go into the dark area behind/east of it. The cache is buried on top of a pile of rocks. (Click screenshot to enlarge.)
COIN CACHE 3
The last coin cache is in the same area as Document 2, above. Fast travel to the Syrian Tomb Base Camp. Climb down from the tower on the north side, and you'll find the cache buried in the large alcove at the top of the stairs. The document is sitting on the wall nearby. (Click screenshot to enlarge.)
Top of Page | Walkthrough | Collectible Guides | Main ROTTR Page
†UPDATE HISTORY: 4/4/16 - Page first posted online.
7/3/20 - Fixed the description for Coin Cache 2, which previously referenced the wrong base camp. It's near the Syrian Tomb camp, not the Syrian Catacombs. The map and screenshot are still correct. Thanks to James for the correction.
WAS THIS WALKTHROUGH HELPFUL? If not, I apologize and invite you to contact me with any questions. If you need help right away, I recommend the r/TombRaider subreddit. Other fan-run forums are listed at tombraiders.net/stella/community.html. If this site was useful, please consider supporting it financially or in other ways. For details, visit tombraiders.net/stella/support.html. As always, I welcome your corrections/suggestions. Thank you!
Copyright © 2015 - Stellalune (). All rights reserved. Feel free to copy or print this walkthrough for personal use. By all means, share it with friends, but please include this credit line so people can send me their feedback. No part of this walkthrough may be reproduced on another site without permission. Follow this link for details about this site's advertising and privacy policy.
Stella's Tomb Raider Site: tombraiders.net.
