STELLA'S CLASSIC TOMB RAIDER 1 WALKTHROUGH
LEVEL 11: OBELISK OF KHAMOON (Classic)
Updated: 3/28/24(†)
Kills: 16 Items: 38, including a key and 4 artifacts—the Eye of Horus,
Ankh, Scarab and Seal of Anubis
Save Crystals: 7 (Saturn and PlayStation only) Secrets: 3
NOTE: One of the regular pickups here will include the MAGNUMS if you didn't get them earlier.
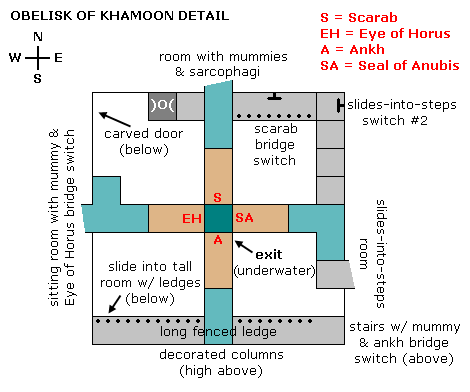
LEVEL MAP by VGCartography (used with permission)
Obelisk of Khamoon Video Walkthrough by Eldincy‡
OBJECTIVES: Locate the key to unlock a room with four drawbridges. Then find the switches that drop each of the four bridges to the central column. Retrieve the four artifacts on the column, take them back to the obelisk you saw at the beginning of the previous level (City of Khamoon) and use them to open the level exit.
Enter and head to the right. Go down the sandy steps then climb up to the doorway on the left. Enter and follow the passage to the end. Note the locked door on the left. Go through the doorway on the right into a room with 4 movable blocks, as well as a gold door set high on one wall. Through the windows on the left you can see the BIG ROOM WITH COLUMN & FOUR DRAWBRIDGES, which you'll get to soon.
ROOM WITH FOUR MOVABLE BLOCKS: You really only have to move the leftmost block to proceed, but if you want all the kills and pickups, do them all. First, move the rightmost block to the side. Enter the hall you've uncovered. A panther emerges from an alcove on the left. Hop back firing. (Alternatively, pull the block straight out several times so you have room to maneuver. Then, step into the hallway, roll, run back out and jump into the block, where you can shoot the cat from safety.) Once the panther is dead, go to the end of the hallway for a small medi pack. Then return to the room with the movable blocks.
The next block to the left has only a panther behind it, no goodies. If you want all the kills, do this one the same way as the first.
Now move the third block (second from left) and enter the passage beyond. Drop and hang from the opening in the floor to draw out a panther in the room below. Pull up and shoot it from the opening. Or, draw weapons, step off the edge, slide down the angled block and start shooting as soon as you get a lock on the panther. Use the switch to open the door above. Climb the steps, pull up onto the block and grab a small medi pack, then climb to the ledge above. Climb to the highest carved block, near the center of the room, and take a running jump to the doorway. Hop over the opening in the floor and pick up the magnum clips behind the door, then drop down through the opening in the floor to emerge near the ROOM WITH FOUR MOVABLE BLOCKS where you started.
Move the fourth block. In the short passageway is a water-filled opening. Swim down, following the passage, until you can surface. Climb out quickly and shoot the crocodile in the water. Take another swim and find some magnum clips and a small medi pack on the bottom, and a SAPPHIRE KEY on one of the corner ledges of the underwater structure. (There's also a save crystal on the highest step in the console games.) Return to the main room the same way you came (i.e., through the underwater passage in the north wall).
Go through the ROOM WITH FOUR MOVABLE BLOCKS to the hallway beyond. Use the SAPPHIRE KEY in the keyhole you saw as you came in. This opens the door next to the keyhole, which leads to the ROOM WITH COLUMN & DRAWBRIDGES, and also the gold door in the room with the movable blocks.
SITTING ROOM WITH MUMMY (EYE OF HORUS SWITCH): After using the key, return to the room behind you. Move one of the blocks beneath the gold door, climb up and go through. Save your game. (PS1 players will find a convenient save crystal here.) Go up the stairs. When you enter the sitting room at the top, a mummy awakens inside on the left. Run past it into the room, then roll and do your best to take it out quickly. Use the switch in the left window to lower the BRIDGE TO THE EYE OF HORUS.
NOTE: If you're desperately low on health, you can go up the stairs to awaken the mummy. Then speed back down to the block room and try and kill the mummy later on from outside. Or, avoid this room altogether for now.
BIG ROOM WITH COLUMN & FOUR DRAWBRIDGES: This room is illustrated in the diagram below. It isn't to scale and doesn't include all the side rooms, but it may help if you get disoriented.
Exit the mummy room through the window on the right and take the EYE OF HORUS from the column. You'll receive a vision of an underwater door. This is in the pool below the column. (NOTE: If you had to avoid the mummy for now, don't worry. You can get the EYE OF HORUS later.)
Drop into the water and pick up some magnum clips on the bottom. Climb out onto the ledge below the tall column with the artifacts to find a box of shotgun shells. On the south wall is a series of alcoves separated by greenish stone blocks. The rightmost alcove is actually a door. Enter and slide down the ramp to a doorway. If you don't jump down into the room yet, you can kill the 2 panthers from safety.
TALL ROOM WITH LEDGES: Hop down into the room, go up the stairs, then climb onto the block above. Turn around and take a running jump to the next higher block. Turn around, take a running jump to grab the ledge and pull up. Walk forward and pull up onto the next ledge. Take a running jump to the ledge ahead and another to the (southeast) corner ledge. Drop to the ledge below and pick up the large medi pack.
NOTE: If you don't care about getting all the kills, you can skip the next bit with the mummies, since there are no goodies involved. Instead, after getting the large medi pack, climb onto the ledge above the doorway. Go to the end, past the little table with the vase on it. Turn left and take a running jump to grab the L-shaped ledge with the greenish stone block in the corner. Climb onto the corner block. Now, skip the next two paragraphs and continue with the walkthrough below.
DARK ROOM WITH TWO MUMMIES: Just in front of where you got the medi pack is a doorway above a long stone ramp. Don't slide down or you'll be ambushed. Instead hang from the edge of the doorway to rouse the 2 mummies in the room below and then pull up. You could shoot the mummies from this doorway, but it's easier if you go to the right (north) end of the ledge and drop onto the rectangular ledge below. From there, jump into the opening that looks in on the room with the mummies (shown in this screenshot). You should be able to shoot them from here without getting hurt. Alternatively, slide down the ramp into the room, run to the right side of the ramp, and climb onto that same ledge from inside.
When you've destroyed both mummies, turn to face out over the TALL ROOM WITH LEDGES. Jump to the ledge on the right. Then take a running jump to grab the small corner ledge ahead. Turn left, climb onto the greenish stone block and take a running jump to grab the ledge ahead. Pull up, walk forward and pull up onto the ledge above. Turn around and take a running jump to the L-shaped ledge in the northeast corner—the one with the greenish stone block in the corner.
Climb onto the corner block, then the next higher ledge. Take a running jump to the large, square ledge ahead. Take another running jump to grab the block at the top right of the stone steps and pull up. (Console players will find a save crystal here.) Walk down one step and pull up onto the ledge at the doorway. This will awaken a mummy at the top of the stairs.
WIDE STAIRS WITH MUMMY (ANKH SWITCH): Try to kill the mummy as it comes down, or jump back down to the steps below the ledge and do it from there. Then climb back up. At the bottom of the stairs on the left is an opening overlooking the COLUMN & DRAWBRIDGES. Step out onto this ivy-covered ledge and use the switch to drop the BRIDGE TO THE ANKH.
After using the switch, turn left and step down. Then drop down to the fenced ledge below. Pick up a small medi pack and 2 sets of magnum clips. (NOTE: If you don't yet have the MAGNUMS, you'll get them now in place of one set of clips.) Climb back up to the switch.)
Climb back up to the switch. Then continue to the top of the stairs, where that last mummy came from. Here you'll find a gold door, which you can't open yet, and an opening in the floor in the far corner by the windows overlooking the obelisk. Drop through the opening and slide down into the room below.
SLIDES-TO-STEPS ROOM: This tall room contains not only the slide you just came down, but also two more slides above, which can be changed back and forth between slides and staircases using a set of switches. There's a panther in the next room. To avoid being mauled, climb into the first raised opening in the wall to the right (i.e., right when Lara's back is toward the slide you just came down). (screenshots) The panther will then emerge and you can shoot it from the safety of the alcove. When the cat's dead, use the switch here to change the slide into steps. Go into the room where the panther came from and pick up some more magnum clips. Go back out to the room with the steps and switch alcove.
Climb to the fourth step and jump to the ledge on the left. Pick up the shotgun shells and jump back to the steps. Go up two more steps then drop down to the pale blue platform on the left (where PS1 players will find another save crystal). Notice the second slide above but, for now, go through the doorway on the right to a ledge on the east side of the COLUMN & DRAWBRIDGES.
Halfway up the stairs you'll find a large medi pack. At the top is another switch. Use this to change the second (middle-level) slide in the previous room into steps, but don't return there yet. First, turn around so the switch is behind Lara and then hop down onto the ledge ahead. Go through the (north) door opposite the SCARAB. (This bridge is still up.)
ROOM WITH MUMMIES & SARCOPHAGI (SCARAB SWITCH): Once inside the room, turn left, go up the steps, then climb down the blocks toward the ground. When you reach the lowest block, drop and hang, let go to drop to the floor, then immediately pull up. You will have awakened 2 mummies, which you can then kill from this block. (It helps to do this ahead of time, since you'll need to drop down on the other side of this room in a few minutes.)
Climb back up the blocks. Then hang from the ledge on the west wall and traverse to the right, under the tan block, and pull up. Climb onto the ledge with the pillar. At the rear is SECRET #1, a room containing a large medi pack and magnum clips. (The path to the secret is shown in this screenshot.) Exit on the other side of the pillar and take a running jump to the small, square ledge ahead. From there, jump to the next ledge, go to the end, then jump to the long ledge on the right. Follow it to the end to get a box of shotgun shells.
Go back to the gap between the first long ledge and the small, square one. Drop down to the flat spot below. (Ignore the corridor with stairs leading up. This just takes you back where you were before.) Drop again to the block below. Hang and traverse to the right until you reach the next corner (as shown in this screenshot). Let go of the crevice. Now drop and hang from this ledge. Traverse to the right again until you reach the next corner. Drop to the square ledge below. Turn around and take a running jump to grab the top of the block ahead. Pull up and go through the doorway on the left, to a fenced ledge overlooking the ROOM WITH COLUMN & DRAWBRIDGES. Use the switch to lower the BRIDGE TO THE SCARAB (and get a save crystal in the console versions).
Return through the doorway. Turn right, walk to the edge and take a standing jump back down to the corner ledge and drop down into the room with the sarcophagus. (If you didn't destroy the 2 mummies earlier, they'll awaken and attack now.) Climb up the blocks on the other side of the room and exit where you came in.
NOTE: If you didn't kill the mummies earlier and don't want to chance fighting two at once, you can traverse back along the crevices the way you came. Then climb onto the block above the second crevice and follow the stairs to the top of the room. Or, take a carefully angled running jump from the ledge near the doorway to grab one of the steps leading up to the entrance, as shown in this screenshot. Or, use the corner bug to cheat Lara from the lower doorway to the upper one, by using it at the corner shown just in front of Lara in that same screenshot.
BIG ROOM WITH COLUMN & FOUR DRAWBRIDGES (AGAIN): Cross the bridge to get the SCARAB. Take two standing jumps from bridge to bridge and pick up the ANKH on the other side of the obelisk. With each artifact, you'll get another watery vision. (Guess these things have something to do with that door in the pool below, eh?) Walk across the ANKH BRIDGE, turn left and go to the end of the fenced ledge. Jump the gap and re-enter the SLIDES-TO-STEPS ROOM, which will be on Lara's right (as shown in this screenshot).
NOTE: You won't be able to do the above if you didn't kill that first mummy and lower the EYE OF HORUS bridge yet. In this case, you'll get the remaining artifacts all at once at the end. For now, after getting the SCARAB, return across the SCARAB bridge, take a right and climb up near the switch in the northeast corner. Use the switch to change the middle-level slide into steps if you didn't already do this. Then go down the steps to the door of the SLIDES-TO-STEPS ROOM, which is on the east side of this area.
SLIDES-TO-STEPS ROOM (AGAIN): After using the switch as described above, the long slide leading down from the top of this room will now be a set of block steps. (In case you missed that switch, it's just outside, at the top of the steps in the northeast corner of the COLUMN & DRAWBRIDGES area.) Climb these block steps. At the top, turn right and take a running jump to grab the narrow horizontal crevice. (screenshot) Traverse to the right and drop onto the golden blocks. Go around to the other side and drop down. (screenshot) Enter the room and throw the switch to change the upper-level slide, which is just outside, into steps. Climb to the top. Another mummy waits in the room above. To kill it safely, jump in place to get a pistol lock on it, then keep jumping and firing until it explodes.
HIGHEST ROOM (SEAL OF ANUBIS SWITCH): Climb up into a room overlooking the entire COLUMN & DRAWBRIDGES area. Pick up a small medi pack behind the silver )O( ornament (plus a save crystal if you're playing on one of the consoles).* Then use one switch to lower the BRIDGE LEADING TO THE SEAL OF ANUBIS, and the other switch to open the gold door next to it.
NOTE: You can take a shortcut here if you like. Instead of going back down the stairs, you can jump directly from this room to secret #2. Details appear on a separate page.
If you don't use the shortcut, go through the gold door next to the switch to emerge in the room at the top of the WIDE STAIRS, where you killed a mummy earlier. Descend the stairs, turn right onto the greenery-covered ledge (near the ANKH BRIDGE SWITCH, which you should have used earlier) and walk forward past the three painted columns. Here you'll find a ledge that juts out toward the square column with the artifacts. You'll need to take a running jump to reach the top of it. Walk to the edge and use the Look key to help set up the jump. When you hop back you won't be able to see where you're going because the camera will shift to behind the pillar, but trust Lara to get it right. (This screenshot shows the correct starting point.) Take a running jump, without pressing Action to grab, and you'll just make it. This is SECRET #2, the prize a small medi pack and Uzi clips.
Now turn and set Lara up for another running jump—this time from the obelisk to the pillar with the silver )O( ornament below (shown in this screenshot). Lara will take a little damage on this one, but it's worth it for the reward—a large medi pack and 2 sets of Uzi clips. This is SECRET #3.
NOTE: If you didn't lower the bridge to the EYE OF HORUS at the beginning of the level, don't drop down yet. Follow the instructions in the footnote below to get the artifact.
BIG ROOM WITH COLUMN & FOUR DRAWBRIDGES (YET AGAIN): From the pedestal with secret #3, drop to the walkway below and step out onto the SCARAB bridge. Jump over to the next bridge on the left to get the final artifact, the SEAL OF ANUBIS, and observe the underwater door below the obelisk opening.
NOTE: If you missed any of the other artifacts earlier, pick them up now to open the door in the pool.
THROUGH THE UNDERWATER DOOR: Drop into the water and swim through the door. Swim down to the bottom then forward. Ahead is a long passage with alcoves along both sides. At the second set of alcoves, you'll find a set of magnum clips on the left. Get those and resurface for air if you need to. Swim down again and forward to the third set of alcoves. Here you'll find shotgun shells and a small medi pack. If you have at least half your air left, continue; otherwise go back to the pool to breathe first.
At the far end of the underwater tunnel, turn right and keep going forward, then up, to a pool where you can surface. On the bottom are some goodies: a small medi pack, shotgun shells and magnum clips. Now get ready to kill that mummy. The safest way I found was to swim to the edge of the pool opposite the raised alcove and doorway (shown in this screenshot). If you tread water there for a little while, the mummy will come toward you. When it does, swim quickly underwater to the opposite edge, climb out, run to the alcove to the left of the doorway and pull up. Kill the mummy from safety. Pick up the 2 sets of magnum clips (and the save crystal in the PS1 game). Hop down and climb up into the doorway.
Follow the hall, past the pharaoh statue room on the left (remember it from the previous level?) to a sandy room. There's another mummy below, which you can easily kill from the doorway. Jump over to the pile of sand ahead and hop down on the left side of the pile to get a large medi pack. Climb over to the other side of the pile, jump to the block steps and then climb to the ivy-covered doorway in the corner. This leads back to the area by the sphinx.
OPEN AREA WITH SPHINX & OBELISK (FROM PREVIOUS LEVEL): The previously impassable slope is now a set of steps. Climb down and head for the obelisk by the pool in the far left corner of this area. On the way, take a little detour to the room between the sphinx's paws to pick up an extra box of shells. (It wasn't there before. Maybe one of the mummies dropped it.) Place the artifacts in their proper spots on the pillar in the middle of the pool to open the exit, which is on the far side of the sphinx.
†UPDATE HISTORY: 4/21/07 - First update since I began tracking page updates. Added various screenshots, including screens for all secrets. Revised several sections for clarity and added a few "what to do if. . ." sections. Also added the shortcut from the HIGHEST ROOM to secret #2, thanks to Mark. R.
6/25/13 - Corrected the position of the save crystal just before the wide stairs leading to the Ankh Switch, thanks to info from Steve C.
2/5/24 - Added VGCartography's level maps, with permission. Follow them on Twitter/X, YouTube, and DeviantArt for more fantastic game maps. Also added a new strat for the panther in the slides-to-steps room, thanks to Kenneth.
3/28/24 - Made a few minor tweaks (e.g., left/right corrections, compass directions, etc.) while working on the remaster updates.
‡NOTE ON VIDEO GUIDES: Eldin's videos don't always follow the same strategies I use in my walkthroughs, but if you prefer that format, I think you'll find them very helpful.
*HATHOR SYMBOL: The )O( symbol is generally associated with the Egyptian goddess Hathor. I've seen this symbol described as either a moon or sun disk between two curving horns or two crescent moons.
IF YOU MISSED THE EYE OF HORUS AT THE START OF THE LEVEL: If you were low on health and avoided the mummy near the start of the level, and thus missed getting the EYE OF HORUS, you'll need to do that. Here are two ways:
From the edge of the pedestal with secret #3, take a standing jump, pressing Action to lower Lara's arc, to land in the window with the switch (shown in this screenshot). Use the switch to lower the drawbridge. The mummy inside will not move. If you want to kill it, go through the sitting room and down the stairs. As you go, the mummy will awaken. If you want to, you can drop down into the ROOM WITH FOUR MOVABLE BLOCKS below. Move a block beneath the gold door and shoot the mummy from there. Then return upstairs and get the EYE OF HORUS.
Alternatively, jump down from the pedestal with secret #3 into the pool. Climb out and go through the small door in the northwest corner to the ROOM WITH FOUR MOVABLE BLOCKS. Climb up through the gold door, fight the mummy and pull the switch to lower the bridge so you can get EYE OF HORUS.
WAS THIS WALKTHROUGH HELPFUL? If not, I apologize and invite you to contact me with any questions. If you need help right away, I recommend the r/TombRaider subreddit. Other fan-run forums are listed at tombraiders.net/stella/community.html. If this site was useful, please consider supporting it financially or in other ways. For details, visit tombraiders.net/stella/support.html. As always, I welcome your corrections/suggestions. Thank you!
Walkthrough text and diagrams copyright © 1998- - Stellalune (). Special thanks are given to the participants in the alt.games.tombraider newsgroup, without whom some parts of this walkthrough couldn't have been written. Thanks also to Ian T. for the locations of the save crystals in the console versions, to Helena for finding the alternate weapon pickup points, and to Mark R. for the shortcut to secret #2. All TR1 screenshots were made using Glidos and Fraps. Diagrams made with the aid of GraphTablet freeware (http://www.graphtablet.com). Feel free to copy or print this walkthrough for personal use. By all means, share it with friends, but please include this credit line so people can send me their feedback. No part of this walkthrough may be reproduced on another site without permission. Follow this link for details about this site's advertising and privacy policy.
Stella's Tomb Raider Site: tombraiders.net.