STELLA'S LARA CROFT GO WALKTHROUGH - Android, iOS, PS4 and Vita, Steam, and Windows Phone/PC/Tablet
THE MIRROR OF SPIRITS - PART 4: THE GREAT HALL
Updated: 4/1/17(†)
Relic Fragments: 1
Gems: 2
Follow this link for my video walkthrough.
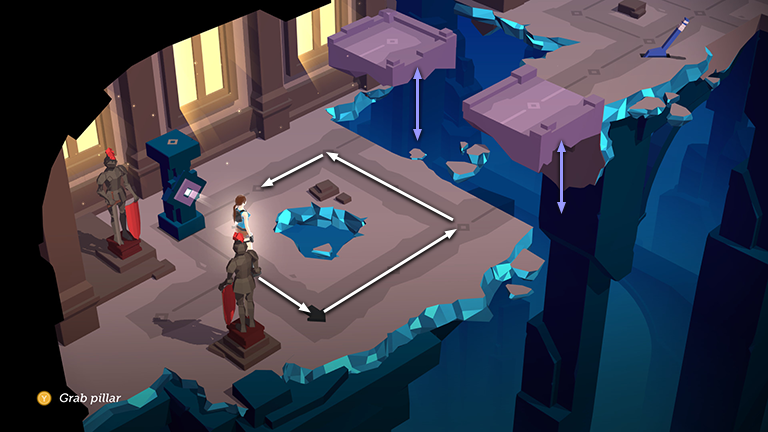
As Lara moves into the beam of light emanating from the movable pillar, the 2 purple blocks rise. Follow the walkway around to the right side of the pillar. As Lara steps out of the beam, the purple blocks sink to their original position.
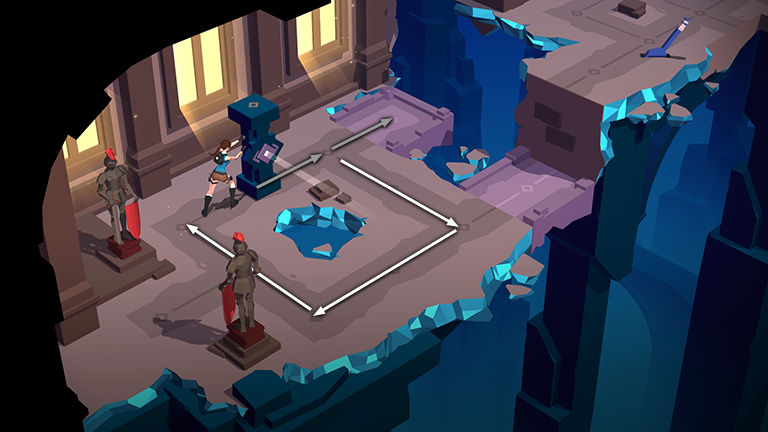
Then move around behind the pillar and push it onto the purple block on the left.
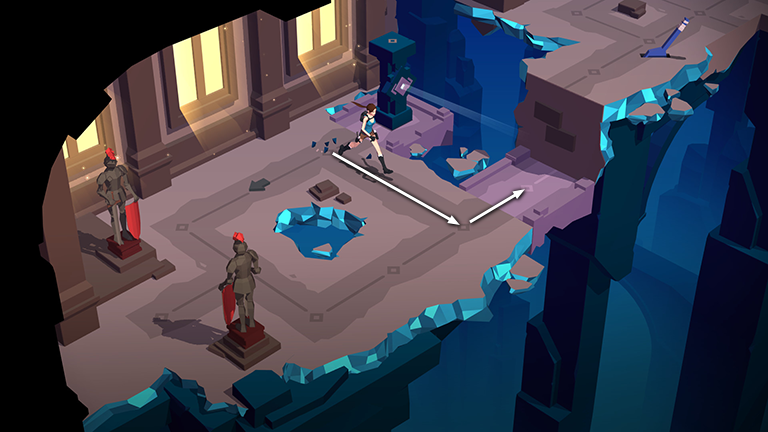
Move around to the purple block on the right.
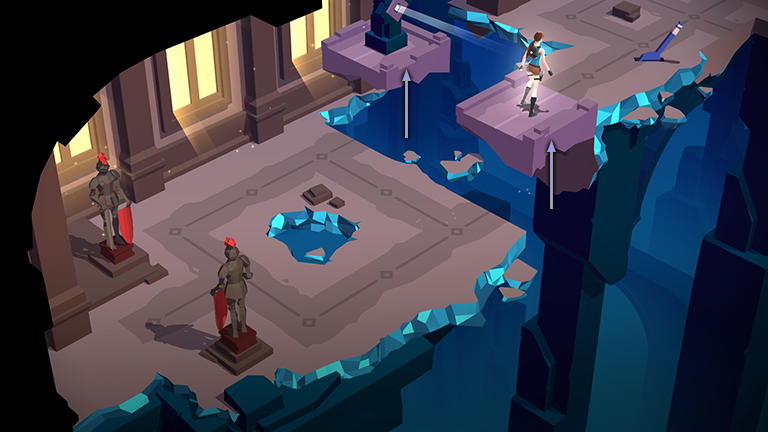
When Lara steps onto the block, she also moves into the beam of light, which causes both purple blocks to rise, carrying her to the upper level.
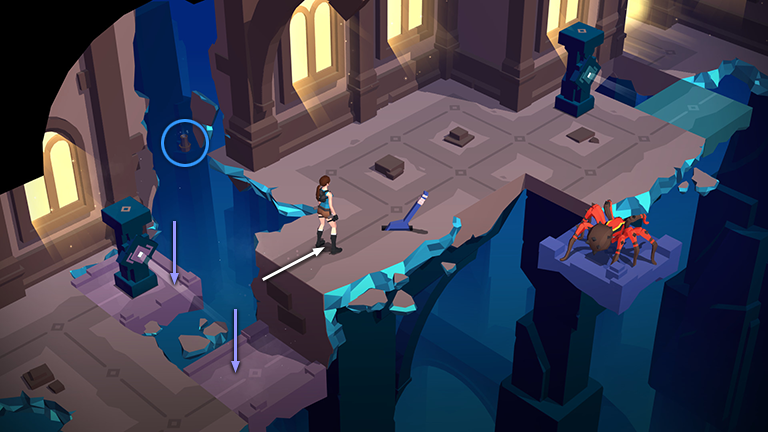
Step forward, causing the 2 purple blocks to sink now that Lara is no longer standing in the beam of light. Break the vase in the background between the rooms to get a CRYSTAL (3/14).
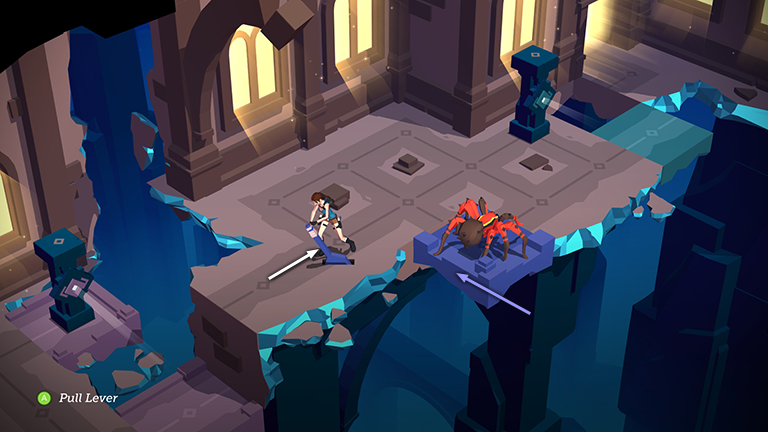
Then step forward and use the lever to move the purple block with the spider on it to the left.
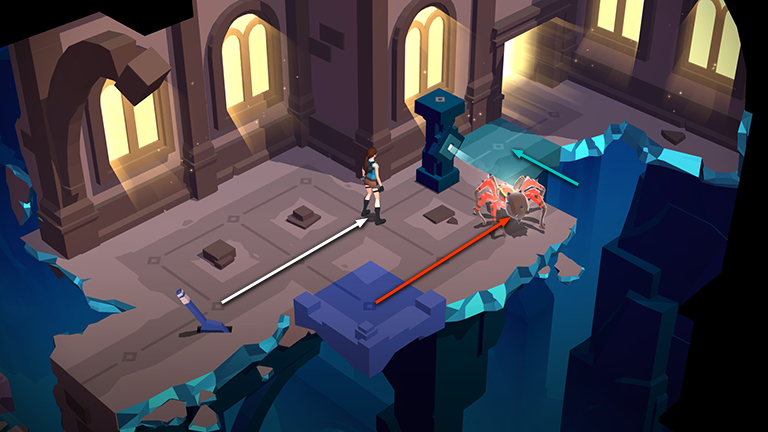
Move forward toward the freestanding pillar. As you go, the spider also moves forward into the beam of light emanating from the pillar. This causes the teal block to slide to the left.
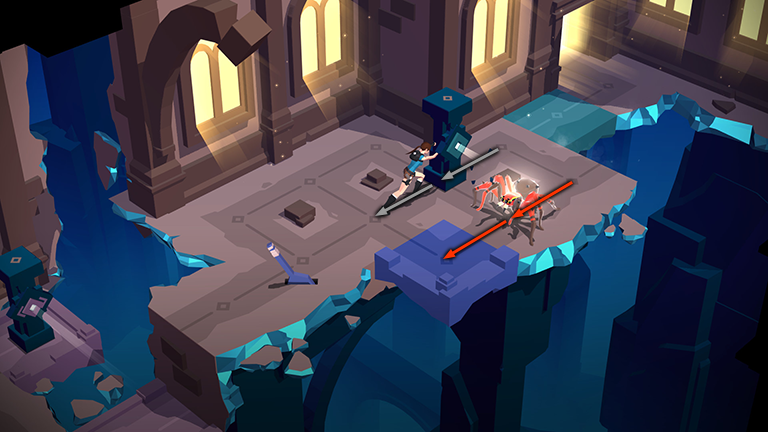
Pull the pillar twice. As you do this, the spider also moves twice, ending up back on the purple block.
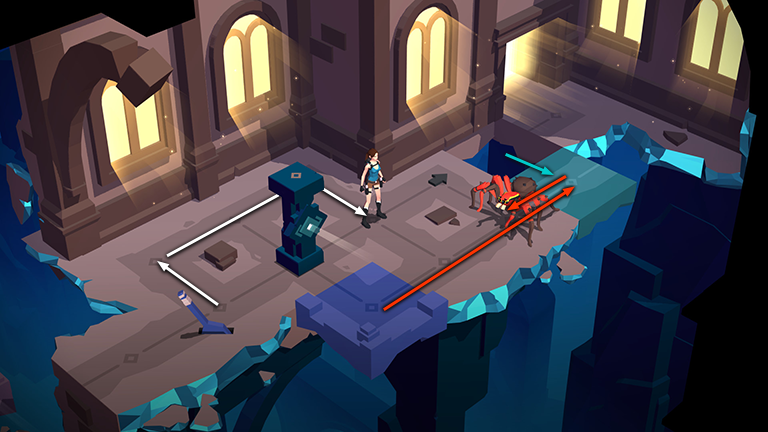
Move around to the upper right side of the pillar. As you go, the spider moves forward out of the light beam, causing the teal block to slide back to the right. The spider then moves onto the teal block, turns around and steps back off it.
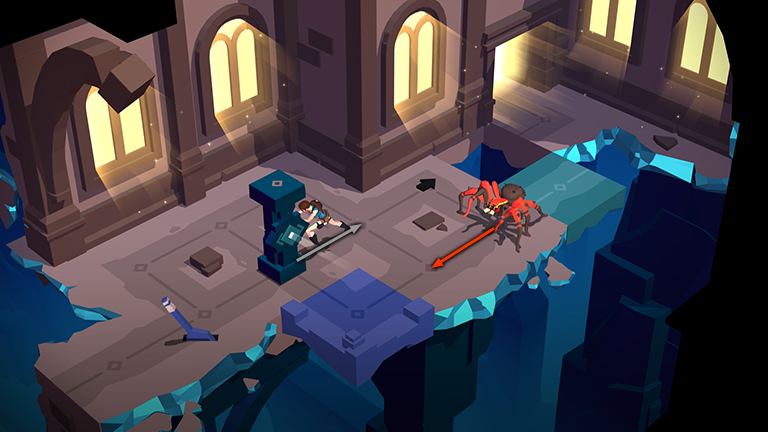
Pull the pillar once to the upper right. As you do this, the spider moves once more to the lower left...
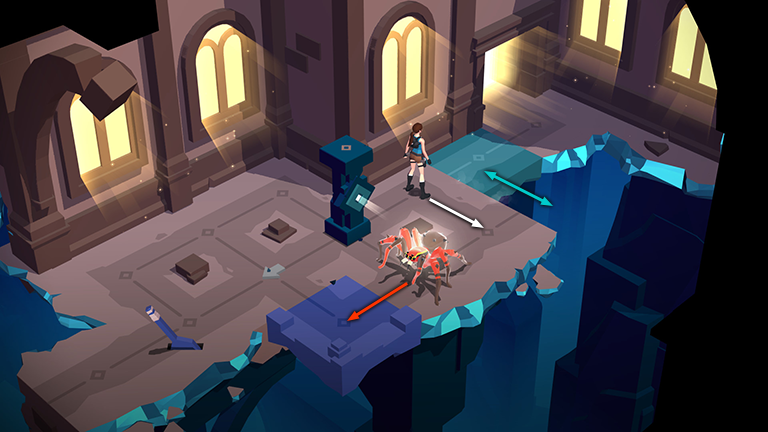
...again activating the beam of light so the teal block moves back to the left. The path doesn't allow you to move directly onto the teal block, so instead step to the right. As you do this, the spider moves out of the light onto the purple block, and the teal block slides to the right.
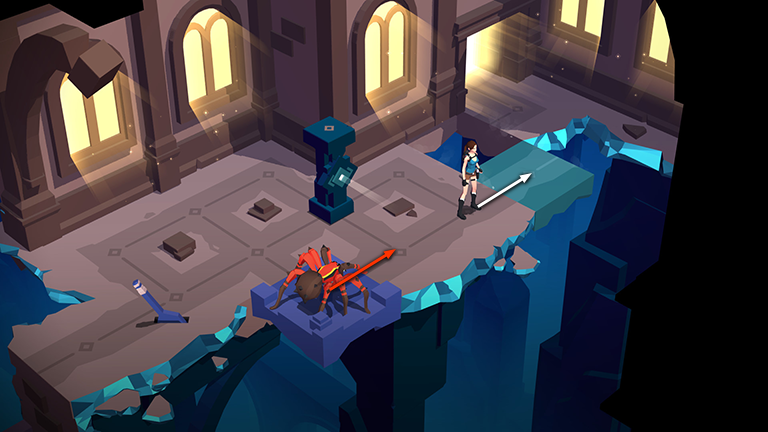
Now step forward onto the teal block. The spider moves back into the beam of light emanating from the pillar...
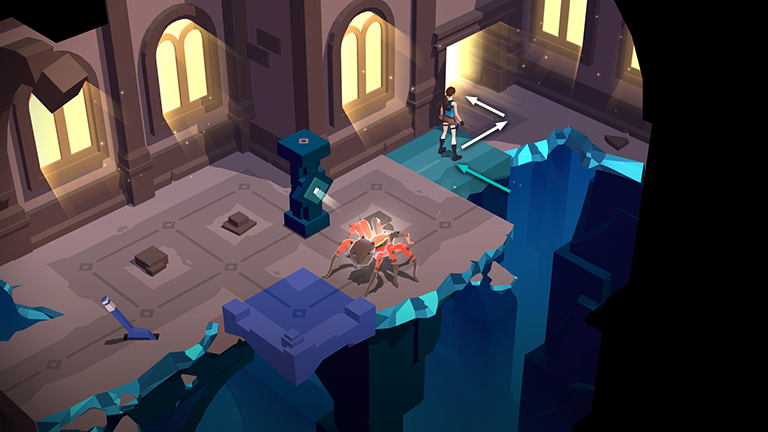
...and the teal block—with Lara standing on it—slides back to the left so you can reach the exit.
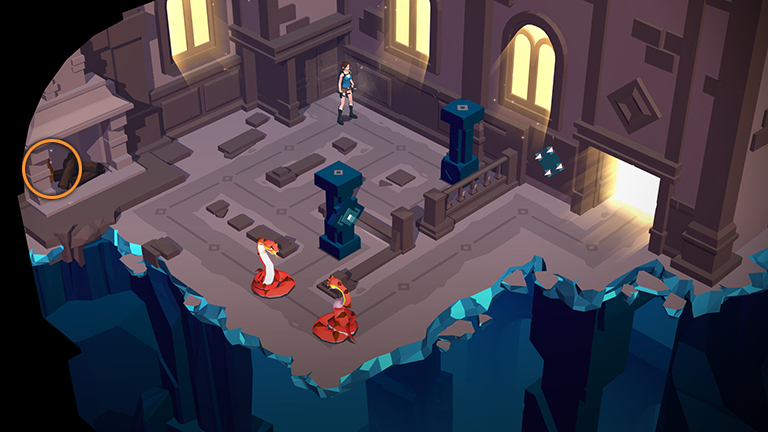
In the next area, smash the vase tucked away in the fireplace on the left to get a piece of the EYE OF THE ABYSS (3/10).
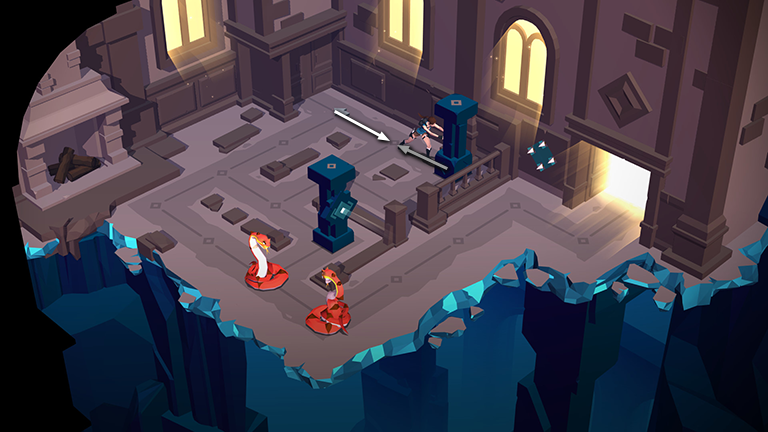
Step forward and pull the movable pillar on the right (i.e., the one without the light) once toward the entrance.
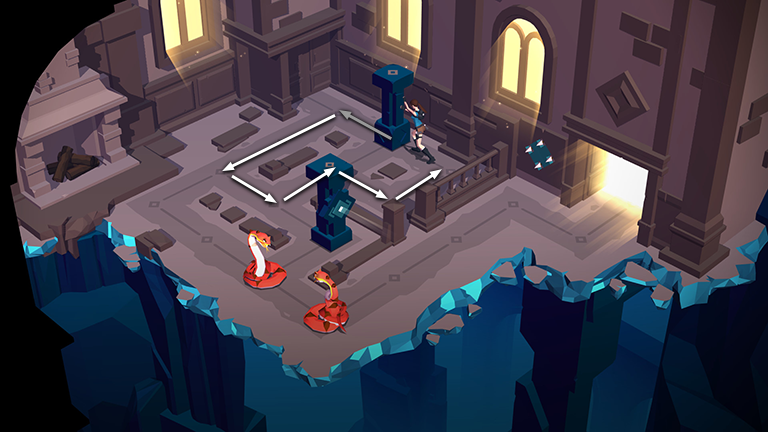
Move around behind this same pillar and push it once into the upper corner.
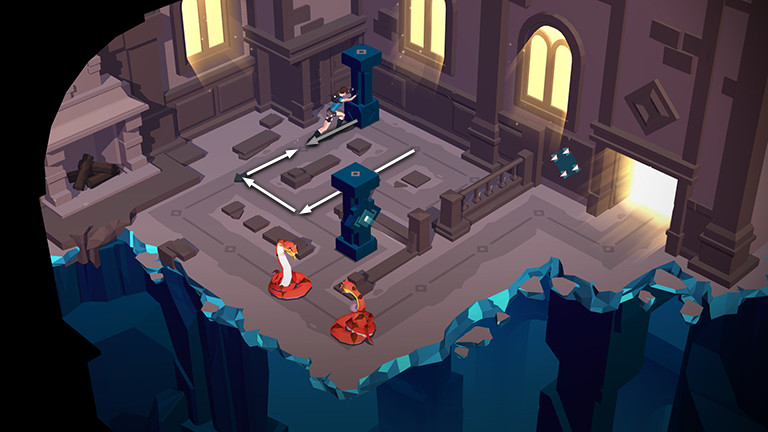
Go around to the left side of the pillar and pull it once to the lower left.
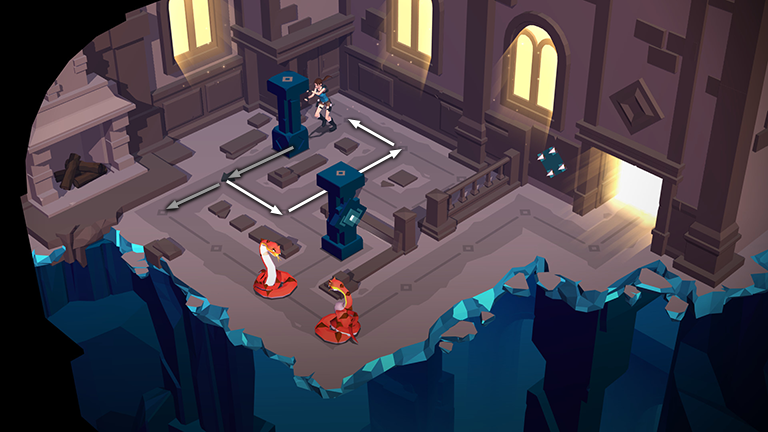
Go back around to the upper right side of the pillar and push it twice so it ends up in the left corner, near the fireplace.
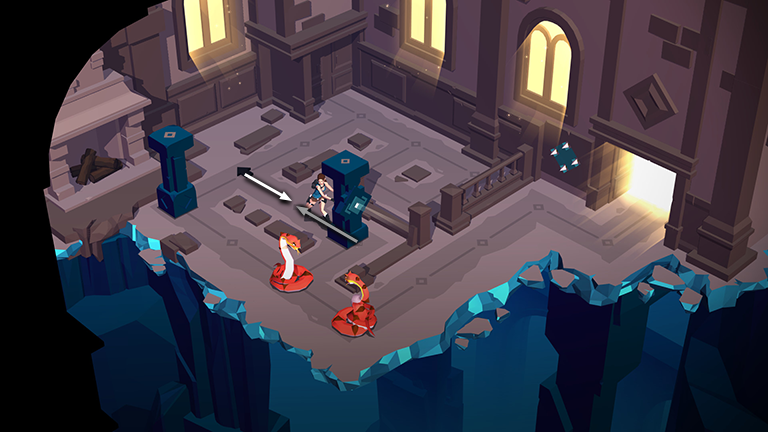
Now move to the lower right, grab the pillar with the light and drag it to the upper left.
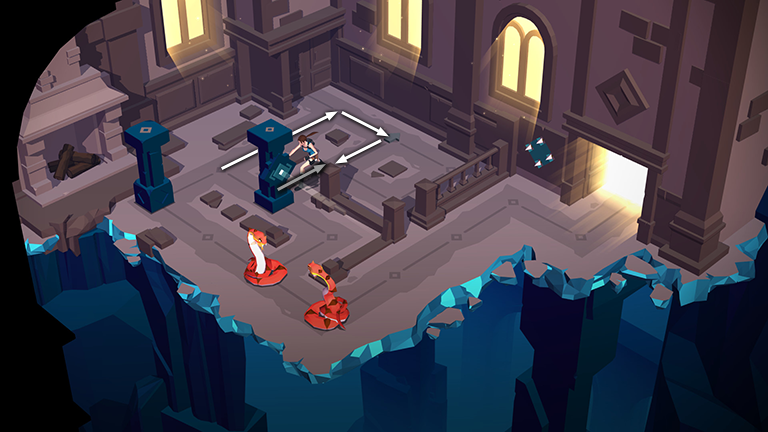
Move around to the right side of the pillar with the light and pull it to the upper right.
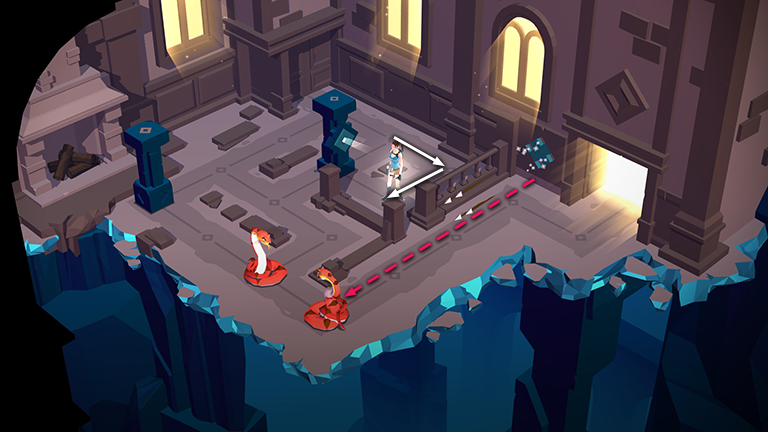
Move around to the lower right side of the pillar and into the beam of light. This activates the arrow trap near the exit, killing the snake sitting opposite the trap.
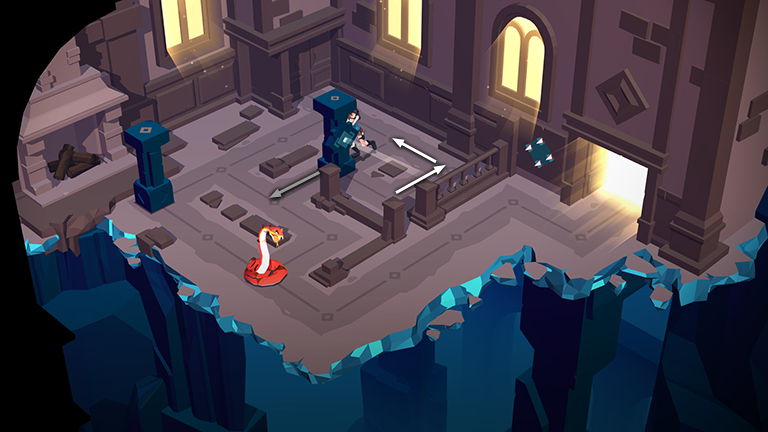
Now return both pillars to their original positions. Start by moving around to the right side of the pillar with the light and push it back to the lower left.
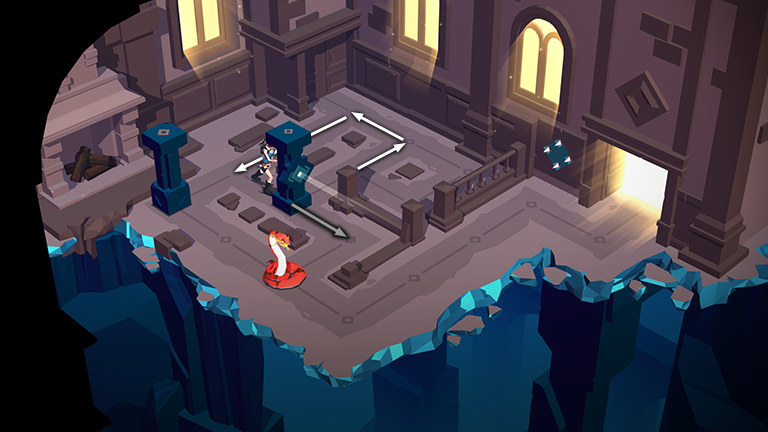
Move around to the upper left side of the pillar with the light and push it to the lower right, back to its starting position near the remaining snake.
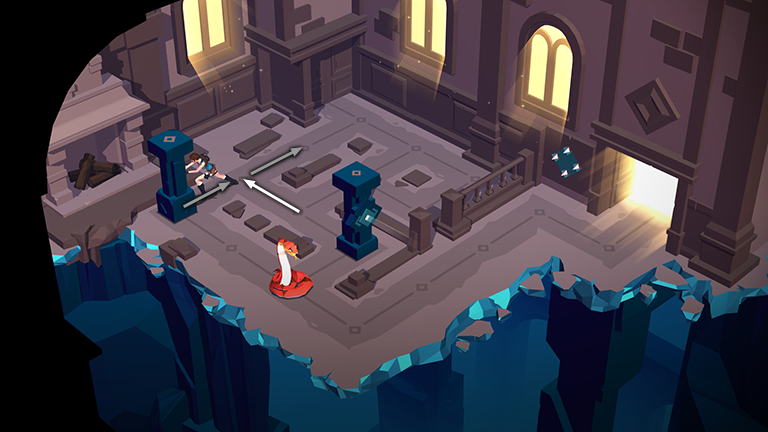
Step back and then pull the first pillar twice toward the upper right.
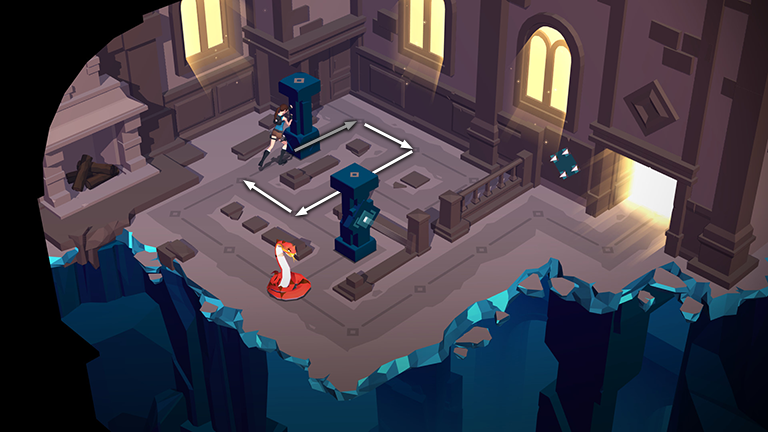
Go around to the lower left side of the first pillar and push it into the upper corner.
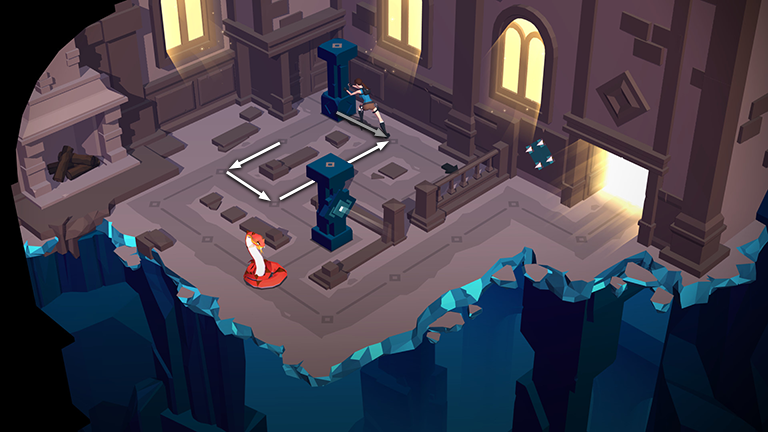
Go around to the other side of the first pillar and pull it to the lower right.
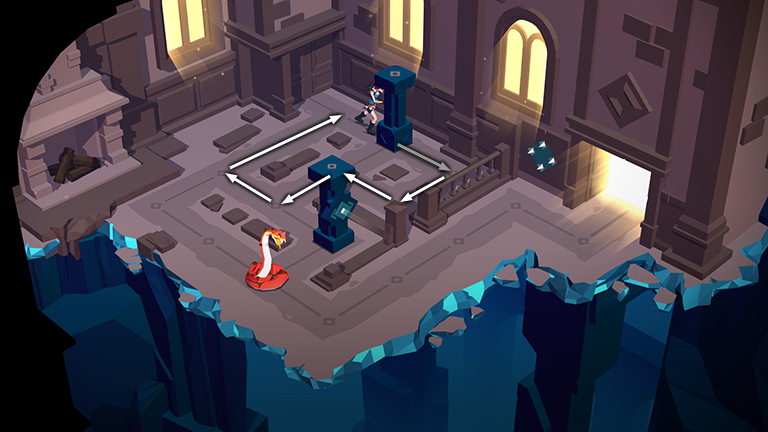
Move back around to the other side of the first pillar and push it into the corner near the railing and arrow trap, where it was when you first entered this room.
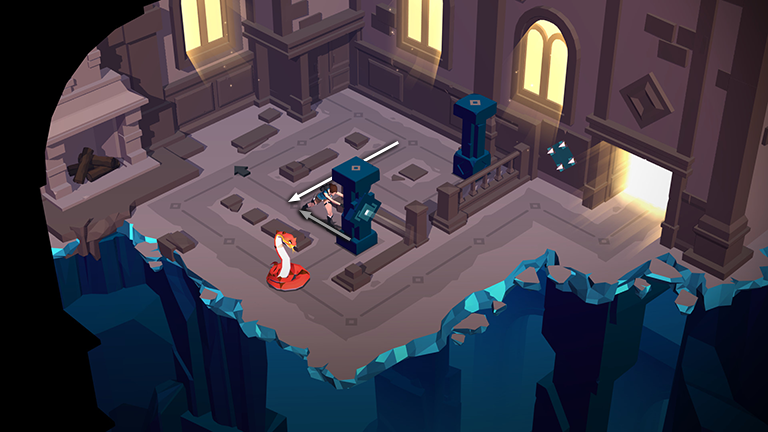
Now pull the pillar with the light once to the upper left.
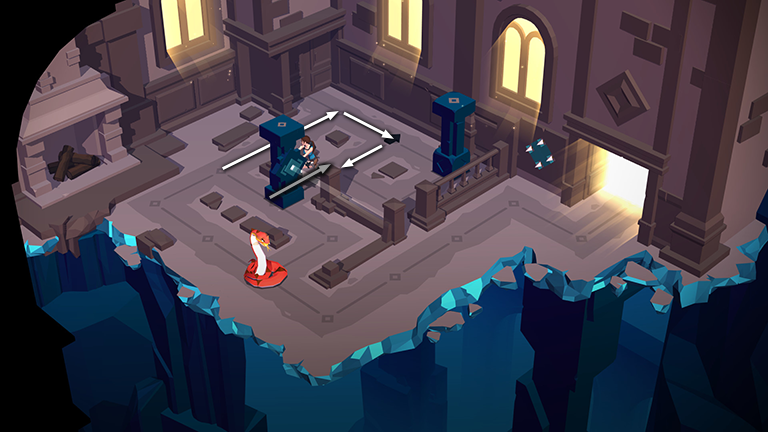
Move around to the right side of the pillar with the light and pull it once.
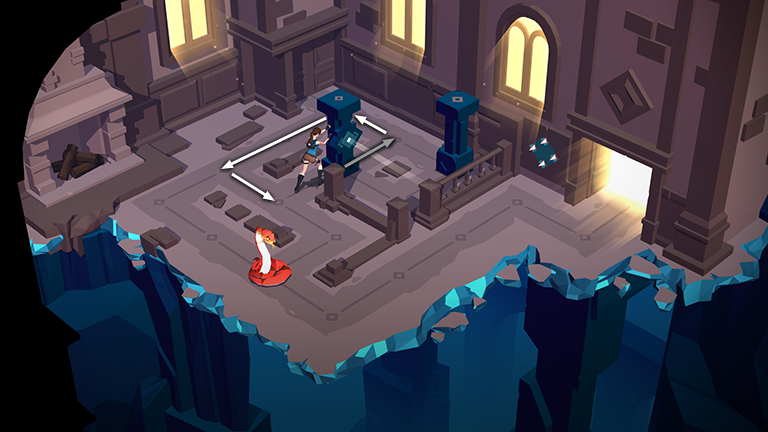
Then go back around to the left side of the pillar with the light and push it again so it lines up with the other pillar.
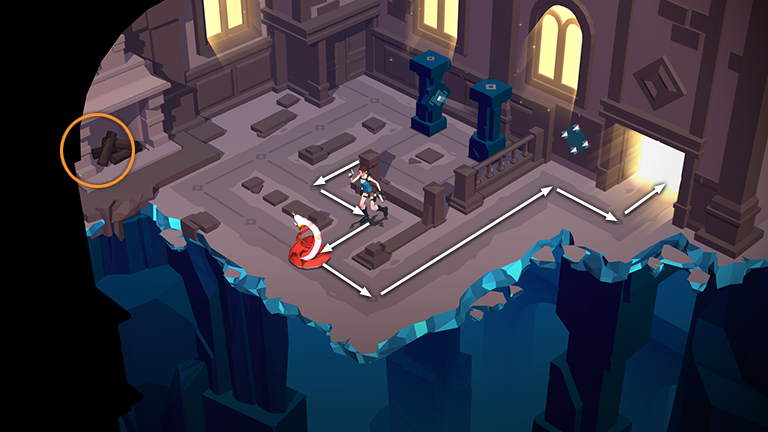
Approach the snake from the side to shoot it. Break the vase in the fireplace to get the third RELIC piece if you didn't do so before. Then make your way to the exit. The plain pillar will block the beam of light so you can pass by without triggering the arrow trap.
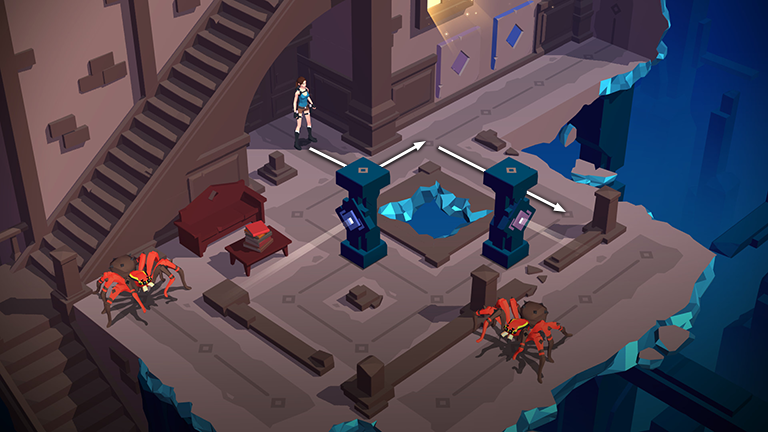
In the next area you'll find 2 pillars with beams of light emanating from them. These are color-coded blue and pink, and activate the 2 block traps near the exit. There are also 2 spiders. They can't reach Lara, but they can trigger the beams and activate the block traps.
Start by moving down to the right corner, next to the pillar with the pink decoration. I haven't drawn their paths in the screenshot above, but as you go, the spiders pace back and forth, passing through the beams and triggering the block traps.
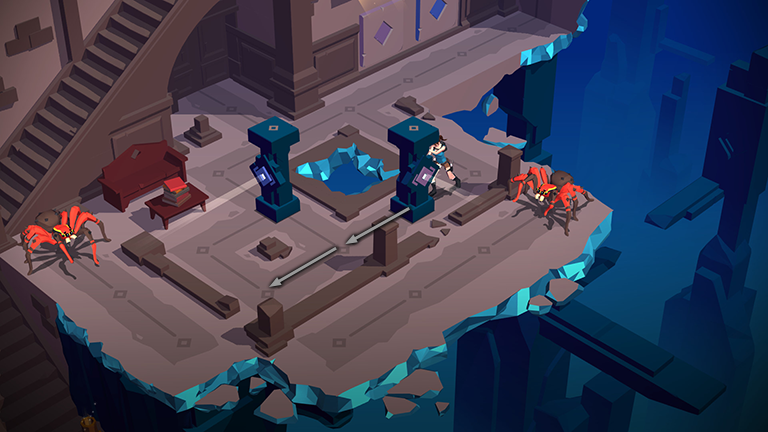
Push the pillar with the pink decoration twice, into the lower left corner.
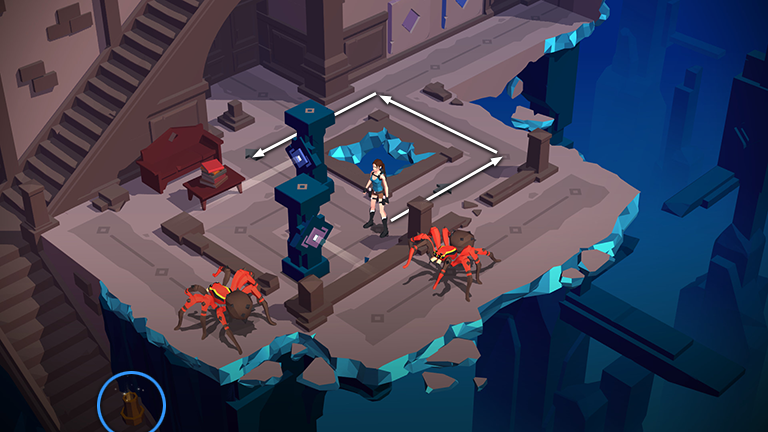
Smash the vase below on the left to get another CRYSTAL (4/14). Then move around to upper left side of the pillar with the blue decoration.
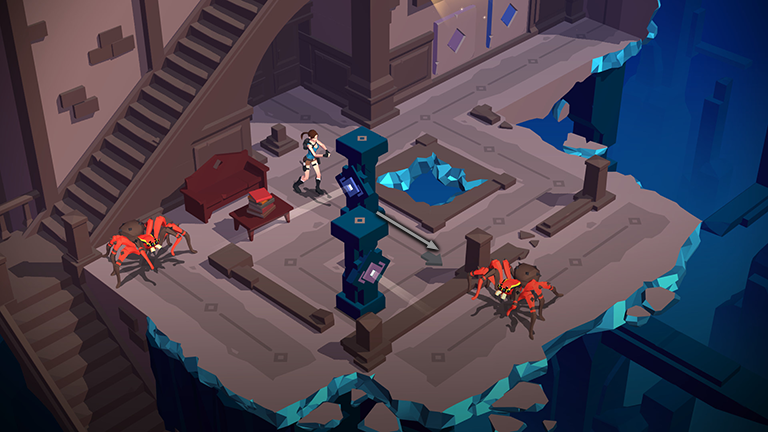
Push this pillar once so its light beam shines on the other pillar. Now the spider pacing along the left path can no longer trigger the blue block trap.
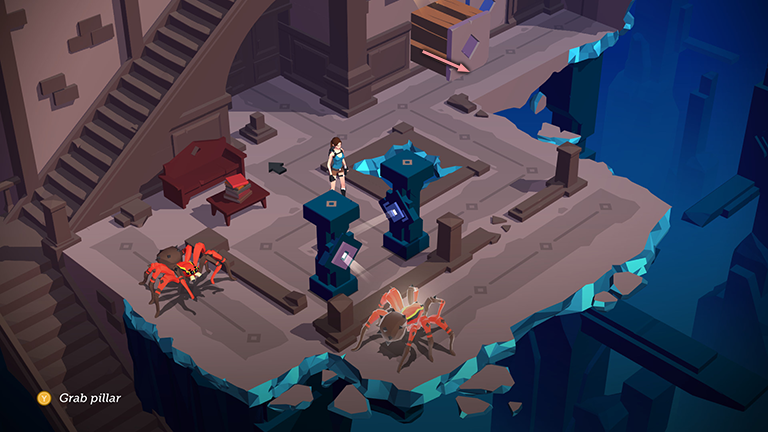
The other spider can still activate the pink block trap, but this is not a problem. If you followed the sequence described above, Lara should now be standing on the upper left side of the pillar with the blue decoration, as shown here. The spider on the right should be standing in front of the pillar with the pink decoration, within its light beam, thus activating the pink block.
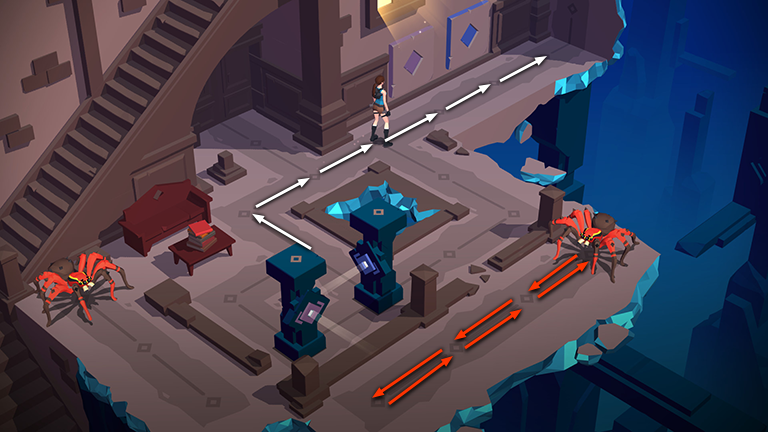
As you step once to the upper left then move five times directly toward the exit, the spider moves to the upper right, out of the beam of light, causing the pink block to retract. The spider then moves twice more to the upper right, then three times back to the lower left.
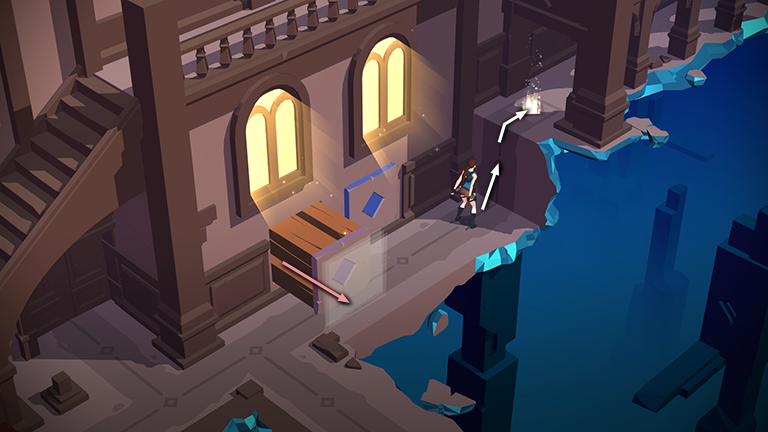
So by the time the spider moves back into the beam of light, Lara has cleared the pink block and can climb up to the exit.
†UPDATE HISTORY: 4/1/17 - Walkthrough first posted.
WAS THIS WALKTHROUGH HELPFUL? If not, I apologize and invite you to contact me with any questions. If you need help right away, I recommend the r/TombRaider subreddit. Other fan-run forums are listed at tombraiders.net/stella/community.html. If this site was useful, please consider supporting it financially or in other ways. For details, visit tombraiders.net/stella/support.html. As always, I welcome your corrections/suggestions. Thank you!
Copyright © - Stellalune ( ). Screenshots for the Shard of Life expansion levels were made using the Steam version of Lara Croft GO. Feel free to copy or print this walkthrough for personal use. Share it with friends if you like, but please include this credit line so people can send me their feedback. No part of this walkthrough may be reproduced on another site without permission. Follow this link for details about this site's advertising and privacy policy.
Stella's Tomb Raider Site: tombraiders.net.
