STELLA'S LARA CROFT GO WALKTHROUGH - Android, iOS, PS4 and Vita, Steam, and Windows Phone/PC/Tablet
THE CAVE OF FIRE - PART 9: DEADLY STEPS
Updated: 3/19/17(†)
Relic Fragments: 1
Gems: 1
Follow this link for my video walkthrough.
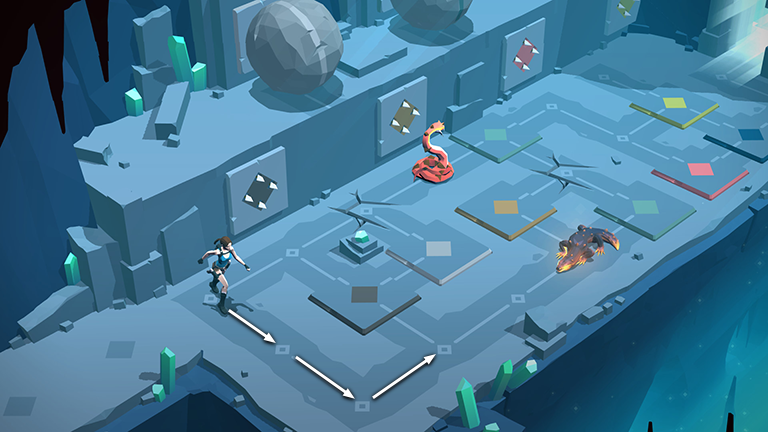
From the starting point, move twice to the lower right, then once to the upper right to get the lizard's attention.
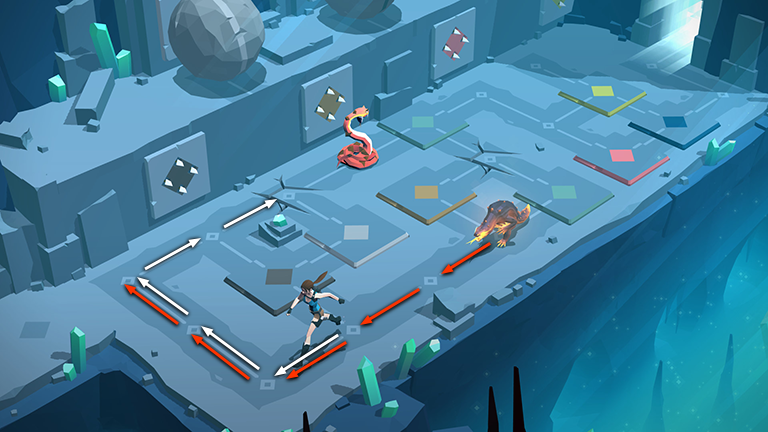
Move back to the lower left, then twice to the upper left, then twice to the upper right, onto the first cracked floor area. The lizard follows two spaces behind, ending up in the left corner where Lara began the level.
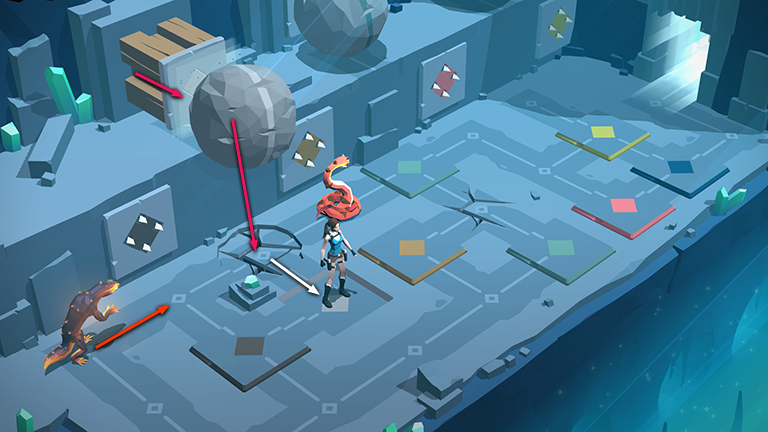
Step to the lower right, onto the pressure pad with the light gray diamond. This triggers the first block trap on the ledge above, shoving the boulder with the light gray stripe off the ledge. It lands on the cracked floor and falls through. Meanwhile, the lizard advances one space to the right.
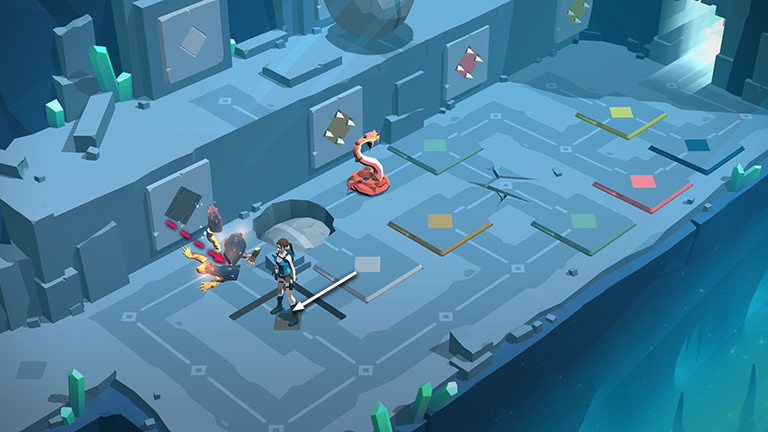
Move onto the dark gray pressure pad. This activates the gray dart trap. Fortunately the lizard absorbs the arrows meant for Lara, putting it out of action for the next four turns.
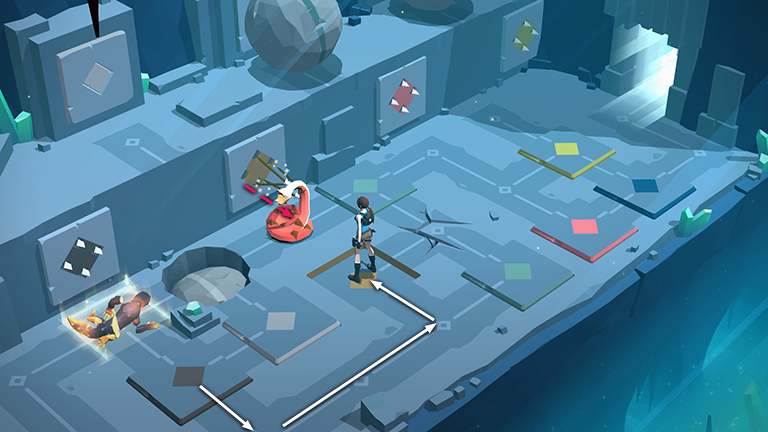
Step off the dark gray pad toward the lower right. Now move around to the tan pressure pad. Stepping there triggers the corresponding arrow trap, which kills the snake sitting between Lara and the trap.
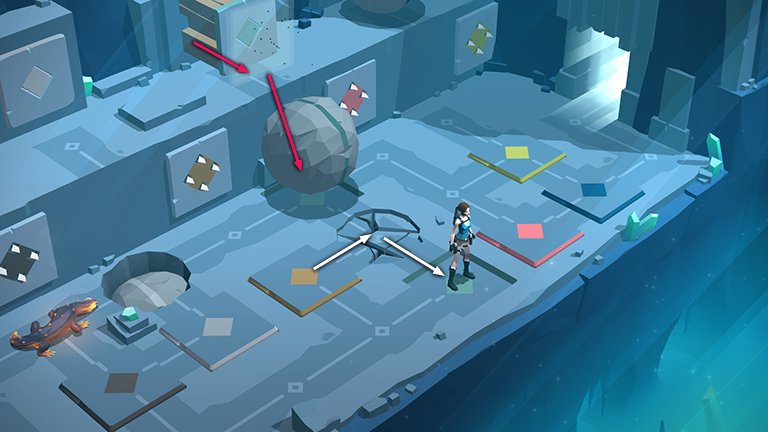
Step off the tan pressure pad onto the next section of cracked floor. Then move to the right onto the green pressure pad. This triggers the second block trap, pushing the boulder with the green stripe off the ledge. It lands on the other green pressure pad, which also activates the block trap. Since the boulder has already rolled, this has no effect.
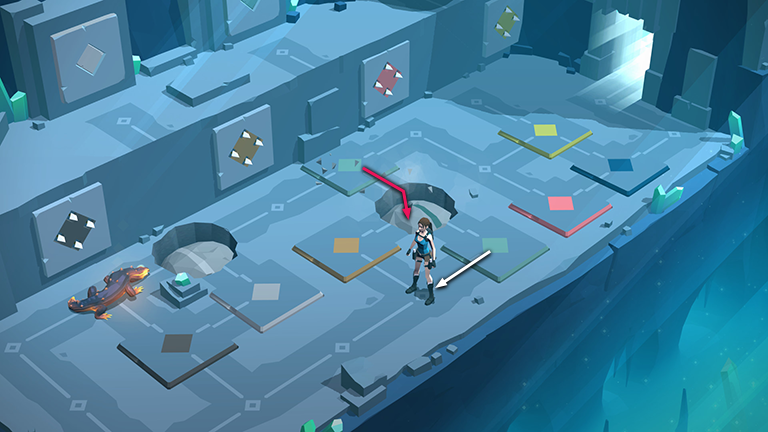
Step off the green pad toward the lower left. The boulder then rolls onto the cracked floor and falls through.
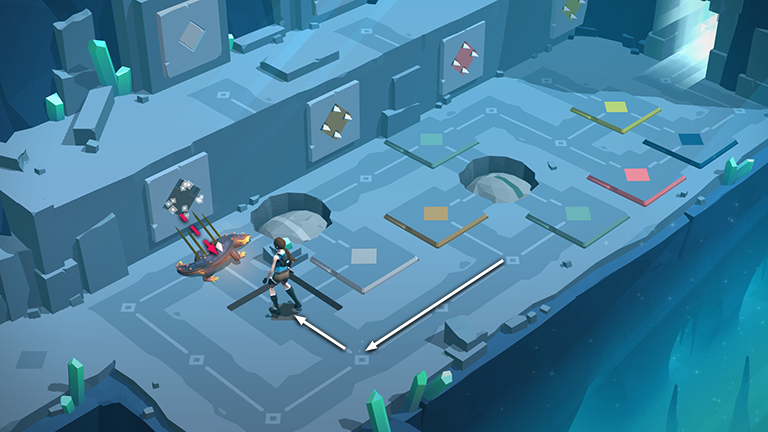
Continue twice to the lower left, then once to the upper left onto the dark gray pad. This triggers the dark gray arrow trap, spearing the lizard again and taking it out of play for four turns.
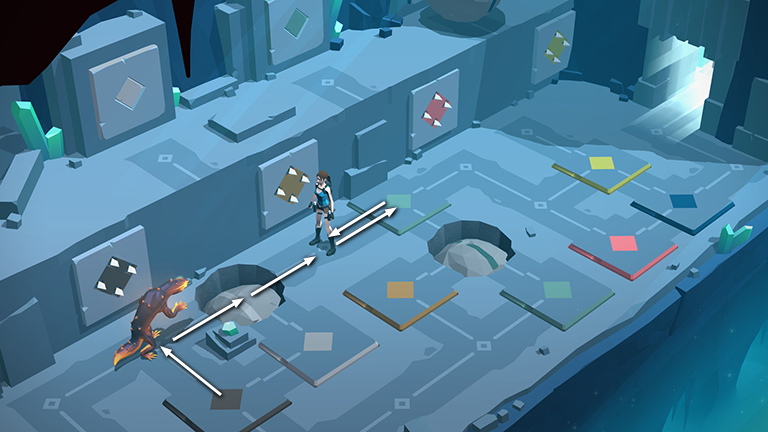
Move over the lizard chunks, onto the first boulder sitting in the hole next to the light gray pressure pad, forward twice onto the green pressure pad (it's safe now that the second boulder has rolled), and then back one space to get the lizard's attention as it wakes up.
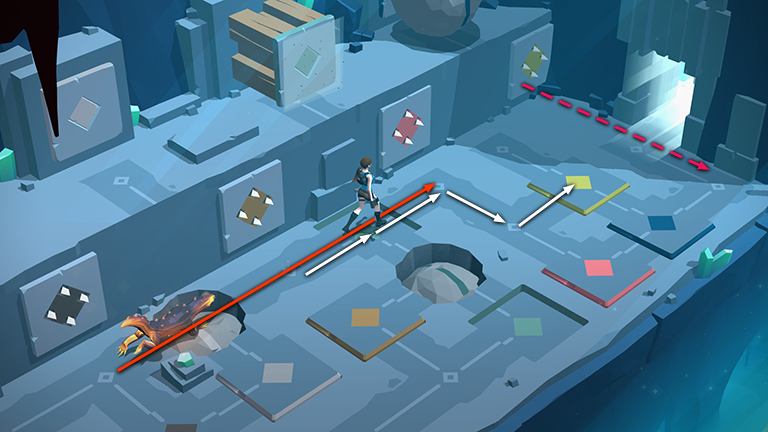
Move forward twice, right, then forward again onto the yellow pressure pad. This triggers the yellow arrow trap, but it shouldn't hit anything. Meanwhile, the lizard also moves four spaces, ending up next to the pink arrow trap.
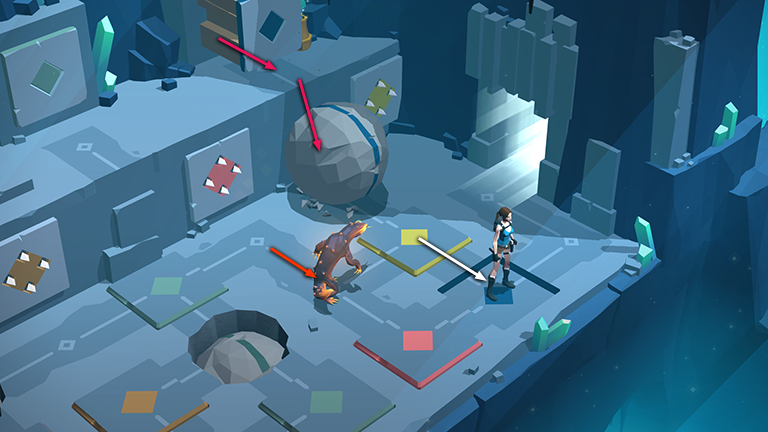
Move to the right, onto the blue pressure pad. This extends the corresponding block trap on the ledge above, pushing the boulder with the blue stripe off the edge. The lizard also moves one space to the right.
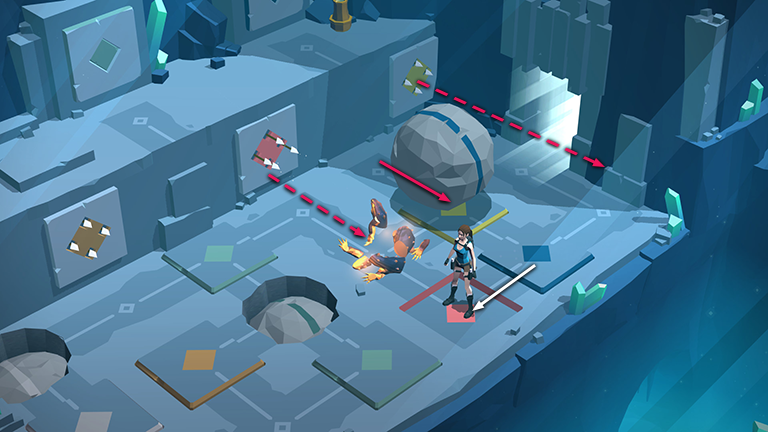
Move to the lower left, onto the pink pressure pad. This sets off the pink arrow trap, but the lizard once again absorbs the arrows and falls to pieces. During this same turn, the boulder rolls forward onto the yellow pressure pad. The yellow arrow trap fires but there's nothing in its way.
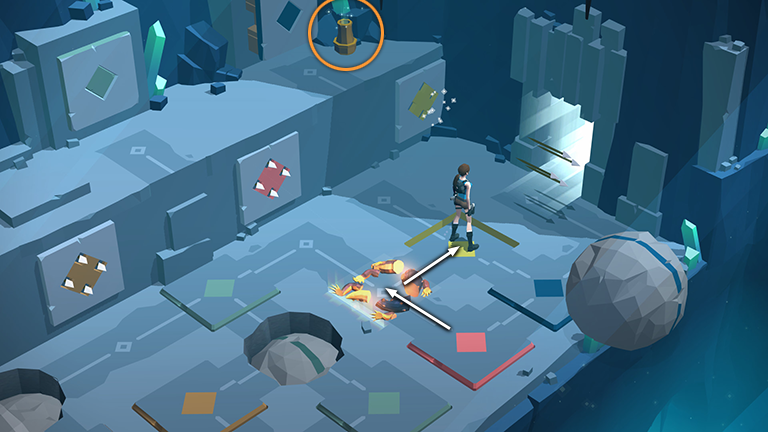
Move over the lizard and onto the yellow pressure pad. Again, this triggers the yellow arrow trap but it has no effect since Lara is not in its path. As you go, the boulder continues to roll off the edge. Smash the vase on the ledge near the blue block trap to get another piece of the SACRED BEETLE (9/11).
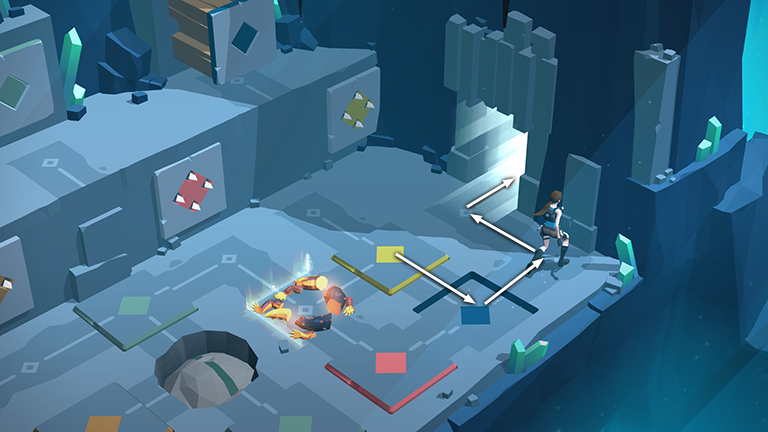
Move onto the blue pad and proceed to the exit. The lizard will revive, but Lara should be on her way out before it can trigger the yellow arrow trap.
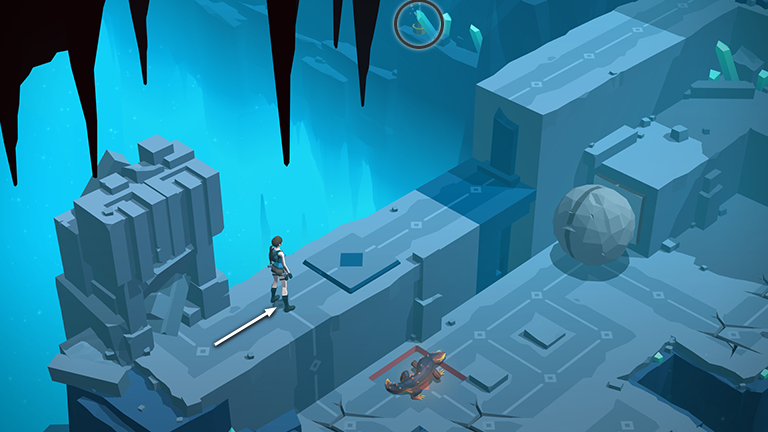
In the next area,
move to the right once and smash the vase in the background for another shard of OBSIDIAN (11/13).
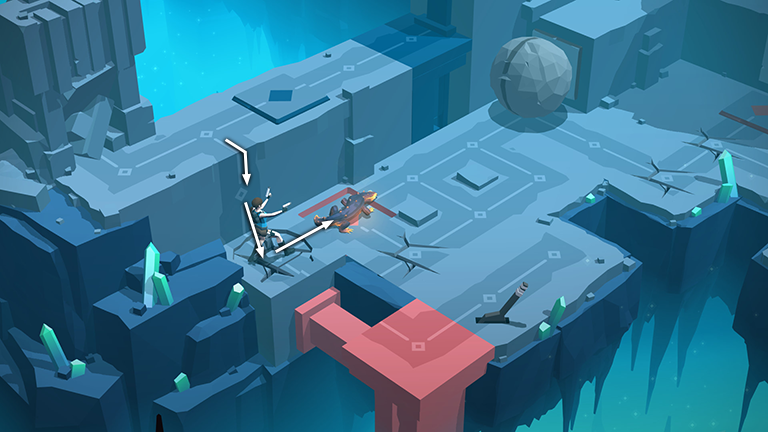
Drop down off the ledge onto the cracked floor. Then approach the lizard from behind to shoot it with your pistols, disabling it for the next four turns.
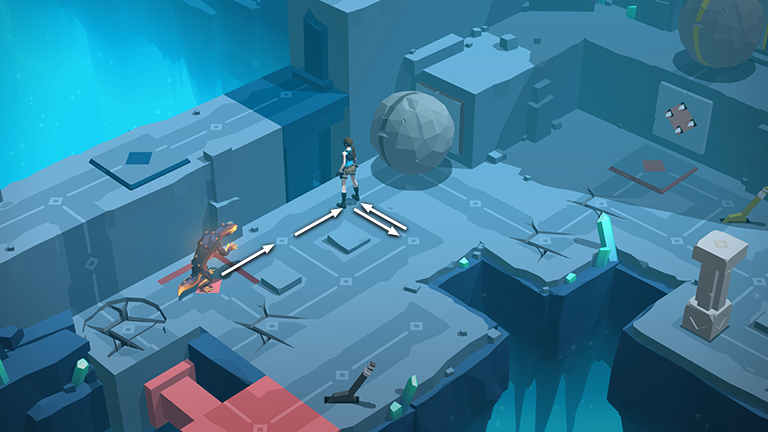
Move twice to the upper right, toward the boulder, which remains still for now. Step to the lower right, then back to the upper left to use up two more turns. The lizard then revives and notices Lara.
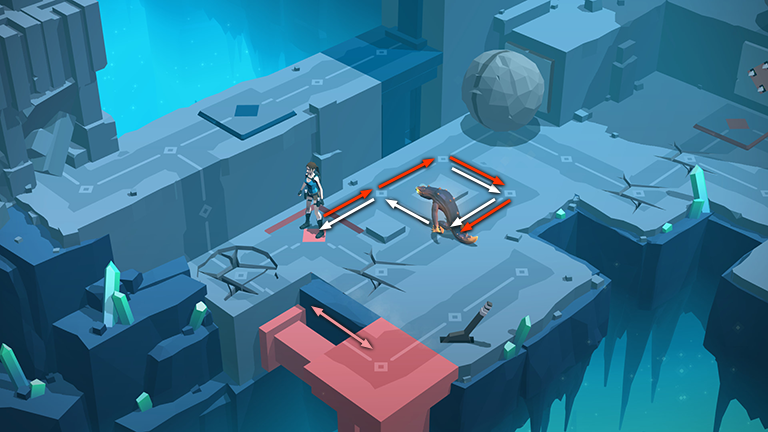
Now lure the lizard on a little chase: Move to the lower right, lower left, upper left, then lower right so Lara ends up on the pink pressure pad. Meanwhile, the lizard moves toward the boulder and around the same way Lara went. When the lizard first moves off the pink pressure pad, the pink block slides to the left. When Lara steps on the pad again, the block slides back to the right, toward the lever.
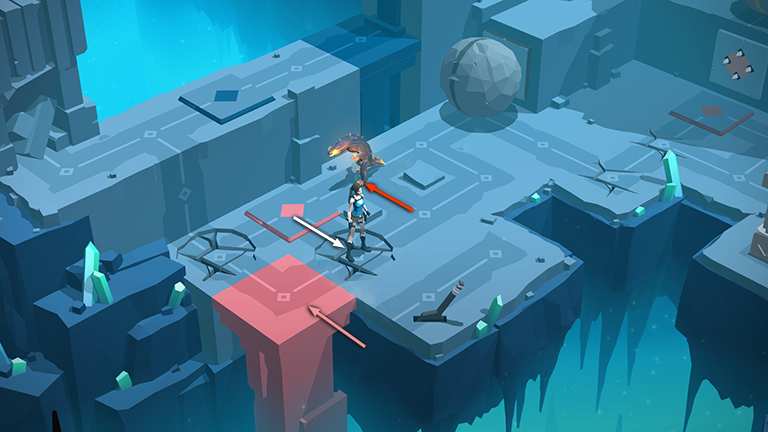
Move off the pink pad onto the second cracked floor just to the right. Stepping off the pad causes the pink block to slide to the left. Meanwhile, the lizard moves to the right once.
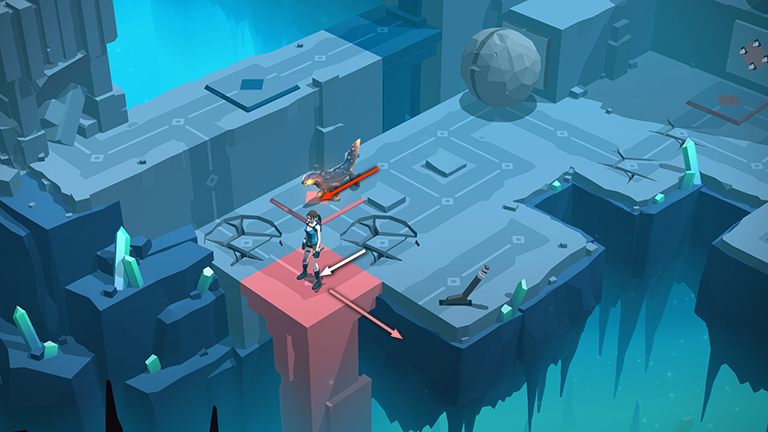
Step onto the pink block. The lizard then moves onto the pressure pad, sliding the block—with Lara standing on top—back to the right.
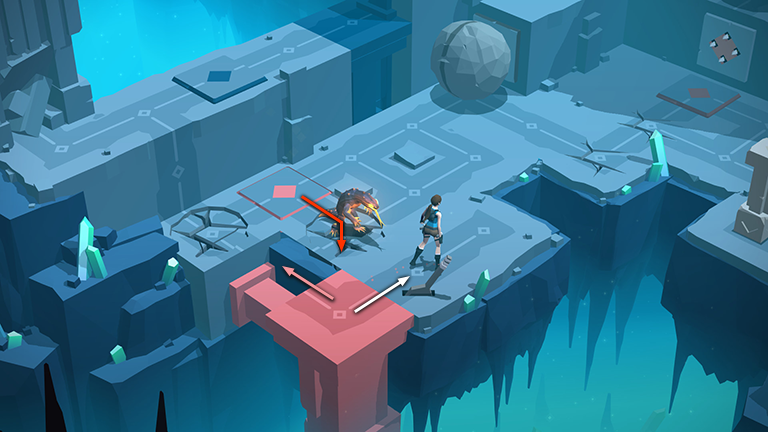
Step off the pink block onto the ledge next to the lever. The lizard, still following in Lara's footsteps, moves off the pink pad onto the cracked floor. Since Lara has already weakened the floor, it collapses, dropping the lizard into the abyss. With nothing depressing the pink pad, the pink block slides back to the left.

Use the lever to trigger the block trap, shoving the boulder forward.
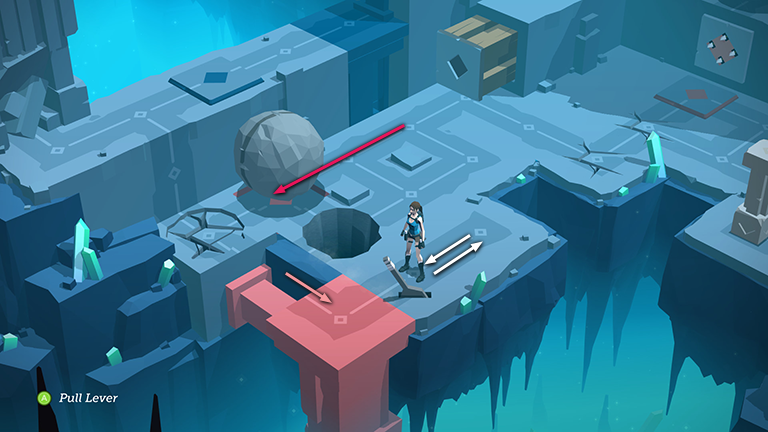
Move back once, then forward once. The boulder continues to roll onto the pink pressure pad, causing the pink block to slide to the right.
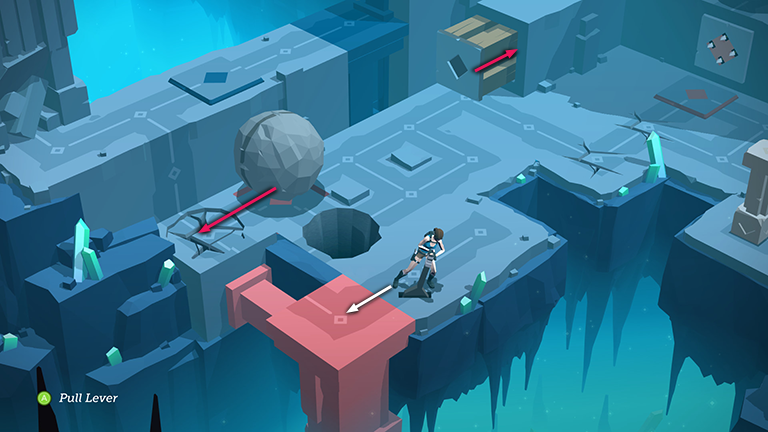
Use the lever again to retract the block trap. Then step onto the pink block. In this turn, the boulder continues to roll forward and falls through the first section of cracked floor.
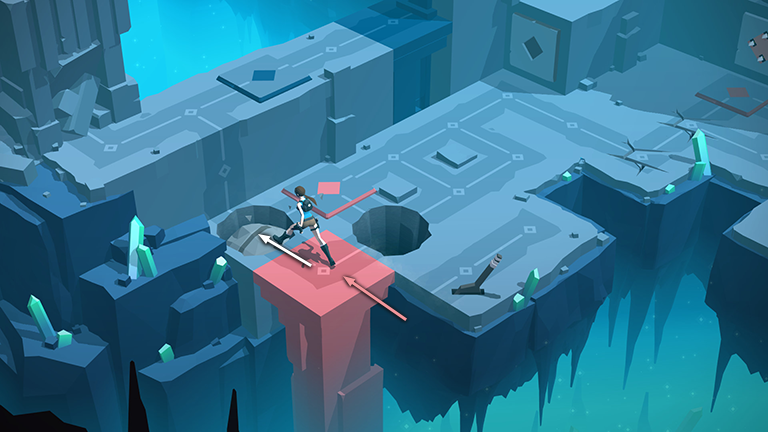
With the boulder no longer holding down the pressure pad, the pink block slides back to the left with Lara standing on top. Step off on the left side, onto the boulder which is now sitting in the hole in the floor.
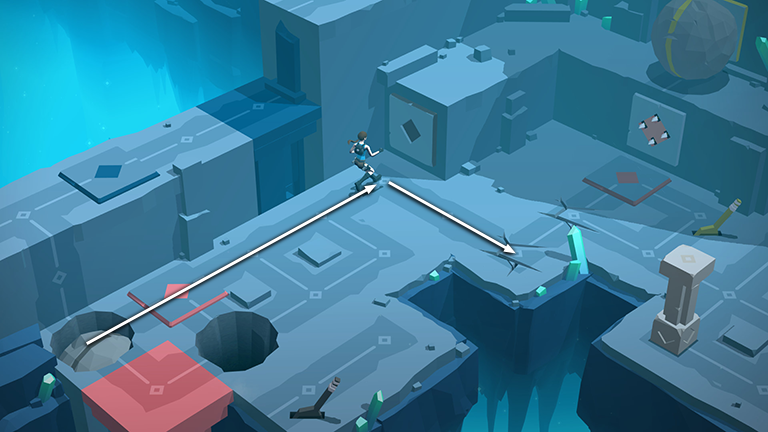
Move along the walkway to the upper right. (As long as you used the lever a second time to retract the block trap, the path should be clear.) Then move to the lower right onto the next section of cracked floor.
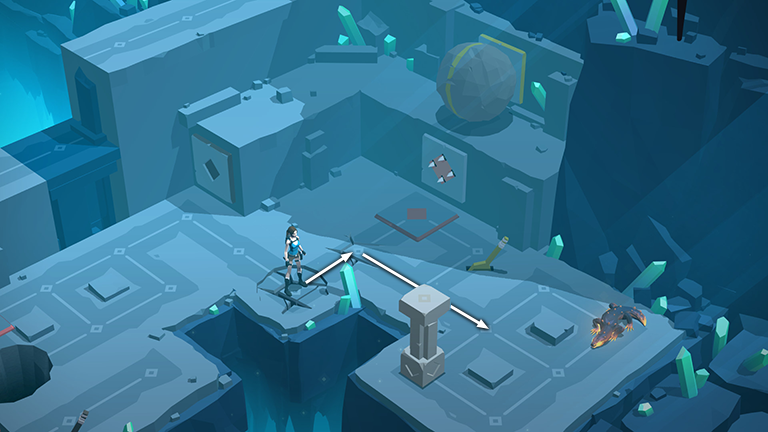
Step to the right onto the next section of cracked floor. Then move two spaces to the lower right so Lara ends up beside the movable pillar.
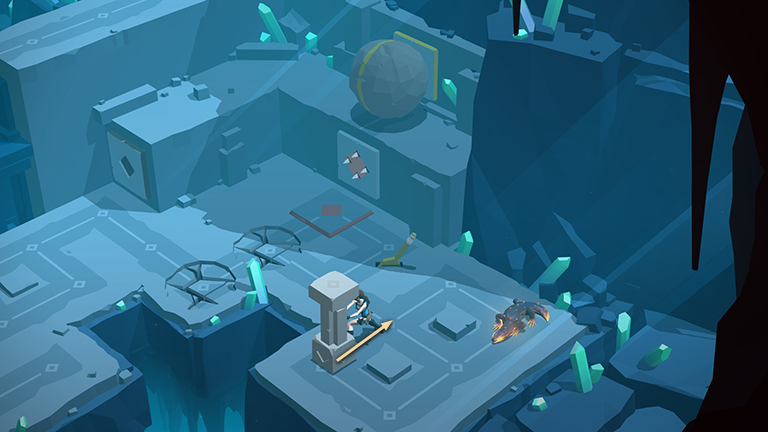
Pull the pillar once to the upper right.
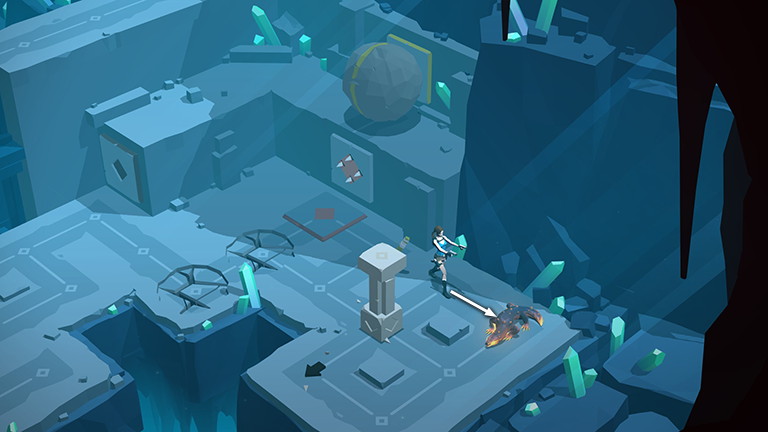
Now approach the lizard from the side to shoot it, disabling it for the next four turns.
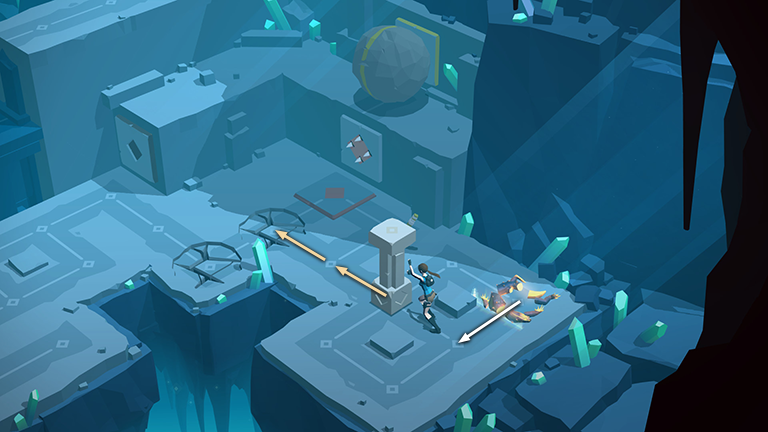
Step to the lower left and then push the pillar twice so it falls through the cracked floor near the orange pressure pad.
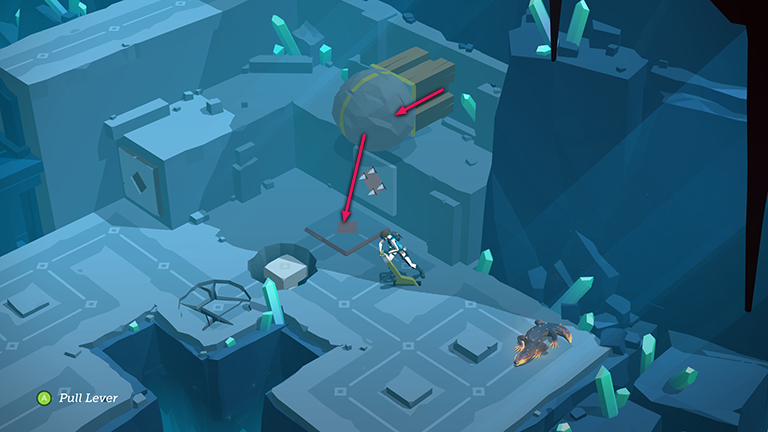
As you move to the lever, the lizard pulls itself together. Since Lara is no longer in its field of view, it settles back down to rest. Pull the lever to extend the block trap above, pushing the boulder with the yellow stripe off the ledge. (The boulder lands on the orange pressure pad, triggering the arrow trap, but the arrows shoot harmlessly into the boulder.)

Move to the lower left, then the lower right. As you go, the boulder rolls forward, over the pillar embedded in the floor and onto the other cracked floor, where it then falls through.
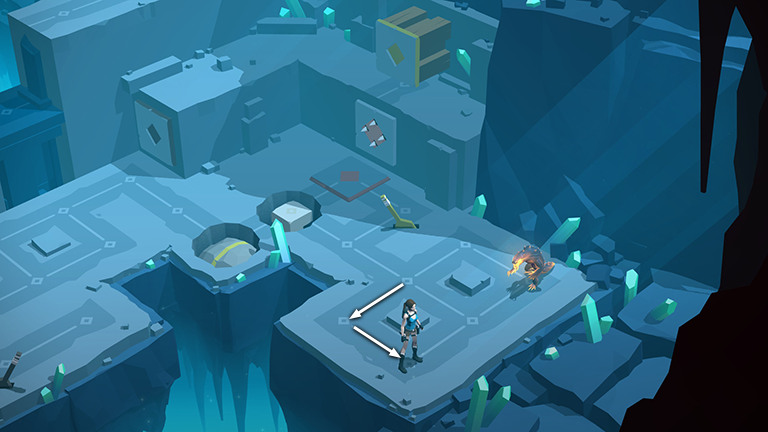
Move to the lower left, then to the lower right, in order to get the lizard's attention.
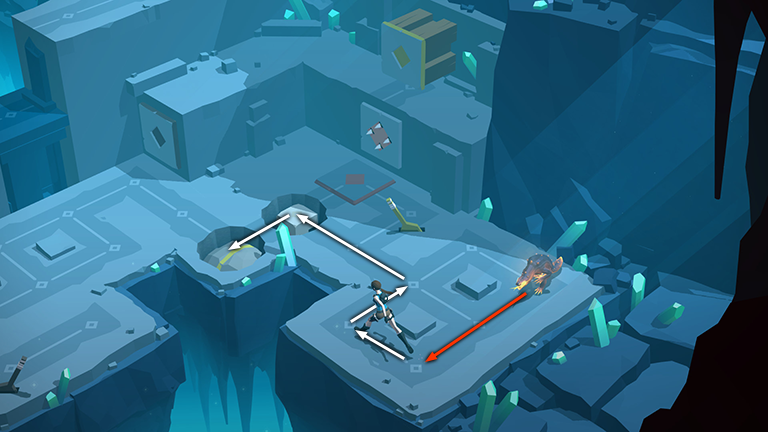
Now comes the fun part! Move back to the upper left, then the upper right. Then continue forward onto the sunken pillar, then left onto the sunken boulder. This time I won't bother tracing out the lizard's route. Just remember that it will continue to follow Lara, remaining two spaces behind the entire time.
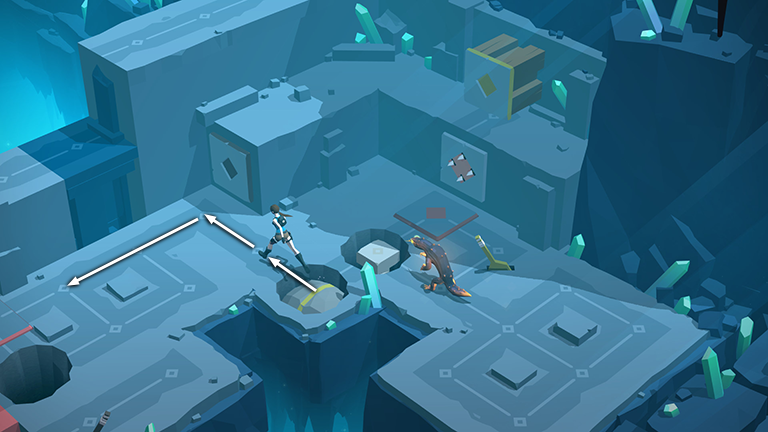
Move into the corner near the retracted block trap. Then move left toward the pink pressure pad.
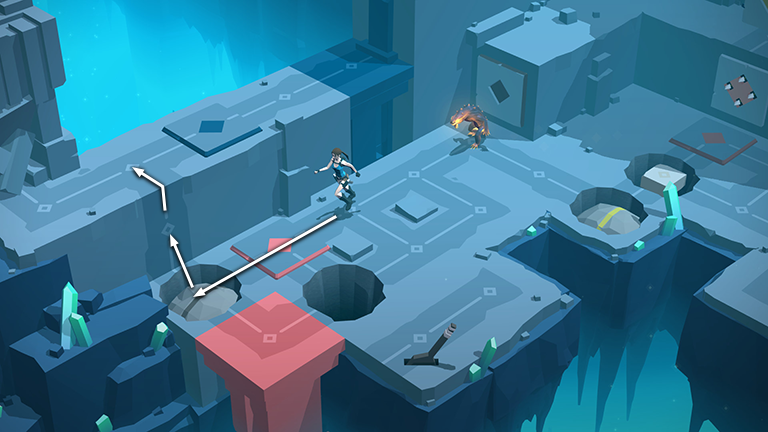
Step onto the pink pad, onto the boulder embedded in the floor, and then climb onto the ledge above.
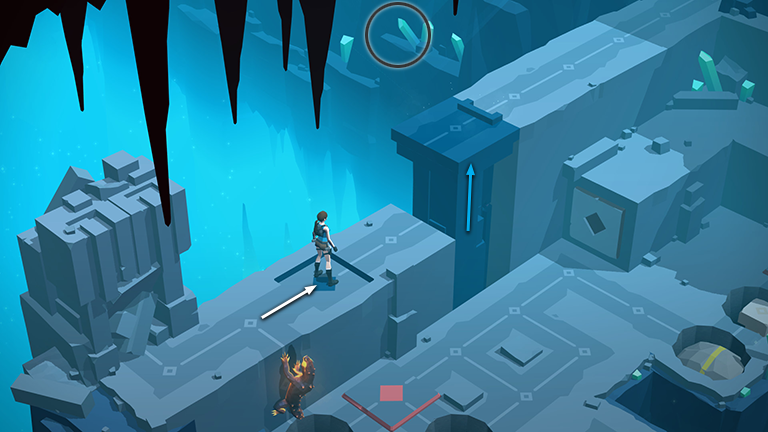
Step to the right onto the blue pressure pad. This raises the blue block ahead. Meanwhile, if you haven't taken any unnecessary steps, the lizard should just be climbing up the wall behind you. (If you missed the vase with the OBSIDIAN shard on the ledge in the background, smash it now.)
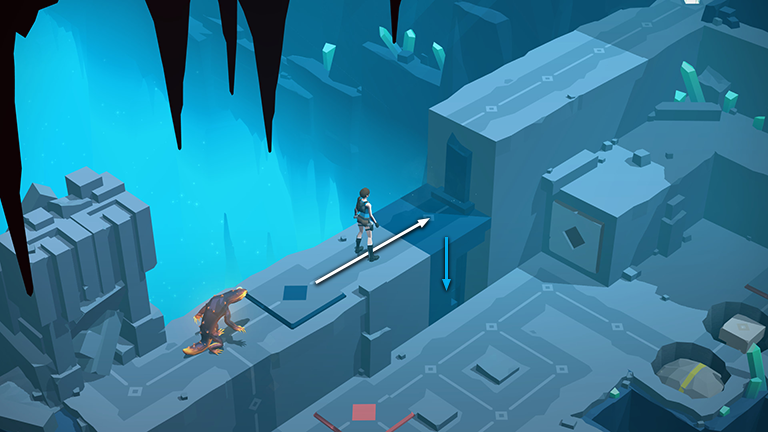
Continue to the right. When Lara moves off the pressure pad, the blue block sinks back to its original position so she can step onto it.
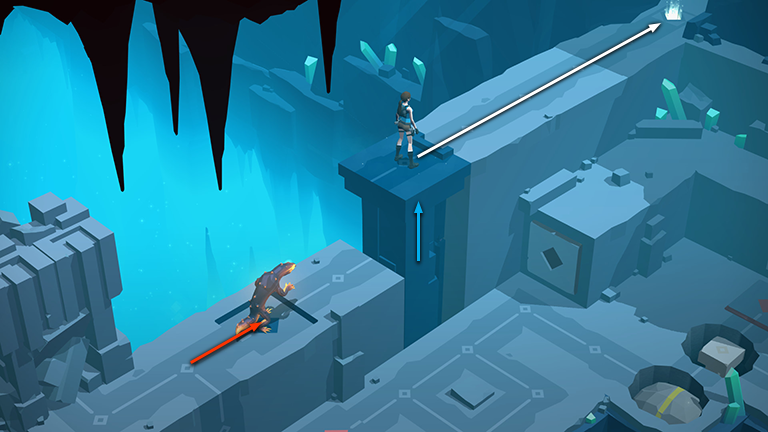
As Lara moves onto the blue block, the lizard should then move forward onto the pressure pad, raising the block with Lara standing on it. Now you can proceed to the exit.
†UPDATE HISTORY: 3/19/17 - Walkthrough first posted.
WAS THIS WALKTHROUGH HELPFUL? If not, I apologize and invite you to contact me with any questions. If you need help right away, I recommend the r/TombRaider subreddit. Other fan-run forums are listed at tombraiders.net/stella/community.html. If this site was useful, please consider supporting it financially or in other ways. For details, visit tombraiders.net/stella/support.html. As always, I welcome your corrections/suggestions. Thank you!
Copyright © - Stellalune ( ). Screenshots for the Shard of Life expansion levels were made using the Steam version of Lara Croft GO. Feel free to copy or print this walkthrough for personal use. Share it with friends if you like, but please include this credit line so people can send me their feedback. No part of this walkthrough may be reproduced on another site without permission. Follow this link for details about this site's advertising and privacy policy.
Stella's Tomb Raider Site: tombraiders.net.