IMPORTANT: If you haven't already done so, you may want to review the INTRODUCTORY NOTES on the storyline, controls, treasures/relics and saving/checkpoints. These appear at the start of the PROLOGUE walkthrough.
As always, I highly recommend that you do not rely exclusively on the autosave. Instead be sure to save manually at least once or twice each level. Then, if you miss something or run into a bug, you can reload rather than having to replay the entire level. Many common bugs are documented in this walkthrough. They are in hot pink text, like this, so they're easy to spot. I have also included an overview of major bugs without game spoilers. However, not every potential problem is covered here. So be safe; save often in new slots. In case you need them, Underworld Save Files for PC, PS3 and Wii are available.
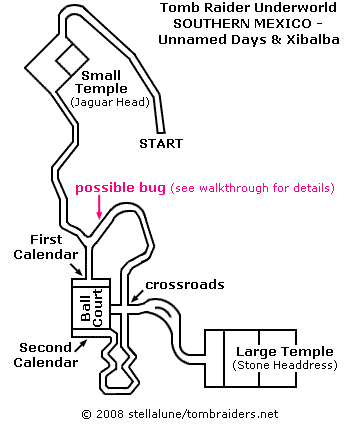
ONE MAJOR BUG IS TRIGGERED NEAR THE END OF THIS LEVEL. To avoid it, see the bug note in the walkthrough below.
Stella's Tomb Raider Underworld Walkthrough - For Windows PC, PlayStation 3, Xbox 360 and Xbox One
(PlayStation 2, Nintendo Wii and DS - click here)
LEVEL 4: SOUTHERN MEXICO - PART 1: THE UNNAMED DAYS | Updated: 4/30/09(†) |
Health Items: 3 Treasures: 9* Relics: 0 Keys/Puzzle Items: 1
Underworld Video Walkthrough by Eldincy‡
*There are 50 treasures in the entire Southern Mexico chapter. Nine of these can be found in this level. They are numbered 1/50 through 9/50 below.
At the beginning of the level you have the opportunity to choose which outfit you want Lara to wear—Jungle Heavy, Jungle Pants or Jungle Shorts—as well as your starting secondary weapon.
A cutscene shows Lara driving her motorcycle along a muddy track in the Central American rain forest. She arrives at the entrance to the nearby ruins and stops to have a look around.
NOTE: When the new level begins, you have access to several new journal entries. If you haven't played Tomb Raider: Legend and/or Anniversary, you may want to check these out. They mention Lara's history with Amanda and Natla, the Wraith Stone and Lara's doppelganger, as well as Lara's hopes and fears about finding Thor's Hammer.
ROAD TO RUIN: Drive forward into the man-made stone tunnel. Smash the clay jars inside on the right. You can do this with the bike, but you must still dismount to pick up the treasure (1/50) inside.
NOTE: The Southern Mexico map (below) shows the general layout of this area. It is not completely accurate or to scale, but it includes the main areas in this and the next level, along with the roads connecting them. The basic motorcycle controls are described in the on-screen training text (if enabled in the Game Options menu). Details are on the Underworld Controls page.
As Lara makes her approach, a brief cutscene shows a point of interest in a high window. Afterward, Lara is standing next to the bike.
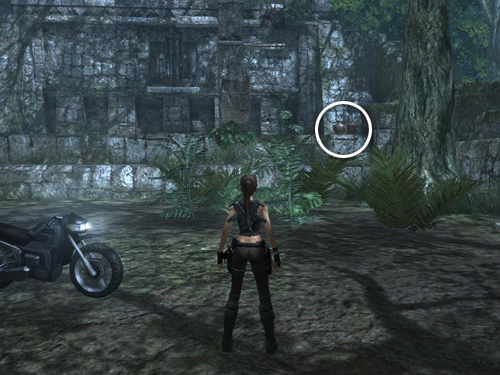
SMALL TEMPLE WITH CLOSED GATE: At this point, you can either drive right up to the small, ruined temple or head that way on foot. At the right end of the low wall in front of the building, there are more breakable jars, one of which holds a treasure (3/50). (This screenshot shows its location.)
To get inside the temple, first climb on top of the shorter of the two square pillars in front. Jump to grab the stone slab handhold on the taller column. Jump up to grab the handhold above and then climb around to the left. From there you can jump to the nearest handhold on the side of the building. (These screenshots show where to go.)
Jump straight up to stand on this narrow ledge, which is just above and to the right of the closed gate. Jump straight up twice more, then climb a bit father until Lara is hanging from the uppermost handhold in this group. Traverse to the left. Lara will clear the gap in the ledge without jumping. At the end of this ledge, lightly tap Jump + Left to reach the next handhold, which is one of three small stone slabs above a window-like opening. Climb down and to the left and then drop to grab the windowsill. Pull up into the room.
Attach your grapple to the metal ring and step backward out the window. Lara's weight pulls the lever, raising the gate to the right. When it's open all the way, adjust the length of the cable so Lara's feet are a little higher than the doorsill in front of the gate. Swing back and forth a couple of times. Then, when Lara swings to the right, jump into the doorway and go through before the gate closes again. (Again, check the screenshots if you need help with any of this.)
Approach the pedestal at the back of the small temple and take the carved JAGUAR HEAD.
Before leaving, pick up another treasure (4/50) in one of the clay jars in the alcove to the right of the jaguar pedestal (when facing away from it) and a health potion in one of the alcoves on the left. Just beyond the alcove with the health are two closely spaced walls that you can use to chimney jump to the ledges above.
Before climbing out the window, look down to spot a panther on the prowl below. You may be able to target it from above, but once it's been hit a few times, it will run off into the bushes. Instead, try this:
To get down without injury, hang from the windowsill and jump back to land on the beam jutting out from the tall, square pillar (as shown in the first of these screenshots). Pull up onto the beam, equip the tranquilizer gun and if the panther is still lurking on the ground below, shoot a dart to put the big cat to sleep. Then hang from the beam and drop to the ground.
Run toward the motorcycle but as you approach it, turn around to look at the temple. A second panther leaps down from the high window on the left. Quickly shoot it with another tranquilizer dart. You have about a minute from the time the drug takes effect to kill each cat before it wakes up. So you may want to start with the one you drugged first. Switch to pistols, go into Manual Aim mode, target the panther's prone body and fire. You'll know you're hitting it when you see spurting blood. Keep firing until you hear a yowl and the blood stops. Then you can be sure the cat is dead. Repeat for the second panther. (Again, check the screenshots if you need a visual.)
NOTE: You can also use manual aim with grenades here, but I don't recommend it. You will need your grenades for tougher enemies later in the level.
If you don't want to tranq the cats but would rather not get into close combat with them, you can also run to the bike, get on and use it to run down one or both panthers. The donut and power slide maneuvers can be useful here. Hold the Brake and rev the engine. Then steer to the left or right to spin in circles (donut), or drive forward then press Brake and Left or Right to skid (power slide). Both moves will injure any enemy that gets too close.
ROAD TO THE FIRST CALENDAR PUZZLE: After dealing with both panthers, drive away from the temple along the dirt road to the left. (Going to the right leads back to the beginning of the level.) Continue around the edge of the ruins, weaving between several low stone walls, until you come to a flight of stairs leading down into a man-made tunnel.
If you like, you can dismount here to collect a few treasures. The first treasure (5/50) is in a breakable jar just to the right of the top of the stairs. When facing the stairs, turn left and you'll see another clay jar containing a treasure (6/50) in a corner just ahead. From that spot, turn around and look ahead and to the right to find a third jar with yet another a treasure (7/50). (These screenshots show the locations of the three secrets.)
Get back on the bike and drive down the stairs and through the tunnel. (NOTE: The motorcycle headlight control is the same as the one for the utility light.) After you emerge on the other side, the track twists and turns through the undergrowth but doesn't split until the next set of ruins is in sight. Here you'll see another path leading off to the left. Head to the right here. DO NOT GO TO THE LEFT.
IMPORTANT BUG NOTE: There is a potentially game-killing bug at the beginning of the third Mexico level, The Midgard Serpent, which Eidos support believes is triggered in this area. If you go to the right, toward the visible ruins, you should not encounter the bug. Still, I recommend saving manually before continuing and not overwriting that save until you've finished Southern Mexico. That way, if you do experience the bug, you'll have a "clean" save from which to reload. If you rely on the autosave, you may get stuck and have to replay a large section, possibly even the entire game. Additional details appear in the Midgard Serpent walkthrough and on the Spoiler-Free Bug Notes page.
As you approach the ruins, stop the bike and dismount. On the left near a partially collapsed stone wall, you'll find a health potion and a couple of clay jars, one of which holds a treasure (8/50). (This screenshot shows the spot.) Get the pickups and continue forward toward the building.
FIRST CALENDAR PUZZLE: Usually the corpses turn up after Lara's been for a visit. Here, however, the dead hunters on the steps warn of other hazards in the area. The coast is clear for the moment, though.
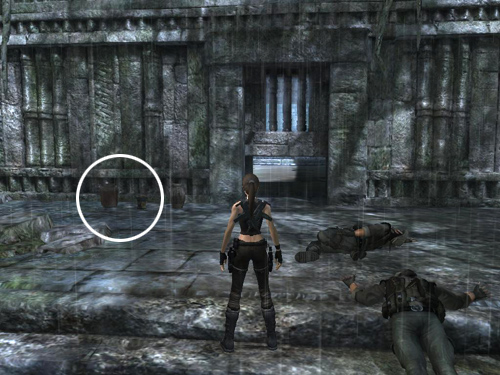
At the top of the steps, just to the left of the low opening leading inside, you'll find another health potion and another treasure (9/50). (The goodies are circled in this screenshot.) Get them and roll through into the room beyond.
When Lara approaches the stone circle, a cinematic sequence begins. "The Mayan calendar had only 360 days," Lara explains as she videotapes the elaborate mechanism. "The remaining five were the 'Unnamed Days'. The Maya believed that each year when the Unnamed Days arrived, the gates to the underworld would open."
†UPDATE HISTORY: 12/8/08 - First draft posted online.
12/17/08 - Added map graphic.
4/25/09 - Made numerous small changes for accuracy and clarity, including correcting the trigger for the second panther near the small temple. Thanks to Random Matt for pointing that out. Also thanks to the many players who wrote in to suggest the donut maneuver for running over the panthers with the motorcycle.
4/30/09 - Added tranquilizer tips, thanks to a suggestion from Mike J.
‡NOTE ON VIDEO GUIDES: Eldin's videos don't always follow the same strategies I use in my walkthroughs, but if you prefer that format, I think you'll find them very helpful.
WAS THIS WALKTHROUGH HELPFUL? If not, I apologize and invite you to contact me with any questions. If you need help right away, I recommend the r/TombRaider subreddit. Other fan-run forums are listed at tombraiders.net/stella/community.html. If this site was useful, please consider supporting it financially or in other ways. For details, visit tombraiders.net/stella/support.html. As always, I welcome your corrections/suggestions. Thank you!
Copyright © 2008- - Stellalune (). All rights reserved. The screenshots and videos included here were made using Fraps. Feel free to copy or print this walkthrough for personal use. By all means, share it with friends, but please include this credit line so people can send me their feedback. No part of this walkthrough may be reproduced on another site without permission. Follow this link for details about this site's advertising and privacy policy.
Stella's Tomb Raider Site: tombraiders.net.