INTRODUCTORY NOTES
STORYLINE: Tomb Raider: Underworld is the sequel to Tomb Raider: Legend and also includes references to the original Tomb Raider and its more recent remake, Tomb Raider: Anniversary. If you haven't played those games, you may have some difficulty following the plot of Underworld. For a refresher, go to Underworld's main menu, select Extras, Trailers & Credits, then "Previously On Tomb Raider...."
CONTROLS: These are explained in detail on my Underworld Controls page. They are also customizable from the Game Options menu. If you haven't played Legend and/or Anniversary, I recommend turning on the Helper Buttons and Training Text in the Game Options menu. These provide on-screen hints to help you learn the controls.
The Underworld Controls page also includes information on inventory, weapons, health items, treasures and relics, unlockable content, including Xbox 360 Achievements, and much more. I encourage you to check it out.
SAVING AND CHECKPOINTS: Like the last two games, Underworld has autosave checkpoints. Whenever you pass a checkpoint, the game is saved automatically. Then, if Lara dies or you quit the game and restart, the game reloads at the last checkpoint.
I highly recommend that you do not rely exclusively on the autosave. Instead be sure also to save manually at least a few times in each level. Then, if you miss something or run into a bug, you can reload rather than having to replay the entire level. Although there is an audible chime when you pass most checkpoints, there is no visual indicator on screen, as there was in previous games. And some checkpoints don't even have chimes, so I have given up on the idea of noting the location of all checkpoints in the walkthrough, as I have in the past.
SECOND PLAY-THROUGH: If you've completed the game and want to replay certain levels to obtain artifacts and relics you missed the first time, choose Treasure Hunt from the main menu and then select the level you want to replay. Starting a new game, either during the first play-through or after beating the game, can result in a bug in which any treasures and relics you found previously are missing. As far as I know, the only solution is to delete all save files (on the PC these are located in the My Documents > Eidos > Tomb Raider - Underworld folder) and then select New Game. If you have the PC version, you may also need to uninstall and reinstall the game to start from scratch.
PROLOGUE: NO ILLUSIONS | Updated: 3/22/09(†) |
Health Items: 1 Treasures: 0 Relics: 0 Keys/Puzzle Items: 0
Cinematic: The game begins with a huge explosion that leaves Croft Manor in flames.
From the starting point, move forward along the hall and around the next two corners, avoiding the open flames, which will injure Lara. Jump up to grab the low wall; jump again to pull up to the level above. Continue up the stairs. Stand near the electrical box and press Interact to throw the switch opening the nearby door. Go through.
Go to the right and roll through the low opening under the fallen beams. (Press Forward + Crouch to roll.) Go around to the left and climb onto the flat-topped pile of stones. Step to the edge and face the wooden door with the metal ring on it. Press the Grapple key to fire Lara's grapple at the ring. Then press Interact to pull the door off its hinges. Hop down and go through the doorway.
There's a first aid kit on the floor just ahead. To pick it up, stand over it and press Interact. This item will be stored in your inventory until you need it. If Lara becomes injured, press the Use Health Pack key to heal.
NOTE: In this game there is no limit to the number of health items Lara can pick up; however, Lara's inventory is reset at the start of each new level. So don't bother hoarding health packs, except in the later levels, where you may need them toward the end for more difficult encounters.
Stand at the edge of the hole in the floor facing the narrow light-colored band of molding on the wall ahead. (This screenshot shows the spot.) Jump across the flaming pit to grab the molding. Climb to the left and then jump up to grab the strip of molding above. Climb to the left some more until Lara is hanging above another strip of solid molding. Press Crouch to drop and grab it. Continue climbing to the left. When you can't go any farther, press and hold Back to lean away from the wall. Then press Jump to leap off and land on the solid floor behind.
Stand next to the ornate lacquered chest and press Interact to grab it. Use the direction keys or left stick to push it forward toward the wall. Then climb on top of it and jump to grab the horizontal molding on the wall. Climb to the right as far as Lara will go. Don't worry about the flames inside the wall. They won't hurt Lara. Jump to the right to land on the safe floor ahead.
As you approach the next door the floor collapses, leaving another flaming pit. Take a take a running jump across to the doorway. Continue forward into the main hall of the manor.
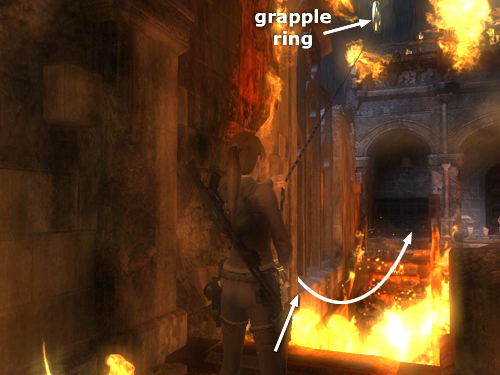
Turn left and go to the end of the balcony. Then turn right to face out over the flaming staircase. Position the camera behind Lara so you can see the metal ring on the ceiling above. Press the Grapple key to fire the grapple, anchoring it to the ring (as shown in this screenshot). Run and jump off the edge and Lara will swing across the flames. If she has enough momentum, just press Jump as she nears the far balcony and she'll detach the cable and land there. Otherwise, keep the camera pointing forward and press and hold the Forward direction key (or push the left stick forward if you're using a gamepad or controller) to swing back and forth. When you've built up enough momentum, wait for Lara to swing toward the far balcony and then press Jump to land there.
NOTE: You shouldn't need to do it here, but if you find that Lara is hanging too low or high on the cable to make the jump, you can adjust the length of the cable by holding the Interact button and pressing Up or Down. Later this will come in handy for rappelling.
Turn right and move along the balcony to the gap in the railing. Step off to grab the edge and then drop to the floor.
In the ensuing cinematic sequence, Lara spots her long-time helpers Zip and Winston near the main entrance. Zip aims a gun at Lara and fires. Winston tries to intervene, but Zip seems determined to stop Lara from following them. Apparently he knows or suspects something that neither Winston, Lara or we, the players, do.
NOTE: If you're having trouble understanding the dialogue, you can turn on subtitles in the Audio/Visual section of the Main Menu.
†UPDATE HISTORY: 11/24/08 - First draft of walkthrough posted online.
3/22/09 - Made several small changes for clarity while editing the entire walkthrough, but nothing major was changed in this level.
WAS THIS WALKTHROUGH HELPFUL? If not, I apologize and invite you to contact me with any questions. If you need help right away, I recommend the r/TombRaider subreddit. Other fan-run forums are listed at tombraiders.net/stella/community.html. If this site was useful, please consider supporting it financially or in other ways. For details, visit tombraiders.net/stella/support.html. As always, I welcome your corrections/suggestions. Thank you!
Copyright © 2008- - Stellalune (). All rights reserved. The screenshots and videos included here were made using Fraps. Feel free to copy or print this walkthrough for personal use. By all means, share it with friends, but please include this credit line so people can send me their feedback. No part of this walkthrough may be reproduced on another site without permission. As an Amazon Associate I earn from qualifying purchases. Follow this link for details about this site's advertising and privacy policy.
Stella's Tomb Raider Site: tombraiders.net.