Stella's Tomb Raider Legend Walkthrough - Windows PC, PlayStation 2, Xbox, Xbox 360, GameCube, Wii & PSP
NOTES ON WALKTHROUGH FORMAT: Because enemies don't always drop the same items each time they are killed, the number of item pickups can vary. Instead of counting them, as I have in previous walkthroughs, I have indicated the types of items that drop in the intro for each level. The text then gives details.
Also, now that subtitles are available and it is possible to review all cut scenes from the Extras menu after completing a level, I will no longer transcribe each cinematic. Instead, I'll give a brief synopsis in italics, along with the name of the cut scene so you can reference it in the Extras menu.
Checkpoints are numbered in the text to correspond with PC savegame files (available on the savegame page). In theory, you can save at any point during the game, but when you reload (either by choice or automatically after Lara dies), the game returns Lara to the last checkpoint. This system is frustrating for players who like to make frequent saves during difficult sequences, but it has the advantage of preventing you from saving as Lara is about to die. I still recommend saving manually at least a few times in each level. That way if you miss something or run into a bug, you can reload rather than having to replay an entire level.
Legend Demo: The PC and Xbox 360 demos for Legend are nearly identical to the Bolivia level in the full game, except that you cannot save (the game still autosaves at each checkpoint); there are no bronze, silver or gold rewards; there are no jaguars (human enemies are the same); and the demo ends after the movable cage puzzle. (See the Legend Downloads page for links to the PC demo. The Xbox 360 demo is available through Xbox LIVE.)
DVD COPY PROTECTION ERROR: A common glitch in the PC version of the game is a malfunction in the DVD copy protection resulting in the error "Please insert the original instead of a backup(1000)". If you're using an original copy of the game and you still get this error, it may help to eject the DVD, insert it again, then choose Play from the Autorun menu. If that doesn't work, you may need to update your DVD drive's firmware. To do that, go to the manufacturer's web site and search their support section for your hardware model. Or, visit Securom.com for support.
LEVEL 1: BOLIVIA - TIWANAKU | Updated: 9/28/09(†) |
Items: health packs, submachine gun, assault rifle, ammo
Enemies: mercenaries, jaguars
Rewards: 10 bronze, 5 silver, 1 gold (*)
Time Trial: 12:30 (**)
The game begins with a cut scene ("Nepal - Part 1"), in which young Lara and her mother, passengers on a private plane, crash in the Himalayas. Those who've followed Lara's biography since the early days will recognize this as a crucial event in our heroine's history.(***)
Segue to the present in a second cut scene ("Meet Tiwanaku"), in which Lara works her way up a cliff side, all the while chatting over her headset with her assistant Zip, back at Croft Manor. Alister arrives at Zip's location and we hear his comments too. Lara explains that she's been searching for certain artifacts and received a tip from a friend about the nearby ruins.
NOTE: If you're having difficulty understanding what's being said, activate subtitles in the Options menu under Language.
UPSTREAM TO THE TEMPLE: From the starting point (CHECKPOINT 1), go forward and left to find a bronze reward (1/10) under the stone archway. (This screenshot shows the spot.) Continue through the archway and out the other side, wade across the stream and climb onto the ledge ahead.
Here you'll find some small boulders that Lara can kick by pressing Interact (E on the PC, Triangle on the PS2, Y on the Xbox), the rough equivalent of Action in earlier games.(****) There's no purpose to this except to practice the controls. You'll also find another bronze reward (2/10) ahead on the left, tucked into a corner. (screenshot) Grab it and return to the pool below the falls.
Jump into the water and swim across to the small ledge. Just press Forward and Lara will climb out. (The Controls page covers swimming.) In a brief cinematic (titled aptly enough "PDA Check"), Zip asks Lara to check her PDA, which seems to be waterproof. Press Tab (Select/Back) to access Lara's PDA at any time.
Now you're back on the same side of the stream where you started. Stand facing the ledge and jump straight up. Lara will grab the edge automatically. Jump again to pull up. Ahead on the left is a large boulder. Position Lara next to it and press Interact to grab it. Then tap Forward to push it off the ledge. Now that the way is clear, take a running jump across the gap to CHECKPOINT 2.
Approach the cliff wall and climb the vine. Press Forward and Lara climbs automatically. Press Right and Jump to leap and grab the other vine. Climb a bit higher if necessary. Then jump to the right again to reach the ledge. Continue to the right along the ledge to CHECKPOINT 3.
NOTE: If you're replaying the level or doing a time trial, there's a handy shortcut here. Instead of swinging to the cave, or to the opening behind the falls, climb up the vine and swing all the way up to the waterfall. Details are shown here. Be warned that you miss the next reward if you go this way.
If you're following the normal route from checkpoint 3, jump forward to grab the dangling vine. The obvious path is on through the falls. Instead take a detour for a reward: While hanging from the vine, turn left to face the cave between the ledge where Lara was just standing and the waterfall. (These screenshots show where you're headed.) Swing toward the cave and jump from the vine into the opening. (The in-game instructions explain how the keys work. Check your booklet or the Controls page for more info.)
As you head into the dark cave, activate Lara's Personal Light Source (Delete/D-Pad Left), a fancy name for a flashlight. Follow the tunnel around to the right to find a silver reward (1/5). Continue along the passage and drop down into a lower tunnel. The waterfall is back to the right, so go left (uphill).
When you emerge into the light, take a running jump across the gap to grab the ledge on the other side.
NOTE: The saving grab is a new feature in Legend. When jumping to grab a ledge, pole, or other handhold, occasionally Lara will fall a bit short and grab on using only one hand. When this happens a warning icon appears (a yellow hand on the PC, Triangle button on the PS2, Y button on the Xbox). Quickly press Interact to grab with both hands; otherwise Lara will fall. This may not happen right here, but you will see it throughout the game.
If Lara does fall, retrace your steps, this time skipping the cave where you found the silver reward and instead vine-swinging directly to the ledge behind the waterfall.
When you clear the gap, the camera pans to show the route Lara will take next.
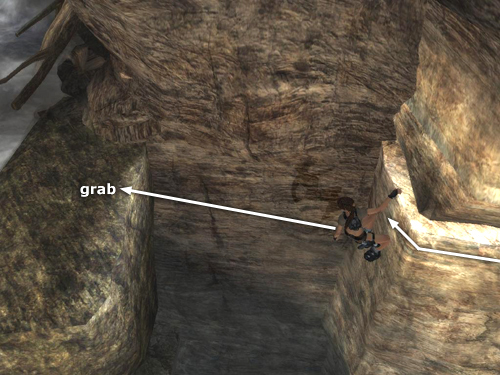
Notice how her head also turns to look up at the narrow ledge running along the rock wall. Move toward the wall, jump to grab that ledge and traverse to the left above the tunnel opening where you emerged earlier and on toward the falls. When you climb around the last corner and reach the end of the ledge, Lara will then need to jump and grab the ledge behind her. To do this, press and hold the direction key (or tilt the left analog stick) in the direction that makes her lean away from the ledge she's holding (as shown in this screenshot). Then press Jump to leap off and grab the ledge across the gap. Jump again to pull up. You are now back at the stream, this time above the falls. Step forward to trigger CHECKPOINT 4.
If you want to play around a bit, you can save here and then practice Lara's swan dive. To dive, stand near the edge and press Forward, followed immediately by Jump and Duck. Just be sure to aim for the pool, not the rocks below. Then either climb back up or reload your saved game.
When you're ready to move on, turn upstream. Here you can use the binoculars to scope out the huge boulder hazard ahead. Activate the binoculars (Page Down/D-Pad Left), zoom in and out (H/G or mouse wheel/R1 and L1/RT and LT), then press Interact (E/Triangle/Y) to engage RAD mode. When Lara has the boulder in her sights, the "Fragile" icon lights and she'll comment on it. Press the binocular button again (Page Down/D-Pad Left) to return to normal view.
Move off to the left side of the stream and shoot the debris holding the boulder in place to send it rolling downstream. (To enable manual targeting, press Z/R3/right stick button then shoot with the left mouse button/R1/RT. Tap Z/R3/right stick again to return to normal targeting.) Or just continue ahead on foot, hugging the left wall when the boulder rolls.
Continue toward the low waterfall. Run up the angled rock and jump to grab the nearest of the two horizontal branches. Move to the left side of the branch. Position the camera behind Lara and then press Forward to swing around the branch. Jump just as Lara starts to swing upward to let go and grab the second branch. Repeat the swing-and-jump maneuver to grab the horizontal crack in the wall to the left of the falls. Traverse to the right and jump to the right to grab onto the ledge beyond the waterfall.
In a brief cut scene ("First Contact") Lara overhears a mercenary talking into his radio.
Pull up and shoot him before he notices Lara. He may drop a health pack. Look for a red object on the ground where he died then just run over it to pick it up.
Continue upstream. Here the game explains how to use the binoculars, which you already know if you read the section on the boulder (above). RAD mode reveals that both the boulder on the ledge and the fallen tree below are movable. Before dealing with them, follow the stream around to the left to find a bronze reward (3/10). (screenshot)
Turn to face downstream. Climb onto the light-colored, sloping rock and jump onto the fallen tree. Before Lara's weight pushes the base of the tree downward, run to the end and jump to grab the top of the moss-covered, man-made ledge. Press Jump again to pull up. (Alternatively, grab the narrow horizontal shelf running along the middle of the man-made ledge, traverse around the corner to the right and jump straight up to grab the higher ledge. Jump again to pull up.) Push the boulder off the ledge and onto the fallen tree, raising the end with the branches. Jump down from the ledge onto the angled rock. Run up the rock and jump to grab the protruding horizontal branch. Swing around it and jump to grab the rock ledge ahead. Pull up and move forward to CHECKPOINT 5. (This sequence is shown in these screenshots.)
ENTERING THE RUINS: The shiny disc blocking the doorway can be moved using Lara's magnetic grapple. The on-screen training text explains how it works: Press Grapple (Q/Square/X) to fire the grapple, Interact (E/Triangle/Y) to pull the object and Grapple again to detach the cable.
NOTE: Objects that can be grappled generally have that telltale metallic shine. You'll see many more of these as you go along. The Controls page covers manual targeting with the grapple.
Crossing the threshold triggers a cut scene ("Second Contact"), in which Lara sneaks up on a pair of mercenaries gossiping.
This is a good spot to practice your combat skills, since the checkpoint is close by in case Lara dies. Combat is different than in previous games. In addition to guns, Lara now has an arsenal of other combat maneuvers, including melee attacks. Targeting is somewhat automatic, but you can change targets by moving the mouse/right stick. You can also choose from several different Combat Modes, which determine how and when Lara will draw and holster her weapons. Check your instruction booklet and/or the Controls page for details.
After dispatching the mercenaries, see if either dropped a health pack and pick it up.
NOTE: Lara can only carry 3 health packs. No more bottomless backpack as in previous games.
Face the waterfall and stand on the low rock outcropping below. Jump to grab the narrow ledge and traverse to the left. Tap Interact (E/Triangle/Y) to get across before the ledge crumbles away. If Lara doesn't make it, try again, jumping sideways to clear the broken area. Lean away from the wall and jump to grab the horizontal pole behind Lara. Still hanging, turn to face in the opposite direction. Then swing around the pole, jump and grab the crevice on the square column. Traverse around the corner to the left as far as Lara will go. Then jump to the left to grab another handhold. Jump up twice to reach a flat ledge and CHECKPOINT 6.
Turn to face the falls and walk to the edge near the hanging vine. It's difficult to spot from here, but there's a bronze reward (4/10) in an alcove behind the falls (shown in this screenshot). Use the magnetic grapple to snag the reward and then jump to grab the vine. Swing and then jump to the ledge behind the falls just to the right of the alcove that held the reward.
Turn to face out over the open area below. There are two horizontal poles (sculpted chameleons' tongues, actually) high on the left wall. Take a running jump to grab the first. Swing and jump to grab the second. Swing around again and jump to land on the path ahead. This is CHECKPOINT 7.
There's a mercenary ahead on the right behind the rocks. Watch out for the sheer drop-off to the left as you fight him. Pick up a health pack if he drops one.
NOTE: In Time Trial mode, you can take a small shortcut here. After grabbing onto the vine, instead of swinging to the ledge with the bronze reward, turn about 120 degrees to the right. Swing as high as possible and jump to the narrow, uneven ledge below the square pillars. Either run along the ledge and jump onto the broken bridge to the left, or climb through the third opening from the left, and the mercenary will not appear. If you go through the first or second opening, you will meet the mercenary. Alternatively, instead of using the vine, climb onto the corner of the low wall and jump to the ledge below the square pillars then onto the broken bridge. This jump is a bit trickier to land, but it saves even more time. (These screenshots show where to jump.)
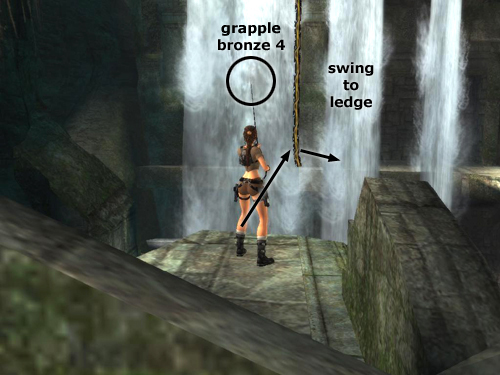
Where the mercenary had been lurking, there's a wide gap where you'll need to use the magnetic grapple to swing across. The training text explains how to grapple-swing: Take a running jump into the gap and quickly press the Jump key twice to grapple the metal disk above. Hold Forward to swing back and forth, gaining height. Then, when Lara swings toward the opposite edge, press Jump to leap off.
On the other side of the gap, climb the stairs. Lara looks up to the left to spot a bronze reward (5/10). Use the magnetic grapple to pull it down. (screenshot) If Lara won't grapple the reward by simply facing it and pressing the Grapple button then Interact, try using manual aim. Once you have it, continue along the path to the temple.
A cut scene ("Falling In Love Again") shows Lara discovering the ruins. Naturally the bad guys are only a few steps behind.
TEMPLE EXTERIOR: Just beyond CHECKPOINT 8 the game educates you about the environmental hazard indicator (a yellow triangle with an exclamation point on the PC, Triangle icon for PS2, Y icon for Xbox). This appears on objects that can be shifted, blown up, etc., thus causing damage. To kill the 2 mercenaries from here, hold Interact (E/Triangle/Y) for several seconds to shoot the rubble, dislodging some loose rocks, which roll down and crush the bad guys. (Ouch!) If one or both survive, slide down and finish them.
When Lara reaches the base of the slope, 2 more mercenaries appear on the ledge to the left. Kill them and pick up any health packs dropped so far.
Before going on, get the bronze reward (6/10) tucked away in the far right corner (i.e., right if Lara's back is to the slope; this screenshot shows the spot). Then continue up the path toward the dangling vine, where you'll meet another mercenary. Kill him and pick up the SUBMACHINE GUN.
NOTE: Unlike health packs and ammo, which are added to Lara's inventory when she runs over them, weapons must be picked up manually by pressing Interact (E/Triangle/Y). To switch weapons while fighting, press End/D-Pad Down. The HUD shows the number of rounds in the current clip, as well as available backup ammo for that weapon. The PDA is updated as you go along to include information about each new weapon, including the maximum number of rounds Lara can carry for that gun.
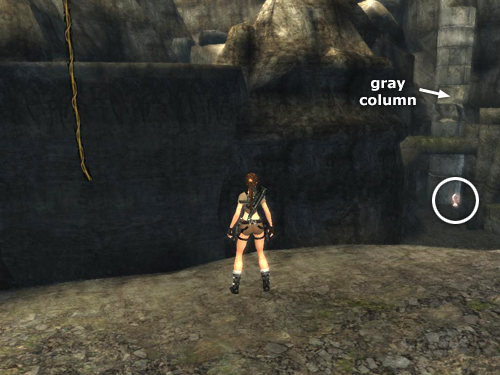
Move to the edge of the low ledge near the dangling vine. Hop down and head to the right and forward to find another bronze reward (7/10) near the tall, gray column. (screenshot) Lara can grab it from a distance with the magnetic grapple.
Backtrack to the ledge below the vine, use the low block to climb up and then jump to grab the vine. Swing across the gap to the higher ledge.
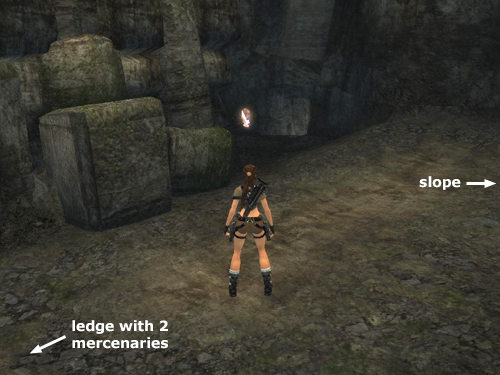
Don't rush down the hill yet. You can't see them all, but there are 6 mercenaries down there: 4 near the small bridge and tall, gray pillar and 2 more behind the Jeep. You can even the odds a bit by taking out a few of them from the hillside. Move to the edge and position Lara near the big, tan boulder (as shown in the first of these screenshots). Hold the Target Lock key. You should then see the Interact icon on the tall, gray pillar, indicating that it is another environmental hazard. If not, inch forward a bit until the icon is visible. Wait until one of the soldiers is standing beneath the pillar and then press Interact to fire and topple it onto the enemy.
You can also shoot one or both of the first two soldiers from the top of the slope using pistols. (Save the SMG for closer combat.) Again, hold Target Lock. A red targeting reticle means the enemy is within range, but even if the reticle is gray, some of Lara's shots should connect. (Check the screenshots and the Combat section of the Legend Controls page for more info.)
Slide down the slope and begin to draw out the other mercenaries. When fighting groups like this, try to advance gradually so you don't have to engage all of them at once. Once the fighting starts, either keep moving or take cover where you can (e.g., behind the breakaway stone walls, Jeep, etc.). Use health packs as needed, but try to wait until Lara's health is below 50% before doing so, otherwise you're wasting them. Then run over any health packs enemies drop to add them to your inventory.
A few soldiers drop SMG clips. You'll also find the RC650 ASSAULT RIFLE, which you have to pick up manually, and several clips for it, which are added to your inventory when you run over them.
NOTE: Lara can only carry one secondary weapon in addition to her standard pistols. Picking up a gun causes her to drop any other secondary weapon she's carrying. If you want a more powerful, close-range weapon, take the SMG. If you'd like something with greater range, take the assault rifle. You'll have other chances to swap weapons later.
If you missed bronze reward 7 below the small stone bridge, you can snag it now using the magnetic grapple (screenshot). If Lara happens to fall off the bridge, work your way back around, via the swinging vine, to the top of the slope and then slide down again.
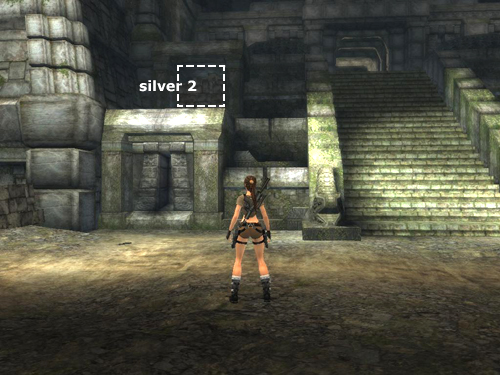
After picking up as much gear as you can, turn and face the temple. Examine the front of the building. (Use the binoculars in RAD mode if necessary.) A crumbling stone panel on the middle level to the left of the stairs conceals a silver reward (2/5). (The exact spot is shown in this screenshot.) Climb up, shoot the stones and grab the idol. Climb back over to the steps and enter the temple. (NOTE: If you avoid the steps by climbing the ledges, you won't trigger the cut scene.)
Lara confronts another pair of mercenaries in a brief cinematic ("Death by Irony"). You don't get to fight them, though, as they are finished off by a deadly trap.
TEMPLE ENTRANCE: Pick up the rifle ammo dropped by one of the men and then descend the short flight of steps to CHECKPOINT 9.
Watch out for the deadly spike trap beneath the floor ahead. It's not difficult to make out which sections of floor retract. Be sure to open them all before attempting to cross. Do this by walking forward to the edge of the pit or kicking one of the small boulders into the trap. Then grapple-swing to the other side of the pit. If you try to swing out before all of the floor panels are open, the cable can get stuck causing Lara to fall into the trap.
Go up the stairs. Before entering the ROOM WITH PULLEY AND CHAINS, go into the narrow passage to the left, where you'll find a bronze reward (8/10). (These screenshots show where to go.) Return to the main passage and go left to the chain room.
The camera pans to an opening high on the wall near the chains. Over the headset, Lara hears Alister and Zip speculate on the purpose of the mechanism. She, however, would rather do than discuss.
Lara must climb the 2 vertical chains to reach that raised opening. (These screenshots show the sequence.) Enter the room with the chains and climb the chain on the right until the spherical metal weight prevents you from going any higher. If you're not used to this style of camera control, it may help to turn Lara so she's facing the other chain. Then move the camera directly behind her by pressing the center-camera/display HUD button (J/L2/LB). Adjust Lara's angle if necessary until she's squarely facing the other chain. Then jump forward and she should grab it.
NOTE: It really doesn't matter which way Lara is facing when you jump as long as the camera is pointed where you want her to go. But centering the camera behind her makes it easier to aim for the chain.
Once Lara is hanging from the second chain it begins to descend. So climb quickly. As the on-screen hint suggests, you can tap Interact in time with Lara's movements to climb faster. As soon as Lara is higher than the round weight on the other chain, jump to grab onto that chain above the weight. Again, you can turn Lara toward the chain if you like, but it doesn't matter which way she is facing. Just point the camera directly toward the first chain and jump forward and she should catch it. If you don't climb fast enough, the oblong weight on the chain Lara is holding will prevent her from climbing high enough to clear the round weight on the second chain. If that happens, drop down and try the whole thing again.
When you have grabbed onto the first chain above the round weight, you can take your time. Climb up so Lara is level with or just above the raised opening in the wall. Point the camera toward that opening and jump forward to land there.
Follow the tunnel to another small room with a chain. Jump to grab it and slide down or just hang from the opening and drop to the floor. There's only one way out. Follow the passage to CHECKPOINT 10.
FLOODED PASSAGEWAY: Jump into the pool and swim down and to the right. Continue straight ahead and then up to the surface. Climb out on a small ledge where you'll find a bronze reward (9/10) hidden behind some rubble. (screenshots) If you look back into the water from this ledge, you'll see the tunnel you came from on the left. It's dimly lit and sort of purple. Jump into the water and swim down through the brightly lit tunnel on the right. Surface and climb out of the water near CHECKPOINT 11.
TRAPPED CORRIDORS: A jaguar lurks to the left at the bottom of the ramp. If you get a target lock on it and then back up the ramp, it won't follow and you can shoot it from safety. Otherwise, maintain some distance as you fight it. If it gets too close, it will knock Lara down.
When it's dead, go down the steps and advance carefully to the pounding block trap. Stand at the center where the blocks meet and start running forward just as they slam together. They should then start to open as Lara runs through. If necessary, jump or roll near the end to clear the trap before it closes.
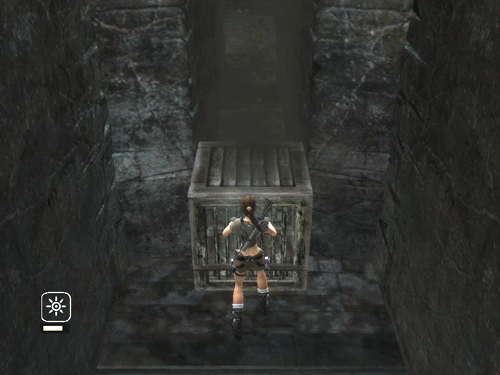
A longer series of block traps lies ahead. This time use the movable cage to protect Lara as she goes through. Press Interact (E/Triangle/Y) to grab the cage and use the direction keys (left stick) to push the cage ahead of Lara through the trap. When you've pushed the cage between the first and second set of blocks (as shown in this screenshot), it should keep both sets open. Climb over it and run through the rest of the way. If you try to push the cage all the way through, Lara will be crushed once the cage clears the trap and she's still in it. Continue to the next room and CHECKPOINT 12.
A short cut scene reveals various points of interest.
LARGE ROOM WITH CAGE & PRESSURE PAD PUZZLE: Before attending to the puzzle, kill the jaguar lurking down below in the flooded area. To do this without injury, go to the end of the central walkway, taking care not to fall off, and shoot the cat from above using pistols (as shown in this screenshot).
OPENING THE EXIT: The way out is on the high ledge at the far end of the room. To open it you must activate the 3 square pressure pads on the long ledge near the entrance. The left and right pads control the huge gears on each side wall. The center pad actually raises the door. All three pads must be depressed at the same time for the mechanism to work. You'll need 2 of the 3 movable cages. Lara will press the third pad. (This series of screenshots shows the entire process. There's also a video tutorial detailing everything from entering this room to leaving with the 3 available rewards.)
Drop down off the left side of the walkway near the seesaw-like stone structure. First, pull the cage out from beneath the end of the seesaw. Then push it onto the lowered end. Climb back onto the walkway and go to the top of the small flight of steps at the end. Jump onto the raised end of the seesaw to catapult the cage up onto the ledge. (Again, check the screenshots if necessary.)
Alternatively, you can jump from the middle of the seesaw onto the raised end, but this doesn't always propel the cage all the way up to the ledge. So, although you save steps, you may end up wasting time if you have to repeat the process.
Once the cage is up on the ledge, climb up and move the cage past the nearest pressure pad and onto the center pad.
The second cage you'll use is already on the upper level; it's against the back wall, on the left when facing the entrance. Go past it and climb into the alcove next to the vertical chain to find a bronze reward (10/10). (This is also included in the screenshot series.) After grabbing the reward, move the cage onto the closest pressure pad, unlocking the huge gear on the right wall.
Then stand on the remaining pad. A brief cut scene shows the gear on the left wall unlocking and the exit opening.
NOTE: If you're playing the demo version, there are no rewards, so there's no need to do anything else here. Skip down to the section "CLIMBING TO THE EXIT." The demo finishes after you leave this room.
In the full game there are 2 hidden rewards here, both gold and silver. To get the gold, you'll need to fiddle with the door mechanism a bit more. Assuming you're still working with 2 cages and Lara herself as the third weight, leave the cage on the pad on the right (i.e., right when facing the exit). Move the cage off the center pad and then step on the left pad. When both side pads are depressed but not the center pad, the door closes. Move the cage back onto the center pad. The mechanism starts to work but can't raise the door with the left gear locked in place.
Stand on the left pad just long enough to raise the door halfway. Positioning the door correctly is important. Step off the pad just before the carved notches halfway up each side of the door line up with the higher pair of horizontal grooves on both sides of the door. The door will then move a little bit more after Lara has stepped off the pad. You'll see the door bobbing up and down a bit as the mechanism works, but the grooves will be aligned. (Again, refer to the screenshots or video for a visual.)
NOTE: If the door opens too far, you won't be able to reach the gold reward in the alcove above the exit, so you'll have to start over: Close the door again by dragging the cage off the center pad and stepping on the left pad. Then repeat the steps above, pushing the cage onto the center pad and standing on the left pad just until the door is positioned correctly.
CLIMBING TO THE EXIT: To reach the exit, go to the back left corner of the room (i.e., left when facing the exit). Climb into the alcove and jump and grab the vertical chain. Climb the chain and jump to grab the handhold ahead. (Here it may help to move the camera behind Lara and then jump forward.) Traverse around to the right. Jump to grab the ledge above and jump again to pull up. Jump straight up to grab the horizontal chain. Climb hand over hand along the chain and drop down on the ledge at the other end. Turn to face out over the room and walk off the edge to drop and hang. Let go and grab the handhold below. Again, traverse to the right. Jump to grab the horizontal pole. Swing around and jump to the ledge near the exit. This is CHECKPOINT 13. (These screenshots show where to climb.)
NOTE: If you're playing the demo version, exit here to finish the level.
Before going for the gold, look for the silver reward (3/5) on one of the ledges high above the huge gear on the other side of the room. (screenshots) To get there, cross the wide ledge near the exit. Face the support column between this ledge and the huge gear. Jump to grab the handhold on that column. Climb around the corner to the right. Jump to grab the ledge above. Jump again to pull up. Jump straight up to grab the horizontal chain and traverse hand over hand to the opposite ledge. Drop down and take the silver statue. Then return to the exit the way you came.
To get the gold reward, face either of the stone panels flanking the exit. Grab the first horizontal crevice. Jump to grab the crevice above. Climb in toward the door and jump to grab the mouth-like hole in the middle of it. Jump up to grab the top of the door. The door should be moving up and down slightly as the mechanism works. Wait for it to move upward. Then jump straight up to grab the ledge above and once more to pull up into the alcove. Take the gold reward (1/1). CHECKPOINT 14 registers here. Climb back down. (Again, the screenshots and video show the way.)
Exit the room to trigger an interactive cut scene. As Lara attempts to navigate the trap, a series of icons appear on the screen. As soon as an icon appears, quickly press the control indicated and she will make it through. Each time you press the correct button, a chime sounds. If you press the wrong button, or press the correct one too soon or too late, Lara dies and the game reloads. The correct keys for this sequence are:
PC: Down, Up (i.e., back and forward direction keys or arrow keys, not duck/jump)
PS2: Circle, X
Xbox: B, A
PSP: Circle, X
GameCube/Wii: B, A
Notice the silver reward in the room below the trap. You'll retrieve that shortly. For now, continue along the hall to CHECKPOINT 15. Round the next corner and stop at the edge of the pit. Another jaguar lurks below, so don't just drop down. Instead step off and grab the edge. Traverse to the right and then drop to the handhold below. Climb to the right a little more and drop onto the raised area in the corner. (screenshot) The jaguar can't reach Lara here, so you can shoot it with pistols before hopping down to the floor.
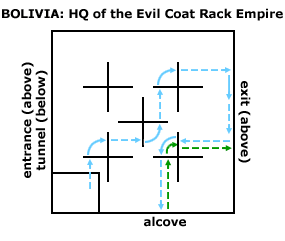
In the diagram above, blue arrows show the path to the silver reward; green arrows indicate the way to the exit.
Now for that last silver reward: Stand on the raised area in the corner of the room with the alcove containing the silver reward behind Lara on her right and the entrance and tunnel ahead on her left. Face the left horizontal "arm" of the rack straight ahead and jump forward to grab it. (Again, there are screenshots and a video if you need them.) Momentum pivots the rack 90 degrees clockwise. Now you're facing the center rack. Swing around and jump to grab the bar on the center rack, which then turns 90 degrees counterclockwise. Swing and jump to the next rack, which turns 90 degrees clockwise.
As you explore, Zip cracks wise regarding these odd looking devices; hence the business about the evil coat racks.
After jumping to the third rack and swinging around, Lara should be facing the wall below the exit. Swing, jump and grab the narrow, horizontal ledge running the length of the wall. Traverse to the right as far as you can. Jump past the rough area of wall to grab on where the narrow ledge continues.
Climb to the right a little more until the grabbable arm of the nearest coat rack is directly behind Lara. Lean away from the wall and jump to grab onto the rack. Release the direction controls and let the rack pivot toward the alcove with the reward. Swing around the bar and jump to grab the edge of the alcove. Pull up and take the silver reward (5/5)
To reach the exit, jump from the alcove back to the coat rack. It rotates back to its original position so Lara is facing the wall. Swing around the bar and jump to grab the long, narrow ledge where you were before. Climb to the right, then up, right again, then up again. Climb left, jump past the gap in the ledge and continue to the left. Climb around the corner and let go to land in the elevated exit tunnel.
Climb out and follow the hallway to the right past CHECKPOINT 16. Just around the next corner is a large, open area with a rope bridge spanning a huge chasm.
This chamber brings back memories of a similar dais in a different time and place. In the following cut scene ("Nepal - Part 2"), Lara's flashback to childhood continues. Back in the present, in a second cinematic ("James Rutland Talks"), Lara encounters Rutland, the mercenaries' boss, on the rope bridge. We also catch a glimpse of a blonde woman, whose identity will soon become clear, lurking in the nearby helicopter.
LARGE CHAMBER WITH ROPE BRIDGE AND STONE CIRCLE: When the cut scene ends, Lara finds herself on the bridge under fire from the helicopter off to the left. Rather than indicating a particular button, the blue Lara icon at the bottom right corner of the screen means "run like hell". So immediately start moving forward. Keep running and jump the gap in the bridge. At the next gap, take a running jump along the right side of the bridge (as shown in these screenshots). The bridge is slightly higher on the right, making it easier to grab the edge of the plateau ahead. Pull up as the bridge falls away behind you. Cross CHECKPOINT 17 and get ready for a fight.
NOTE: If Lara dies before crossing the bridge, the game reloads at the previous checkpoint. To skip the cut scene, wait for it to start, press Escape (Start) and then select "Skip Cinematic" from the menu.
Eight mercenaries lurk among the standing stones. Keep moving and use the stones for cover. Use jumping and dodging moves (see Controls) but avoid the edges of the platform; it's a long way down. Move the mouse/right stick to lock onto different enemies. Heal as needed and run over any dropped health packs and ammo to pick them up.
When the last mercenary falls, a cut scene ("The Stone Dais") starts. Lara examines the pedestal more closely and finds it nearly identical to the one she encountered as a girl in Tibet. Her replies to Alister and Zip are enigmatic at best, but she tells them there's more work ahead.
LEVEL COMPLETE: Finishing Bolivia allows you full access to Croft Manor from the main menu. Prior to this, the Manor level loads but most of it is off-limits. Depending on which rewards you recovered in Bolivia, various bonuses may also be available. I recommend playing Croft Manor immediately after Bolivia. The gym provides a good opportunity to practice the controls, and finding all the rewards helps unlock the first Pistol Upgrade sooner.
[Croft Manor or Peru] |
†UPDATE HISTORY: 5/21/06 - Cosmetic changes and typo corrections only. 5/22/06 - Time Trial info added.
6/4/06 - Fixed a few typos, including incorrectly numbered checkpoints; added screenshot showing alternate paths at fallen tree.
6/8/06 - Various notes and additions inspired by readers' questions and suggestions. Added several screenshots and renumbered existing screens.
6/12/06 - Added DVD error fix info and link to savegame instructions.
10/16/06 - Added demo info, shortcut near start, controls for interactive cut scene and link to new time trials page.
12/19/06 - Fixed a typo in the paragraph about the shortcut after checkpoint 7. GameCube controls for interactive cut scene, thanks to Treeble.
2/8/08 - Tweaked the sequence section in the room with the gold and third silver rewards, thanks to a suggestion from Killer ][nstinct.
8/2/09 - Began major round of updates on entire Legend walkthrough. Added numerous screenshots, as well as videos for the gold reward and evil coat rack rooms. Also made numerous tweaks for clarity and various minor strategy changes, some as a result of suggestions and corrections from the players listed below.
9/28/09 - Added PSP save files, thanks to Dave A.
ACKNOWLEDGEMENTS: Thanks to Sergio for the Time Trial shortcut, to Scott (bigblue) for DVD error info; Ian T., Drew, Evelyn, Lara Man and Treeble for help with the console controls; and to Andy C., Bruche, Jewel, Jildert, John L., Joshorty, Killer ][nstinct, Margaret, Onx, Roger B., Scott N., T.J. and Turza for other help with this level.
*NOTE ON REWARDS: Finding rewards (formerly known as "secrets") unlocks various extras in the game. For a complete list of these bonuses and how to get them, see the Legends Rewards page.
**TIME TRIAL: After completing any level, you can replay it in Time Trial mode to unlock cheat codes. (See the Legend Rewards, Time Trial Tips and Cheats pages.)
***NOTE ON LARA'S BIOGRAPHY: Players of the original series will notice several major changes in Lara's history, including the circumstances surrounding this plane crash and her age at the time. You can find Lara's original and revised backstories at Tomb Raiders Traveler's Guide and Tomb Raider Chronicles.
****NOTE ON CONTROLS: I apologize to console players for the PC-centrism of this walkthrough, but that's the system I use. When referring to specific keys, I try to include PS2 and Xbox 360 controls as well. PSP controls are similar to the PS2, and original Xbox controls are nearly identical to the ones for the 360. There are a few differences though. For further details, including a complete list of controls for all systems, including PSP, original Xbox and Nintendo GameCube, plus numerous tips on using the controls, please refer to your instruction booklet or the TR Legend Controls page.
WAS THIS WALKTHROUGH HELPFUL? If not, I apologize and invite you to contact me with any questions. If you need help right away, I recommend the r/TombRaider subreddit. Other fan-run forums are listed at tombraiders.net/stella/community.html. If this site was useful, please consider supporting it financially or in other ways. For details, visit tombraiders.net/stella/support.html. As always, I welcome your corrections/suggestions. Thank you!
Copyright © 2006- - Stellalune (). All rights reserved. The screenshots and videos included here were made using Fraps. Feel free to copy or print this walkthrough for personal use. By all means, share it with friends, but please include this credit line so people can send me their feedback. No part of this walkthrough may be reproduced on another site without permission. Follow this link for details about this site's advertising and privacy policy.
Stella's Tomb Raider Site: tombraiders.net.