TOMB RAIDER GBC: ROYAL TOMBS A
NOTE: This is a big level and there are a number of different ways you could explore it. Each of the door keys works in either door, and you don't need to collect the colored handles in any particular order. If you come to this walkthrough in the middle of the level and you're missing a handle, you can probably figure out where to go by starting from your current save point and referring to the map and walkthrough. Each save point is numbered in the map and walk.
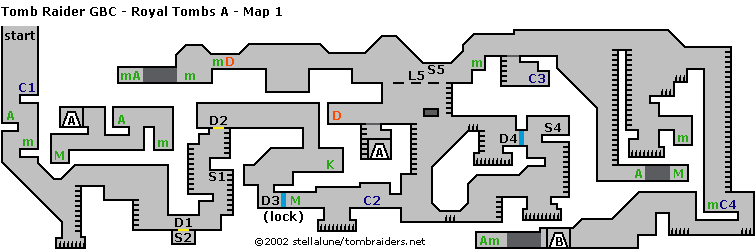
Royal Tombs A - Map 1 (click for printable map/map key)
NOTE: The first map for this level is larger than a standard 8½" x 11" sheet of paper. You can try printing it using landscape (horizontal) orientation. Or, download the left side and right side separately, print both and tape them together.
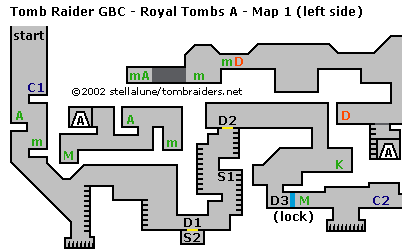
Fall into the level to land on a small ledge with a save crystal (C1). Hop down to the next two ledges for rapid bullets and a small medipak. Safety drop from the lower ledge to land on a slope. Slide down and jump at the end to grab the ladder on the wall ahead. If you miss, Lara falls into the spike pit below and you have to reload.
Climb the ladder to the top and kill a bat. Go to the right, kill another bat and then continue down and to the right, ducking as needed to avoid the darts, past a gold trapdoor (D1) over a red switch (S2).
To open the trapdoor, continue to the right and climb the first ladder not quite to the top. Draw weapons and shoot the ceiling switch (S1). Return left to the gold trapdoor (D1). Drop in and use the red switch in the pit (S2) to open the next gold trapdoor (D2) at the top of the ladders.
Return to the right, climb the ladder again and this time backflip to the ledge at the top. Climb the ladder on the left and then backflip to land on the ledge behind. Climb the ladder on the right wall to the top. The gold trapdoor (D2) should be open if you used the red switch below.
Go to the right past two red statues. When you come to an opening in the floor, safety drop down to the room below. Kill the mummy and approach Illiat.
CUT SCENE: Lara kills the mummy and kneels beside the injured Illiat. He explains that when she disturbed the altar, she unwittingly unleashed the temple guardians. He also tells how he was ambushed by mercenaries looking for the Nightmare Stone. Illiat tells Lara that he only gave the treasure hunters part of his map. Without the other piece, they will not be able to descend to the level with the Snake Guardian, who holds the final part of the key to unlock the Stone. He gives Lara the map and urges her to find the Nightmare Stone and bring it up to the altar to destroy it. Then he dies.
After the cut scene, pick up the DOOR KEY (K) and head to the left. Drop down one level, taking care to avoid the dart traps, and use the key to unlock the blue door (D3). Pick up a large medipak on the other side. The pit off to the right has retracting spikes. Take a running jump to get across and continue to the right. You'll find a save crystal (C2) between a pair of dart traps in the ceiling. Save and continue to the right, hopping down one level.
The next low overhang has retracting spikes, so duck and just as they retract, roll underneath. On the other side, pass under another dart trap, kill a bat and climb the ladder. There's another ceiling-mounted dart trap at the top.
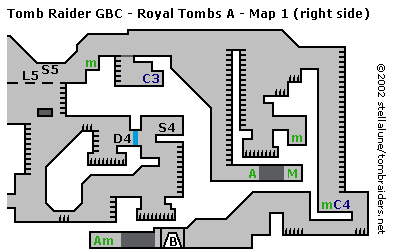
Take a running jump across the next spike pit and climb the ladder ahead. backflip to land on the ledge behind. Climb to the ledge above on the right to rouse the sleeping skeleton. Then jump down and shoot it from below. Climb back up and use the red switch (S4) to open the blue door (D4) to the left.
Go through the blue door and take a running jump across another spike pit to grab the ladder on the other side. Climb up. Watch out for the retracting spikes and dart trap at the top of the next ramp. When it's safe, step forward to slide down the ramp and then jump at the end to grab the ladder ahead and climb to the top. If you miss the grab, you'll need to retrace your steps to the right then up to the top of the ramp again.
At the top of the ladder, go to the left. When you reach the white floor tiles, you'll awaken another skeleton. Back up to the tiles and crouch to avoid the darts. The skeleton won't follow any further, so you can shoot it from safety.
Use dynamite to blow up the white tiles. (If you don't have any dynamite, you can find some to the left near the dart-shooting gargoyle.) Climb down the ladder to the red doorway. Go through to emerge in another area of this map. (Both doors are marked "A" on the level map.)
This room has several dart traps, so go carefully, ducking as needed. Shoot a scorpion and 2 snakes, and pick up a large medipak, heavy bullets and a small medipak (behind the wall to the right). Return to the red doorway (A) and go back through to the connecting door.
Climb back out of the room, get the dynamite off to the left if you didn't do so earlier, and backtrack to the right. At the edge above the ladder take a standing jump to grab the small platform ahead and pull up. From the platform, jump to grab the ladder to the right. Climb to the top.
Shoot the ceiling switch (S5) to extend a series of narrow ledges (L5) to the left. Hop across the ledges to the third one and wait for a skeleton to approach from the left. Kill it from the ledge and then jump across and continue to the left to a pit with 3 snakes. Safety drop into the pit and turn around to shoot the snakes without taking damage. Climb out of the pit on the other (left) side and continue on.
Pick up dynamite (if you don't already have some) and a small medipak and hop down into a pit with another small medipak and dart traps in the ceiling. Continue to the left through a concealed tunnel to a secret room with rapid bullets (2x) and another small medipak. Backtrack to the right all the way to the three ledges (L5) you extended earlier. Hop across and continue to the right.
Climb up two ledges, picking up a small medipak on the way. Walk to the edge of the white break-away tiles. Let the first one crumble and then climb down the ladder into the pit. Shoot the skeleton that awakens when you approach. Use the save crystal (C3) before climbing out of the pit.
Jump over the opening and continue right to the top of the ramp, killing 2 bats as you go. Slide down the ramp and jump at the end to grab the long ladder ahead. Climb down, avoiding the dart-shooting gargoyles, and drop to the floor. Go to the right, kill 2 bats and pick up heavy bullets. Continue to the right through a hidden passage to a dead end with a large medipak. Return to the ladder and climb up past the dart traps all the way to the top.
Climb down the ladder on the other side of the wall. At the bottom, take a running jump across the spike pit and pick up the small medipak in the shallow pit beyond. Jump back across the spike pit, climb the ladder until Lara is opposite the ledge with the retracting spikes and then backflip to land at the edge of the ledge. When the spikes recede, run forward to the base of the ledge ahead, where it's safe. Climb up, wait for the spikes to recede and run forward again. Climb onto the top ledge. Take a running jump to grab the long ladder on the right wall and descend past more darts. At the bottom, let go to land near a small medipak and a save crystal (C4).
Walk to the right and safety drop off the end of the ledge, avoiding the dart trap and retracting spikes to the right. Go to the left, under the ledge with the crystal. Carefully run past another set of retracting spikes. Climb over the wall, shoot the mummy, and then hop down and continue to the left. Beyond the red doorway is a concealed passageway. Go through to a dead end with a snake, small medipak and heavy bullets. Return to the red doorway (marked "B" on the map) and go through to a new area.
Royal Tombs A - Map 2 (click for printable map/map key)
You enter this area at the middle right. You can't go back the way you came, so head to the left past two arched doorways (these are decorative only) to a save crystal (C5). Climb up one more level, turn and jump to grab the ladder above on the right. Climb to the top, grab the monkey bars and swing over to the left.
Before you reach the first platform, you'll meet a bat. Position Lara above the edge of the platform below so that when you let go, she doesn't fall into the retracting spikes. Shoot the bat from this safe spot.
When the spikes retract, take a running jump to grab the edge of the next ledge to the left. Shoot the skeleton. Go to the left end of this ledge. Kill 2 bats and climb down the ladder. While still hanging on the ladder, shoot the mummy in the room below. Pick up a small medipak and rapid bullets. Climb back up the ladder and jump up to grab the ceiling bars. Again monkey swing to the left and let go to land on a ledge with another small medipak. Safety drop to the ground, climb back up the ladder and return to the right.
Either safety drop from the left end of the ledge, losing a little health, or take a running jump to grab the ledge with the retracting spikes, monkey swing back to the right, climb down the ladder and slide down the ramp. Either way, you'll end up on a level with a gold trapdoor (D6) and red switch (S6). Use the switch to open the trapdoor and climb down the ladder.
Use the save crystal (C6). Approach the pile of bones to the left to animate the skeleton and then destroy it. Now use dynamite to blow up the gray door to the right of the crystal. (NOTE: If you don't have dynamite, continue to the left to find some, then backtrack to the door.)
Beyond the gray door is a low wall with a mummy schlepping around behind it. Kill the mummy, use the red switch (S7) to open a trapdoor elsewhere (D7), and then go through the hidden passageway to the right to find a large medipak.
Now head back to the left. Go past the save crystal (C6) and climb over the low wall with dart traps above. Roll under the low overhang to get the attention of the mummy on the other side. Then roll back to the right and shoot the mummy from safety.
Near the far left wall you'll find dynamite if you don't already have some. Grab it and climb the ladder. The gold trapdoor at the top (D7) will be open if you used the red switch (S7) earlier. Go through the red doorway (marked "C" on the map) to the left of the trapdoor to exit this area.
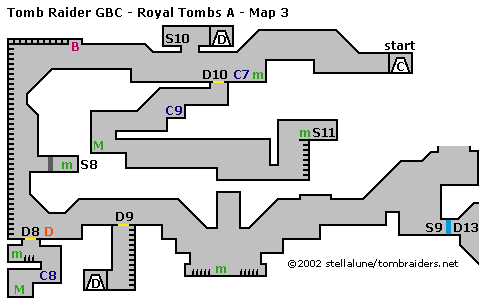
Royal Tombs A - Map 3 (click for printable map/map key)
You enter through the red doorway at the top right of the map (marked "C"). Go to the left, kill the scorpion on the ledge ahead and then climb up. Continue to the left to find a small medipak and a save crystal (C7).
Keep going to the left, passing over a gold trapdoor (D10), which doesn't open yet. A bit farther on, you'll meet a mummy and 2 bats, and you'll pass under a red doorway ("D") and switch (S10) that you can't reach yet.
Climb onto the ledge ahead and advance slowly to avoid the falling boulder. At the ramp, jump up to grab the rungs on the ceiling and monkey swing to the left corner. Grab the ladder and climb down past the ramp.
This ladder extends all the way down the left wall. When you reach the first ledge, about halfway down the wall, backflip to land there. Use dynamite to blow up the gray door, enter and shoot the skeleton. Pick up a small medipak and use the red switch (S8) to open a gold trapdoor (D8) below. (NOTE: If you don't have dynamite, climb all the way down the ladder to get some.)
Take a running jump back to the ladder and climb to the bottom. Shoot the skeleton and pick up more dynamite. Then safety drop through the trapdoor you just opened (D8). Drop on the right side to avoid the retracting spikes below. This small, three-tiered room contains a small medipak, save crystal (C8) and large medipak. Climb out and continue to the right.
Keep going past another gold trapdoor (D9). Watch out for the dart traps in the ceiling. Beyond the trapdoor, hop down two levels and then safety drop off the third to avoid landing in the retracting spikes. When the spikes recede, run forward to the small medipak. (You'll notice the spike areas have plain brown backgrounds, while the safe areas have bricks drawn in.) Wait for the second set of spikes to recede and then run to the ledge on the right. Climb up and continue to the right to another flat ledge with a mummy. Shoot it and keep going to the right.
Climb over the low wall with the carved head on top and use the red switch (S9). This doesn't open blue door (D13) next to it; it opens the gold trapdoor (D9) back toward the middle of the map. Return to the left, past the pit with the two sets of retracting spikes. At the top of the three-tiered ledge is the trapdoor you just opened. Climb down the ladder to a red doorway. Go through to emerge at the top center of the same area. (Both doors are marked "D" on the level map.)
Hop over to the red switch (S10) on the left and use it to open the gold trapdoor (D10) below and to the right. Safety drop to the floor. Drop through the open trapdoor and shoot a scorpion. Continue left and down to find a save crystal (C9). Go left and down again to pick up a large medipak.
On the level below and to the right you'll encounter 2 skeletons. On the level below and to the right of that, there's a mummy. Keep going right to a ladder. Climb to the top, pick up the small medipak concealed in the rubble and use the red switch (S11).
CUT SCENE: Water gushes in through carved openings, flooding parts of the level.
Royal Tombs A - Map 4 - Flooded (click for printable map/map key)
Climb down the ladder to find a save crystal (C10). Go left, shoot a skeleton and then continue left. You'll encounter another skeleton and find a small medipak. Climb onto the ledge above and to the right of the medipak. Shoot the scorpion and climb up two more levels to the right. Climb up through the open trapdoor (D10) and shoot 2 bats.
You're now below the red doorway ("D") where you emerged earlier. Pass under the door to the left, climb up one level and continue left to save crystal (C11). Save and slide down the ramp into a small pool.
Swim down and then along a dead-end passage to the right to get a small medipak. Go back up for air and then swim all the way down the shaft. At the bottom, swim to the right. Watch out for the electric eel. Keep going to the right, past some dart traps and a couple more electric eels, until the ceiling slopes down and then opens up into an air pocket. Down below is a field of spikes.
Take a breath and continue to the right. You'll head upward, past more dart traps. Follow the sloping ceiling up and to the right and you'll soon reach another air pocket. On the way you may notice a couple of blue doors and underwater switches. After getting air, you can deal with these.
The switch on the left just below the air pocket (S12) opens the blue door (D12) opposite. Inside you'll find a couple of jellyfish, a large medipak and 2 small ones. Get the goodies, get air and then swim down to find a second switch (S13) below the first blue door.
Use it to open another blue door (D13) just below. (Swim down on the left side of the ledge to reach it.) Go through the open door and up to the right to get air. There's a save crystal (C12) on the ledge near the red doorway. Before exiting, do a little more exploring underwater.
Swim down to the bottom right, avoiding the 2 jellyfish, and use the switch (S14) to open the blue door (D14) on the opposite wall. Get air if you need it and then swim through the blue door. Follow the passage as it twists up and down. Avoid the dart traps and electric eel and the jellyfish if you can. At the end of the passageway you'll find 2 small medipaks. Swim back to the right and up to the red doorway (marked "E" on the level map).
Climb out of the water, save your game and go through the doorway to the next area.
Royal Tombs A - Map 5 (click for printable map/map key)
You enter this map at the top left. Go to the right, shoot a bat and use the save crystal (C13). Continue to the right, picking up rapid bullets (2x) and shooting another bat and 2 mummies. Pick up the small medipak and jump to grab the ladder on the right wall.
Climb down the ladder past a series of the dart-shooting gargoyles. At the bottom turn left, descend three levels and shoot the scorpion in the pit. Climb out of the pit on the left side, Grab the small medipak and dynamite (if you don't already have some) and use the save crystal (C14).
Take a running jump across the spike pit to the left. Climb the ladder to the blue door (D16) and then turn around and jump to grab the ladder on the right wall. Climb to the top (minding the dart traps). Shoot the mummy across the gap to the left. You may need to jump over and back to get its attention. Use the red switch (S15) at the left end of the passageway to open the blue door (D15) to the right. Jump the gap to the right, pick up the small medipak in the shallow pit below the door. Climb out on the right and go through the blue door you just opened.
Use the second red switch (S16) to open the blue door (D16) down below. Roll under the overhang to the right. Pick up dynamite (if you don't already have some) and the SKELETON KEY (K).
Backtrack to the left, climb down the ladder and backflip to land near the blue door you just opened (D16). Enter and slide down the chute to land in a shallow pit with 2 red switches (S16) and save crystal (C15). Watch out for the dart traps as you use the switches to open the 2 blue doors (D16) to the right.
Go through the doors and climb over the ledge with the large medipak. If you didn't pick up the dynamite earlier you'll find some here near the gold trapdoor (D17). Use the dynamite to blow up the gray door. Shoot the reaper on the other side. (NOTE: If you're low on medipaks, you might want to use heavy bullets to avoid taking too many hits from the reaper's fireballs.)
Use the red switch (D17) to the right to open the gold trapdoor. Drop through and slide down a short slope to land near a red doorway (marked "F" on the map). Shoot the 2 scorpions scurrying around and then head to the left.
Ignore the door to the right ("F") and instead climb over the wall with the small medipak on top. Shoot the 2 snakes and then climb up to the left to find the exit, another red doorway (marked "G" on the map).
Royal Tombs A - Map 6 (click for printable map/map key)
You enter through the purple doorway (marked "G" on the map). Go to the left, grab the large medipak, shoot a bat and drop down one level to find a save crystal (C16). Drop down one more level and continue to the left. Shoot another bat and then a reaper lurking beyond the huge skeleton statue. When the coast is clear, use the SKELETON KEY at the center of the statue to open it and get the first STAFF SEGMENT (SS).
[NOTE: If you missed the SKELETON KEY in the previous area, go back to get it now. Exit through the purple door (marked "G") at the right side of the map. Cross the bottom of the previous area (Map 5) and go through the red doorway at the bottom right corner of the map (marked "F"). You'll emerge from another red doorway (also marked "F") at the top right corner of the map. Safety drop from the ledge to the floor below. Follow the walkthrough for the previous area (Map 5) from the second paragraph, where you jump to the ladder and climb down to save crystal C14. After getting the SKELETON KEY, as described, continue to the bottom left of the map and exit through Door G. Use the key at the skeleton statue to get the STAFF SEGMENT.]
Once you have the STAFF SEGMENT, continue past the skeleton statue to the left. Unlocking the statue also opened the blue door (D18) here. Go through and drop down on the other side. When you land on the ledge below, the skeleton awakens. You can climb back onto the ledge to shoot it if you like. A bat flies in from the left, and there's a mummy and a scorpion on the next level down. So advance slowly and you can deal with them one at a time.
Cross the floor past the two decorative archways and climb up on the other side. Pick up the small medipak. Draw weapons, jump down on the other side and shoot the reaper lurking near the red switch (S19). Use the switch to open the blue door (D19) to the left. Exit the level there.
WAS THIS WALKTHROUGH HELPFUL? If not, I apologize and invite you to contact me with any questions. If you need help right away, I recommend the r/TombRaider subreddit. Other fan-run forums are listed at tombraiders.net/stella/community.html. If this site was useful, please consider supporting it financially or in other ways. For details, visit tombraiders.net/stella/support.html. As always, I welcome your corrections/suggestions. Thank you!
Walkthrough and maps copyright © 2004- Stellalune (). All rights reserved. Feel free to copy or print this walkthrough for personal use. By all means, share it with friends, but please include this credit line so people can send me their feedback. No part of this walkthrough may be reproduced on another site without permission. Follow this link for details about this site's advertising and privacy policy.
Stella's Tomb Raider Site: tombraiders.net.