If the shortcut involving jumping directly from the side of the Anubis statue onto the arm of the Horus statue does not work, you can take the longer route I had originally used in my walkthrough:
After completing the FIRST METAL SCARAB PUZZLE (as described in the main walkthrough) and raising the bars blocking the alcove above, climb up into that above the and use the switch to raise the water level up to the statues' shins. CHECKPOINT 18 registers here.
CLIMBING FROM ANUBIS TO HORUS: You can't reach the ledge above the switch at this time, so instead hop down ands climb the ladder on the right side of the alcove. Jump to grab the curved handhold to the right and climb around to Anubis's side. Jump to the handhold above, climb to the right and jump to grab the next handhold. Continue climbing to the right toward the wall between the two statues. Jump back to grab the horizontal pole. Swing around and jump to grab the handhold ahead on the side of the Horus statue. Climb as far to the right as you can then jump to grab the gold switch. Lara's weight pulls it down, opening a gate underwater on the front of the Horus statue.
This gate is timed to close after a little while, so once you regain control of Lara drop into the water, turn right and quickly swim toward the front of the statues. (Tap Interact to swim faster on the surface of the water.) Swim around to the left to the front of the statue of Horus and dive below the surface to get through the gate between Horus's feet before it closes.
If you don't make it before the gate closes, or if Lara falls into the water while making the climb to the gold switch, either save the game and reload at CHECKPOINT 18 or swim to the front of the statue of Anubis, climb up and try again.
Once you make it through the gate, if you still have some air left, look down at the carvings on the floor for a clue to the next scarab puzzle. Then swim forward and up to an opening where you can surface. Turn around and climb out on the ledge. Climb onto the ledge which forms Horus's lap and turn around again.
Now solve the SECOND METAL SCARAB PUZZLE: Use pistols with manual aim to shoot the 4 metal scarabs until each one points in the same direction as its carved counterpart in the room below. The upper left scarab points upward, the upper right scarab points left, the lower right scarab points down, and the lower left scarab points right (it is already in the correct position). When all four are oriented correctly, the gate above opens. This time, do not climb up and use the switch. Doing that will raise the water level further, and you don't want to do that yet.
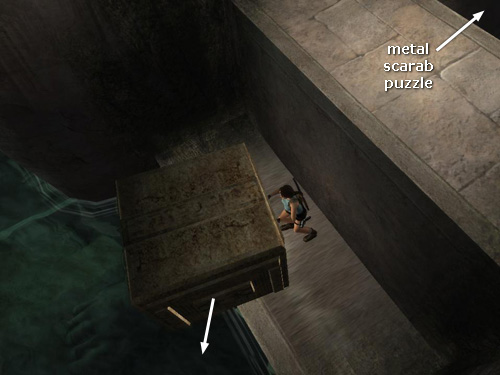
Turn around to face out over the pool. Look down to spot the carved block on the narrow ledge below. Hop down and push the block off the ledge (as shown in this screenshot). It will land in the water and sink to the ledge below.
Now swim between the statues and down to the lever (i.e., the one you used when you first entered this area). Pull it to lower the water level to the bases of the statues.
Swim back to the Anubis statue, climb up to the FIRST METAL SCARAB PUZZLE the same way you did before, but this time do not use the switch to raise the water level. Climb the ladder to the right of the alcove and work your way back to the horizontal pole then forward along the Horus statue to the gold switch. (If you need help with any of this, refer to the walkthrough above.) Lara's weight depresses the gold switch opening the gate between the Horus statue's feet.
As before, the gate is timed to close after a little while. But now, with the carved block in place and that area no longer flooded, you can drop into the pool, turn right, quickly swim alongside the statue, climb out of the water onto the narrow ledge and hop up onto Anubis's right foot. Jump from there onto the carved block and then quickly leap into the opening before the gate closes. (These screenshots show the sequence.)
Once you're inside the room with the four carved scarabs on the floor, climb the three handholds in the back right corner, climb around to the right and jump to grab the ledge. Pull up onto the ledge with the SECOND SCARAB PUZZLE. Again, do not use the switch to raise the water level.
Instead of climbing up into the alcove with the switch, turn to face out over the pool. Drop down onto the ledge where the carved block started out. Hang from the edge, climb to the right and drop to grab the narrow stone band on Horus's left leg. Climb around to the right as far as you can go, and then jump to grab the gold switch on the wall (as shown in these screenshots). This opens a gate behind Horus's shoulder, which is where you'll find the relic.
To get there, begin by letting go of the gold switch and sliding down to Horus's feet. Swim across the pool to the statue of Anubis and climb out near his feet. Climb up to his lap. This time, use the switch in the alcove above the scarab puzzle to raise the water level. Climb the ladder and work your way around to the Horus statue and grab the gold switch on its side. (Again, this is just repeating what you've done before. If you can't remember what to do, refer to the sections above.) This opens the gate between Horus's feet, which is again under water. Swim through it and climb up to the second scarab puzzle. This time, pull the switch in the alcove above the metal scarabs to raise the water level further. Swim out of the alcove as it begins to flood and head for the surface.
CLIMBING TO THE TOP OF THE STATUES: Swim back to the statue of Anubis. Swim in through the alcove in its chest, which is now flooded. Climb out of the water in a small room inside the statue. This is the ledge above the first scarab puzzle which you couldn't reach before. CHECKPOINT 18 registers here.
Go to the right wall, jump up to grab the scarab switch and immediately jump to grab the handhold above before the scarab descends. Jump back to grab the first of 2 horizontal poles. Quickly jump from one to the next, then to the handhold ahead, before the poles descend. Climb around to the left and pull up into an opening on Anubis's shoulder. Turn right and climb the handholds to the high ledge behind the statue's head.
Cross the ledge and jump the gap between the two statues. Continue along the ledge behind Horus's head to the end. Jump to grab one of the handholds on the wall ahead and climb down to the gate you opened earlier. (These screenshots show the path to the relic.) Drop down into the room behind Horus to find the HORUS IDOL, the only RELIC in this level.
To get out of this room, climb the rocks below the doorway, grab the narrow stone ledge and climb to the right until you can pull up in the doorway. Climb back up the handholds to the ledge above.
[Return to the Sanctuary of the Scion Walkthrough]
Copyright © 2007- Stellalune (). All rights reserved. The TRA screenshots included here were made using Fraps. Feel free to copy or print this walkthrough for personal use. By all means, share it with friends, but please include this credit line so people can send me their feedback. No part of this walkthrough may be reproduced on another site without permission. Follow this link for details about this site's advertising and privacy policy.