LEVEL 11: THE 13th FLOOR | Updated: 3/22/10 |
Kills: 14* Items: 16 plus 1 keycard, 2 access disks, a cloth, 2 vials of chloroform, the Iris artifact and 3 Golden Rose Secrets**
Starting Inventory: Heckler & Koch assault rifle, 30 HK rounds, headset, Timex TMX watch, 3 small medipacks, 1 large medipack.***
IMPORTANT: The VCI Headquarters levels can be difficult, especially the final level, Red Alert! Unlike in previous levels and previous Tomb Raider games, you have neither your unlimited-ammo pistols nor the luxury of accumulating equipment for a dozen or so levels beforehand. So be sure to conserve ammo and medipacks, or you may not finish. Whenever possible, I have described ways of handling things that are least damaging to Lara.
Cut scene: After sliding through the chute into the level, Lara makes radio contact with her assistant Zip. He tells her to go through the ducts and try not to attract too much attention. During their conversation we see a nearby vent with a medipack behind it as well as a 360-degree view of Lara in her rubber catsuit. (A transcript appears here.)
VENTILATION DUCTS: Start by going to the left toward the large medipack you saw in the cut scene. Set the HK on sniper mode, use the scope to target the vent and shoot it. Crawl into the duct, pick up the medipack and continue forward past the light blue bars. (See the Equipment Notes below for controls.)
Cut scene: A view of the SUIT ROOM below. Note the golden rose on the floor. A man wearing an armored suit enters. Zip tells Lara about the suits and the weaponry—lasers with a limited range but a lot of power.
Continue to a T intersection with a laser trap. Hold the crawl button and go to the right underneath the laser. Pick up the large medipack. Crawl back in the other direction, past the passage where you came in to a vent in the floor crisscrossed with more deadly lasers. When the moving laser array goes toward the other end of the duct, stand up and take a forward jump over the laser-trapped vent. Run on to the next T intersection.
Shoot the vent on the left. The duct below contains another laser trap. Wait for the laser to move off to the left. Then jump down and immediately crouch. Turn to face the ramp. When the laser passes behind Lara, stand and run to the wall. Crouch and crawl through the opening before the laser returns. Alternatively, once Lara is crouching under the laser array, crawl about halfway up the ramp, wait for the lasers to pass behind her, then continue crawling up the ramp and into the opening.
Continue to a vent, which opens when you approach. You lose control of the Look button here, but fortunately the SUIT ROOM below is safe. Jump down and pick up the golden rose you saw in the previous cut scene. (This is secret #1, 28/36.)
Climb back into the duct and face the laser array. When it approaches Lara then moves away, crawl out, stand, and run forward a few steps, then duck. Crawl on to an opening above on the right. When the laser moves away, pull up into the duct. Or, crawl to the opening and wait for the lasers to move away. Crawl out after them, and continue crawling down the slope. Continue crawling forward and to the right so Lara is directly under the opening to the duct. When the lasers pass away, stand and quickly pull up into the opening.
Once back inside the duct, crawl through to another T intersection. Continue straight ahead to an opening on the left. Jump down into the DIMLY LIT STOREROOM. Search the shelves for a small medipack, HK clips and a HAMMER.
The door won't open, so climb back into the duct and head back to the start of the level. To get there, start by going to the right. Turn left at the T, walk to the edge of the square depression with the laser-protected vent. When the moving laser array passes the vent moving away from Lara, take a standing jump across the vent. Duck immediately. Then crawl forward and through the opening on the right. Go straight on past the opening with the light blue bars overlooking the SUIT ROOM to the next overhead fan.
The duct around the corner (where you started the level) now contains 2 moving laser arrays, one above the other. Getting through without taking damage is very difficult, so be sure to save your game first.
Notice how the lasers are staggered slightly: The lower one comes a little closer than the upper, and doesn't go quite as far in the other direction as the upper one. Position Lara facing the lasers but not too close. Use the Look button to see what's happening. When the lower laser approaches then moves away, run forward just a few steps—not far enough for the upper laser to reach Lara. Wait for the top array to approach then move off. The lower array comes toward Lara just after this. Take a standing jump over it. Then run forward several steps and duck just before the upper laser array reaches Lara. Quickly crawl forward as the upper laser passes overhead. Don't hesitate, or the lower laser will catch up. Still crouching, turn to face the ladder. Wait for the upper laser to return and move away. Then stand, grab the ladder and climb up. Follow the duct to a vent above the IRIS ROOM.
Cut scene: Lara asks Zip to find a way to deactivate the force field protecting the IRIS. He says he's on it.
After the movie, continue forward and pick up the HK clips under the fan. Keep going.
Cut scene: A brief view of another guy in an armored suit standing in the room below. The duct along the ceiling is the one Lara is in now.
PADLOCKED GATE: The duct ends at a locked gate. You can choose between two methods of opening it. If you shoot the padlock, the duct collapses, dumping Lara into the room with the guy in the armored suit. If you use the HAMMER to open the lock, the duct remains intact. You avoid the armored guy but miss one pick up: a small medipack. (After using the HAMMER, continue with the section titled ROOM WITH FISH-BONE LADDER, below.)
If you choose to take on the armored guy, set the HK on sniper or burst mode and use the scope (Look button) to shoot the lock. When Lara slides down the chute, turn and immediately use the scope to aim for the armored guy's face (his one vulnerable spot). Or, avoid him by immediately climbing back into the duct. To do this quickly, roll, run forward to the wall, backflip onto the top of the broken duct, hop back once, then take a standing jump forward into the opening where the duct separated. In any case, this is the way you'll need to leave this room whether or not you kill the suit guy. After climbing up into the broken duct, look for an opening in the floor just ahead.
(NOTE: If you missed secret #1 in the SUIT ROOM, you can still go back for it as long as you don't drop into this opening. Instead, jump over it to grab the other side. Pull up and follow the vent back past the IRIS ROOM to the ladder. Climb down to the duct where you started the level. You'll need to make your way back through the laser traps, following the walkthrough above in reverse.)
If you already got secret #1 (or don't want it) and are ready to go on, drop through the opening in the floor into the duct below. Go through the duct with the slats and loud explosions. Pick up the small medipack on the floor and climb the ladder.
ROOM WITH FISH-BONE LADDER: Before climbing this ladder, pull up into the alcove behind it to get some HK clips. Drop down and go around to the front of the fish-bone ladder. Climb to just below the moving laser array. Climb to the right side of the ladder. (This will buy you a little more time to get past the lasers.) Then, when the lasers move off to the left, climb up past them. At the top, shoot the hole-riddled panel on the left. Climb into the duct and pick up the HK clips on the left.
13th FLOOR - HALLWAY WITH SODA MACHINE AND GUARD: Getting into the hall at the end of the duct requires a bit of finesse. If the guard on patrol sees Lara, he'll run to the left end of the hall and activate a machine gun turret on the ceiling. To prevent this, walk cautiously toward the small opening. When you hear the dramatic music, stop, draw your weapon and make sure it's set on sniper mode. The guard won't notice Lara if she doesn't go any farther forward. Use the scope (Look button) to line up a head shot as the guard passes back and forth. If you're careful, one round will take him down.
Jump down from the duct. There are deadly lasers crossing the hall just beyond the Fizwiz Cola machine. To get past them, shoot the vent near the floor opposite the duct where you came in. Crawl through to the higher spot just before the vent at the other end. Shoot this vent and crawl out.
There's an ELEVATOR down the hall to the left and a sleeping guard in the glassed-in office to the right.
Cut scene: Zip warns Lara that she'll need to avoid waking up the guard in order to steal his access card.
If you run or make noise near the sleeping guard, he'll awaken, call another guard and activate a machine gun turret over the desk, making it next to impossible to get the card. It is possible to sneak into the office and get the card. But if you don't kill the sleeping guard, you'll meet two more guards later on. At that point you'll use up more ammo than you'd save by letting sleeping beauty live.
Walk quietly into the glassed-in office and take out the sleeping guard with a single shot to the head. As long as you kill him stealthily, the second guard doesn't appear. Pick up the HIGH-LEVEL ACCESS CARD on the desk and use it in the receptacle on the wall nearby. This open the STOREROOM and deactivates the lasers out in the hall.
Search the shelves in the STOREROOM to find a small medipack and 2 sets of HK clips. Exit the office and continue down the hall to the ELEVATOR. Press the button on the wall to call the elevator. Enter and press the button inside to ride up.
Cut scene: Two guards in conversation at the right end of the hallway.
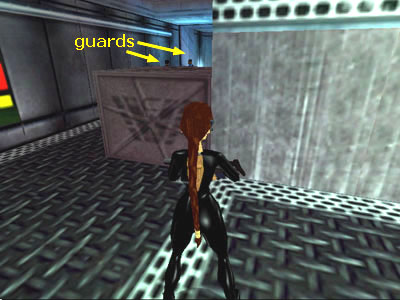
THE 16th FLOOR: If you run out of the elevator as soon as it opens, the 2 guards will be alerted and start shooting. This will alert a third guard, who comes up the ramp at the end of the hall behind the first two. To get past this spot with no health loss and only three rounds spent, set the HK on sniper mode and walk slowly toward the open elevator doors. If you position Lara at the left side of the opening (as shown in this screenshot), you can use the scope (Look button) to target the head of each guard from behind the large gray box. Shoot the one on the left first, and the one on the right won't move right away, leaving you plenty of time to set up your next shot. Run out from behind the boxes toward where the guards fell, then walk to the end of the hall. If you were able to take out the first two with quick head shots, the third guard at the bottom of the ramp will not be alerted. You can then kill him from behind with another head shot.
Go to the end of the hallway behind the crates (farthest from the guards). Use the HIGH-LEVEL ACCESS CARD in the computer console to open the triangular door. The 2 orange-suited workers in the COMPUTER ROOM ignore Lara as long as she doesn't draw her weapon. (If she does, they'll cower and activate a machine gun turret.) Press the button on the square console to activate a hologram of the IRIS. Doing this also opens a door at the far end of the hall.
Exit, and follow the hall past the ELEVATOR to the end. Turn right and go down the ramp. If you pressed the button in the COMPUTER ROOM, the next door opens as you approach. Go through the room with the metal dome above the IRIS and enter the SUIT LOCKER ROOM. Press the button to the right of the orange-suited worker to open the locker. The suit emerges and an ACCESS CODE DISK falls on the floor. Pick it up and go back to the ELEVATOR the way you came. Press the button to ride back down to the 13th FLOOR.
BACK ON THE 13th FLOOR: If you killed the sleeping guard in the glassed-in office earlier, this hall will now be clear. If you didn't kill him, get ready for an ambush. Draw your weapon and kill the 2 guards on the right. Then follow the corridor past the Fizwiz Cola machine. Use the ACCESS CODE DISK in the console at the end of the hall to open the grate above. Climb into the duct.
Cut scene: A series of explosions begins in a vertical shaft with a pole. Notice the opening about halfway down the shaft.
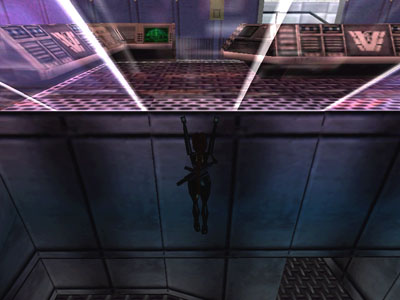
Walk forward and turn right to face the climbing pole, but don't get too close or the explosions will cause Lara to catch fire. Use the Look button to position Lara facing the pole squarely. Now observe the pattern: four strong blasts followed by several less powerful ones. On the last of the four strong blasts run forward and press Action to grab the pole. Slide down about halfway. When Lara is between the two sets of slats, press Jump to backflip into the opening behind her. (See these screenshots if necessary to get oriented.)
At the end of this duct is a golden rose (secret #2, 29/36). Get it then drop to the bottom of the shaft with the pole. Go through the crawlspace to a BIG ROOM WITH CATWALKS. Start across the catwalk.
Cut scene: Zip chimes in over the headset, advising Lara to be especially wary of the "hulk" in the armored suit below. He suggests she again take advantage of the suit's open faceplate. (I have included a transcript of this short exchange in case you miss it because of the bug.)
(BUG NOTE: Some players have reported that their game freezes as Lara steps out onto the catwalk. If this happens to you, try restarting the game. Then next time, keep to the middle of the catwalk and walk instead of running forward. If that doesn't work, you can download this PC savegame, made after the cut scene. For help with savegame and .zip files, see here. Thanks to Afina for this tip.)
Cross the catwalk and enter a hall with overhead pipes. Go into the DARK STOREROOM on the right and take a small medipack and a CLOTH from the shelves. Continue along the hall with overhead pipes to a second catwalk parallel to the first. Cross this catwalk and go down the stairs.
Skirt the perimeter of the room, keeping the wall on Lara's left. Be sure to walk to avoid attracting the attention of the guy in the armored suit. Use the HIGH-LEVEL ACCESS CARD to open the door on the far side of the room. Still walking, enter the ROOM WITH THE INSECT CAGES and stay close to the right wall. Search the first cabinet in the near right corner to get a large medipack and a VIAL OF CHLOROFORM. If you move to the second cabinet, one of the cages shatters and a swarm of bugs emerges. You can avoid this, by skipping the second cabinet for now. Instead walk out of the room. When you do the glass case shatters, but the bugs will have dispersed by the time you finish this next bit of business.
Walk back out to the big room and approach the guy in the armored suit from behind. Don't get too close—a few steps away is enough. Combine the CLOTH and CHLOROFORM, and use it on the guy.
Cut scene: Lara subdues the man by holding the chloroform-soaked cloth over his open faceplate.
Once the suit guy is taken care of, you can return to the INSECT CAGE ROOM and look in the second cabinet. Inside you'll find a small medipack and another VIAL OF CHLOROFORM.
(NOTE: I have heard from several players that it's possible to kill the armored guy by aiming for his open faceplate. However, once you attract his attention, another guy in an armored suit enters through the door in the far corner. You'll need to use the crates for cover to avoid having these two gang up on you. I found the chloroform method much easier.)
Use the ACCESS CARD to open the door he was guarding. On the floor just after the hallway narrows are some HK clips. (I missed them at first since they're hard to spot on the textured floor.) When you move forward, the door closes behind and another guy in an armored suit emerges. Hop back if you want to, then use sniper mode to aim for his open faceplate. When you've killed him, pick up the IRIS LAB ACCESS disk he drops. (It is also a bit difficult to see on the textured metal floor.) Use the disk in the computer console to open the door at the end of the hall.
LASER-TESTING ROOM: Advance just to the first window. Inside the glassed-in laser room, an orange-suited worker is testing a laser. A guard patrols the hallway outside. If he sees Lara he'll run to the far end of the hallway, activate the gun turret on the ceiling then attack. You may want to save your game before attempting to get past him.
Stand near the first glass panel and watch the guard to learn his routine. He comes toward Lara but turns around just before reaching the corner. When he does, run out behind him and into the first alcove on the left. Stand Lara at the back left corner (right corner if she's facing out into the hall). If she is positioned correctly the guard won't notice her when he passes. Use the Look button to watch the guard. He'll pass going to the right, then turn and go back to the left. When he does, follow him and duck into the next alcove. This time, position Lara at the back right corner (left corner if facing out). Wait for the guard to pass to the right. Then run to the left end of the hall into the SMALL CONTROL ROOM.
Cut scene: Zip tells Lara that the next door requires two access cards used simultaneously. He advises her not to kill the worker since she'll need his help to open the door.
After the cut scene, turn around and shoot the guard, who is now alert to Lara's presence.
Now you have a choice of two paths: If you take Zip's advice and don't kill the orange suited worker, you'll miss a secret. So ignore Zip this time and shoot the worker. I found it impossible to aim for his head and had to use burst mode or about eight single rounds to kill him.
(NOTE: If you choose not to kill the orange-suited worker, you'll need to threaten him to make him open the door. Draw your weapon and approach him. A cut scene ensues in which Lara forces the worker to open the door then knocks him out. Go through the door you just opened. Pick up the walkthrough below at the section titled STAIRWELL NEAR THE IRIS ROOM. You enter the stairwell at the middle landing.)
Cut scene: Zip criticizes Lara as two guards enter the hallway beyond the LASER-TESTING ROOM.
Go back into the hallway but don't turn the corner, since the gun turret on the ceiling is now functional. Wait for the 2 guards to come to you. Then kill them. Sprint past the gun turret, taking a little damage in the process. Continue to the end of the hall. When the guards came in, they opened a panel on the left. Follow this hallway, killing 2 more guards on the way down.
Continue to a T intersection with a laser trap. Crawl in under the laser array and turn left. When the laser passes behind Lara, stand and run up to the end of the duct. Pick up another golden rose (secret #3, 30/36). Turn around to face the laser array. When it moves away, run after it and duck at the low point in the floor. Wait for the laser to pass in the other direction. Then stand and run up the ramp and through the door, which closes behind you.
STAIRWELL NEAR THE IRIS ROOM: Straight ahead is a door that opens automatically. Behind it is the hallway leading to the IRIS ROOM. For now, the IRIS is protected by a force field. Climb the metal stairs to a control room. The switch inside next to the door shuts off the force field for about 20 seconds. You'll need to run down the stairs to the IRIS ROOM and grab the artifact before the force field comes back on. This task is made even more difficult by the loss of the Look button in the stairwell.
You can probably figure out your own method, but here's what worked for me. If you find the Mission Impossible-style music distracting, run the gauntlet once then save your game at the switch. Next time the music won't play. If you use Sprint at all, wait until you're inside the IRIS ROOM, since it's impossible to make tight turns while sprinting.
Now the run: Pull the switch, turn right and run through the doorway and down the stairs. Circle to the left as you come down the first set of stairs. Then run across the landing, veering to the left a little to go down the opposite set of stairs. Circle to the right as you come down the second set of stairs. Then cut to the right into the hallway leading to the IRIS ROOM. If you make it this far without running into anything, you should be home free. Now you can see where you're going, so just run up to the IRIS and grab it.
Alternatively, to shave a few seconds off the run, pull the switch, side flip to the right, take a running jump to clear the railing and land on the next landing below. Roll then run down the stairs and around to the left (i.e., Lara's left, which is the right side of the screen, since at this point you're seeing Lara from the front). Continue around to the left into the hallway leading to the IRIS ROOM. Run or sprint up the ramp and across the room to get the IRIS.
Or, if you don't mind cheating a little, you can exploit a bug in the game. (I figure it's only fair, with all the bad bugs you have to deal with.) Flip the switch, sidestep once to the left, backflip twice to land just in front of the angled windows above the IRIS ROOM. Then crouch and crawl backwards. Hold the Action key as if backing down off a ledge, and Lara should crawl THROUGH the window to drop into the room below (as shown in this screenshot). Roll and run across the room to get the IRIS.
(NOTE: If you absolutely can't handle this timed business and the window bug doesn't work for you, you can download my savegames for this level. For help with savegame and .zip files, see here.)
Exit the IRIS ROOM through the hallway on the other side.
*Note on Kills: The number of kills varies depending on how you play certain areas. The number 14 is based on following this walkthrough. I have noted all enemies in orange type, as usual, and included notes on all possible kills.
**Note on Secrets: There are 36 golden roses in the game. If you find them all, after the credits you'll be able to access "Special Features" from the options menu. This is a collection of storyboards, etc., created during the game design.
***Notes on Starting Inventory & Equipment: If you are playing on the PC and a novice raider and/or have trouble getting through the VCI Headquarters levels with the limited health and ammo provided, feel free to download my regular or hacked VCI HQ savegames. The hacked files include initial saves for each of the last three levels with extra medipacks and HK clips. For help with savegame and .zip files, see here.
The HEADSET works just like binoculars: use Crouch/Duck and Sprint keys to zoom in and out, Action for light, draw/holster key to return to normal view. The HK RIFLE has three modes: sniper, burst and rapid. Change mode by going into inventory and selecting the HK. Then select "choose weapon mode." Sniper mode shoots one round at a time. Burst mode shoots rapid bursts of five rounds, and rapid mode constant automatic fire. All three modes have a scope similar to the laser sight. Activate with the Look button, use Crouch/Duck and Sprint keys to zoom in and out.
WAS THIS WALKTHROUGH HELPFUL? If not, I apologize and invite you to contact me with any questions. If you need help right away, I recommend the r/TombRaider subreddit. Other fan-run forums are listed at tombraiders.net/stella/community.html. If this site was useful, please consider supporting it financially or in other ways. For details, visit tombraiders.net/stella/support.html. As always, I welcome your corrections/suggestions. Thank you!
Copyright © 2000- - Stellalune (). Special thanks are given to the participants in the alt.games.tombraider newsgroup, without whom some parts of this walkthrough couldn't have been written. No part of this walkthrough may be reproduced without permission.
Stella's Tomb Raider Site: tombraiders.net.