Rise of the Tomb Raider - Geothermal Valley Challenges
Updated: 6/25/16(†)
There are 5 challenges in the Geothermal Valley. This guide, along with the annotated level maps linked below, should help you find any challenge items you missed. If you are playing this level for the first time, you may want to follow the main walkthrough instead.
To check your progress on any challenge, open the map screen in game. Then press Y on the controller or click the Missions/Challenges button at the bottom of the map screen. This sub-menu shows active and completed missions and challenges, and lets you toggle between them if you have more than one active at a time.
BULL'S-EYE
In order to beat this challenge, you must shoot down 8 bull's-eye targets, all of which can be found on your first visit to the Geothermal Valley. The bull's-eyes are marked with red dots on the annotated level map. You can also check the main walkthrough for details.
BUG NOTE: After completing THE ACROPOLIS you will have unlocked grenade arrows. DO NOT use them to destroy any remaining bull's-eyes. This can result in a bug in which the target is destroyed but not counted toward the challenge.
BULL'S-EYE 1
The first target is just west of the Valley Farmstead Base Camp. If you're standing near the campfire facing west, the bull's-eye is hanging on the left side of the stone archway at the top of the stairs. Strongbox #1 is nearby on the right. (Click screenshot to enlarge.)

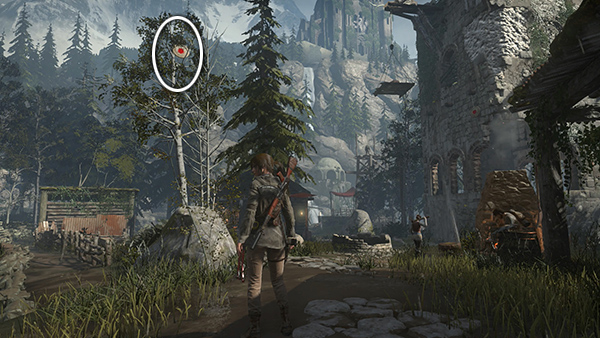
BULL'S-EYE 2
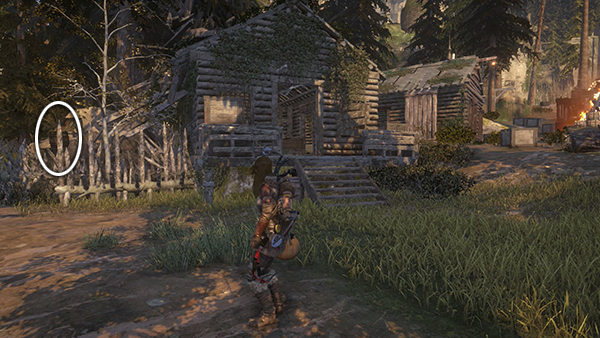
This bull's-eye is one of three in the village northeast of the Valley Farmstead Base Camp. It's hanging in the white birch tree near the blacksmith's cabin and the stone well. (Click screenshot to enlarge.)
BULL'S-EYE 3
This target is very close to the second one. It's hanging on the west side of the stone tower near the blacksmith's house. (Click screenshot to enlarge.)

BULL'S-EYE 4
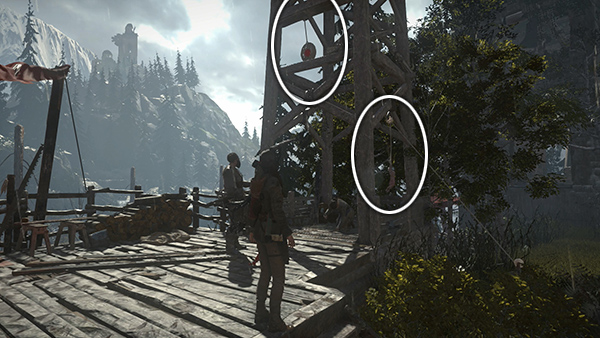
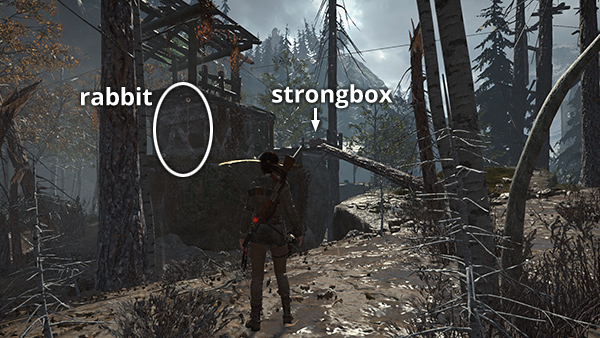
This bull's-eye is hanging in the guard tower near the Remnant builder who gives you the Defensive Strategy Mission. (There's also a snared rabbit here that you can cut down for the next challenge.) The builder leaves this area later in the game, but both builder and the bull's-eye are marked on the level map. (Click screenshot to enlarge.)
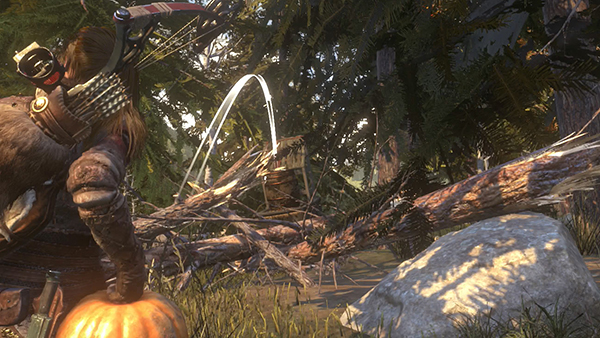
BULL'S-EYE 5
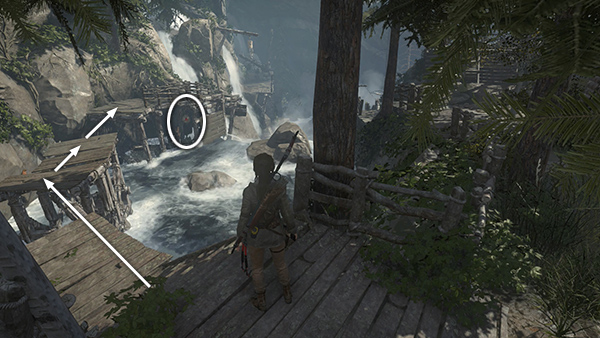
This target is on way to the House of the Afflicted Challenge Tomb from the Valley Farmstead area. As you cross the river via the elevated wooden walkway, look for the target hanging below the third section of walkway. (Click screenshot to enlarge.)
BULL'S-EYE 6
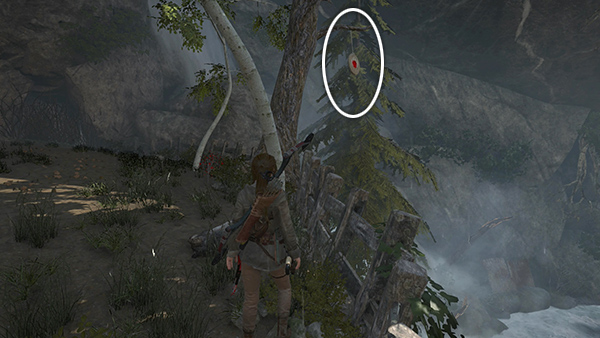
This bull's-eye is near the entrance to the House of the Afflicted Challenge Tomb. After you crawl through the low opening into the area where you fight the wolves, look up on the right to spot target hanging from a tree just outside the fence. (Click screenshot to enlarge.)
BULL'S-EYE 7
This bull's-eye is off the steep path leading up toward the Architect's Crypt in the northwest corner of the level. From the village, head up the path, cross a small wooden bridge, and then look for a clearing on the right. The target and survival cache #10 are here. Later in the game, you can come down from the Ridgeline Base Camp and find the target on the left side of the path. (Click screenshot to enlarge.)

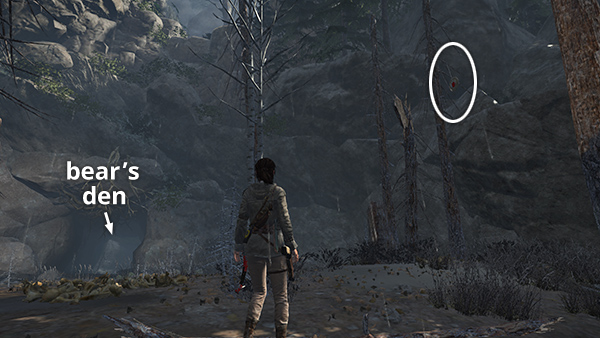
BULL'S-EYE 8
The last target is in the barren clearing near the bear's den on the northwest side of the level (i.e., the same cave that serves as the entrance to the Baths of Kitezh Challenge Tomb). The bull's-eye is above on the right when facing the cave entrance. (Click screenshot to enlarge.)
FOWL PLAY
This challenge is undertaken near the Valley Farmstead Base Camp.
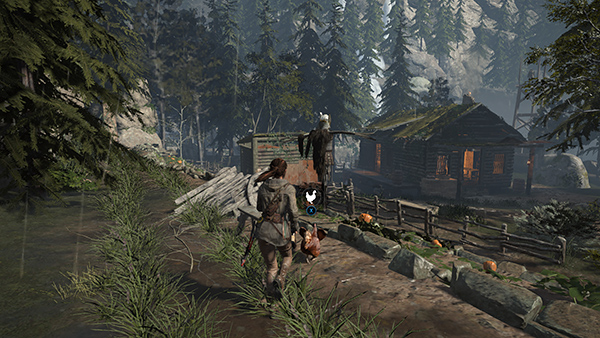
To complete it, run/sprint up to any of the many chickens wandering around the village and press Interact to grab it. A pop-up will announce you've discovered the challenge and mark the location of the chicken pen on your in-game map with a star. (Click screenshot to enlarge.)
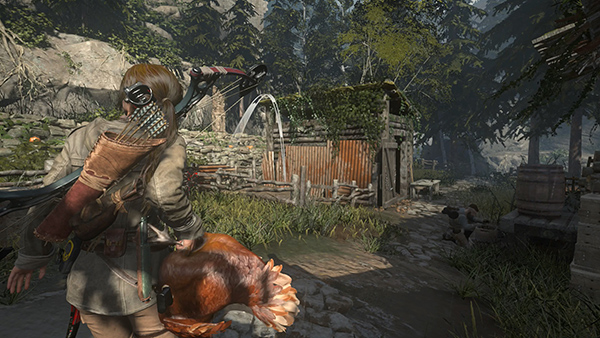
Carry the chicken to the pen and toss it in just as you would for any other throwable object. Repeat this four more times to complete the challenge. (Click screenshot to enlarge.)
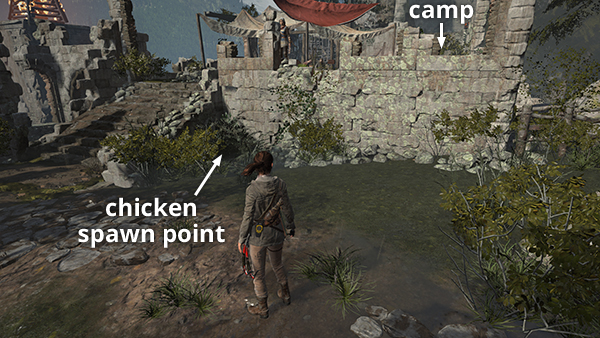
If you're having trouble finding enough chickens, they generally appear in this corner, just below the Valley Farmstead camp. If they stop spawning, try leaving the area and returning to prompt them to respawn. (Click screenshot to enlarge.)
HUNG OUT TO DRY
In order to beat this challenge, you must find and cut down 6 snared rabbits located throughout the area on the west side of the river. All are marked with yellow dots on the annotated level map. The main walkthrough includes additional details. Depending on which ones you're missing, you may find it more convenient to fast travel to the Valley Farmstead or Ruins Encampment Base Camp.
SNARED RABBIT 1
The first rabbit is hanging in the guard tower near the Remnant builder who gives you the Defensive Strategy Mission. (There's also a bull's-eye here that you can shoot down for the previous challenge.) The builder leaves this area later in the game, but both builder and the bull's-eye are marked on the level map. (Click screenshot to enlarge.)

SNARED RABBIT 2
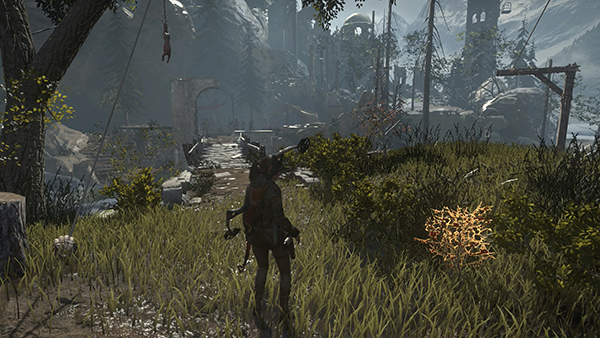
The next rabbit is down in the valley, just below the guard tower and Remnant builder where you find the first rabbit. If you slide down the zip line from the House of the Afflicted Challenge Tomb, the rabbit will be more or less directly ahead. (Click screenshot to enlarge.)
SNARED RABBIT 3
The third rabbit is just southeast of the second, strung up near one corner of the tall, wooden structure with strongbox #3. (Click screenshot to enlarge.)

SNARED RABBIT 4
At the southwestern end of the valley, beyond the Remnant hunter's cabin and the lynx's hunting ground, there's a wooden hut built into the side of the cliff. The fourth rabbit is strung up here. (Click screenshot to enlarge.)
SNARED RABBIT 5
This rabbit can be found alongside the path that leads away from the village to the northwest. There's a cloth canopy sheltering document #10, and the rabbit is tied up next to it. (Click screenshot to enlarge.)

SNARED RABBIT 6
The last rabbit is on the west side of the wooden bridge that crosses the river near the Ruins Encampment Base Camp—i.e., the bridge near where Sofia gives her speech rallying the troops before the Trinity invaders arrive. (Click screenshot to enlarge.)
HIGH DIVE
This challenge involves diving off four wooden diving boards on the west side of the Geothermal Valley. One of these is not accessible until you've completed the Defensive Strategy mission. One cannot be reached until you return to the valley after completing the FLOODED ARCHIVES level. All are marked with aquamarine dots on the annotated level map and detailed in the main walkthrough.
To do a swan dive, stand at the edge of the diving board and simultaneously press Forward and Jump, then a split second after takeoff press LT/Right Mouse to go into a dive. If you're having trouble with the swan dive, it may help to point the camera downward as you dive and/or to press Dodge (C) instead of the Right Mouse button if you're playing with keyboard and mouse. Both worked for me, but you may have better luck with one or the other.
HIGH DIVE 1
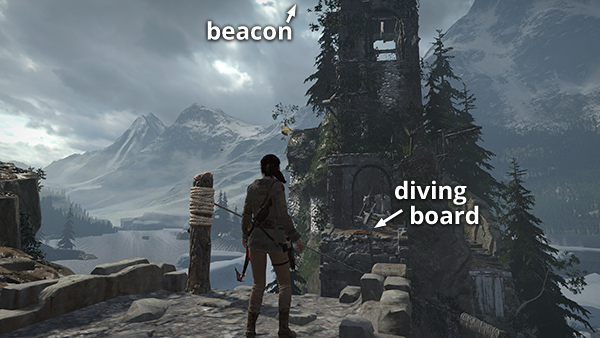
You can initiate the challenge from any of the four diving boards. One of these is at the base of the spire with the beacon that you lit to signal Jacob's people. Climb halfway up the tower, as you did earlier, and then drop down near the diving board. (Click screenshot to enlarge.)
HIGH DIVE 2
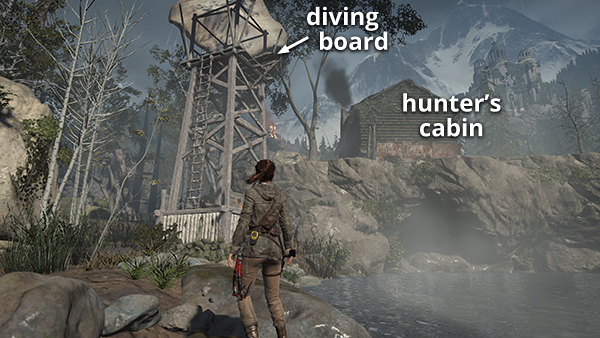
After you complete the Defensive Strategy mission, the guard tower by the lake, just south of the Remnant hunter's cabin, is fitted with a ladder. You can then climb up to find the next diving board. (Click screenshot to enlarge.)
HIGH DIVE 3
The next diving board is near the entrance to the Pit of Judgment Challenge Tomb. To get there, start near the Ruins Encampment Base Camp, where Sofia was giving her pep talk earlier, and follow the path to the north, behind the falls. (Click screenshot to enlarge.)
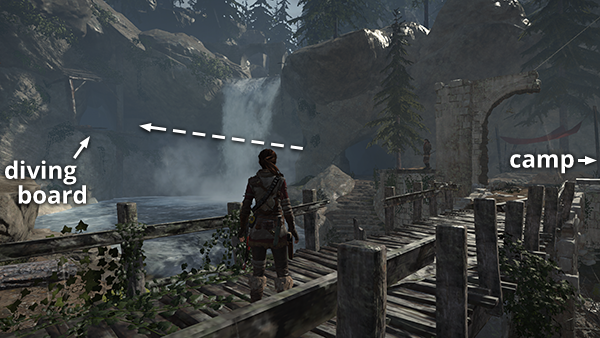
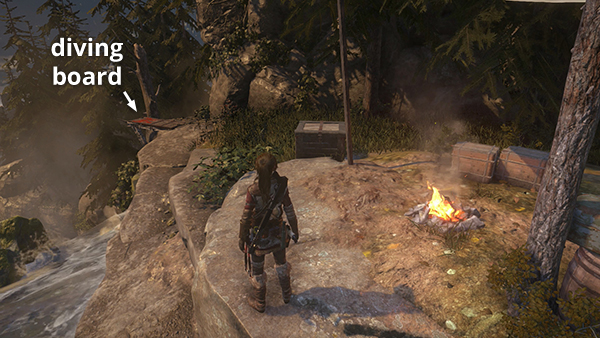
HIGH DIVE 4
The final diving board is located near the top of the waterfall, above The Architect's Crypt. It is not accessible until later in the game, after you've completed the FLOODED ARCHIVES level and re-enter the Geothermal Valley in the northwest corner near the Ridgeline Base Camp. This screenshot shows the diving board from the campsite. (Click screenshot to enlarge.)
This screenshot shows the 4th diving board from the valley below. (Click screenshot to enlarge.)
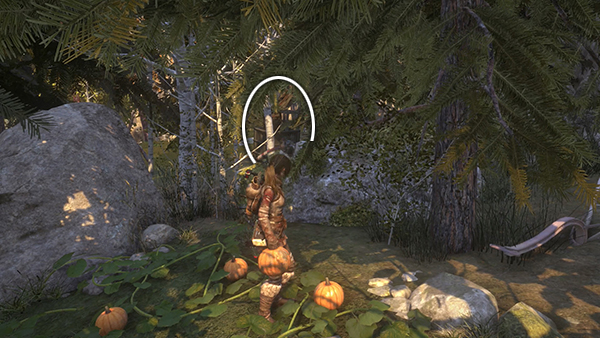
TOSSING GOURDS
This challenge is not accessible until after completing the FLOODED ARCHIVES level. Any time after this, return to the upper village, where you fought the Trinity soldiers before climbing the cathedral and entering the archives. There is no base camp in that area, so you'll either have to return to the Cathedral Courtyard Base Camp, climb the stairs, and jump down to the large cabin near the bonfire. (screenshot) You could also make your way back to the village from the Cliffside Lookout or Ruins Encampment Base Camp.
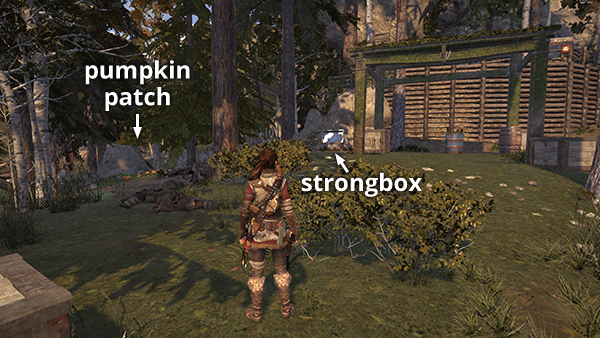
Once you're back in the upper village, head for the southwest corner. Here, near strongbox #8, you'll find a pumpkin patch with gourds you can pick. The goal is to toss a pumpkin into each of 5 nearby wooden barrels. This challenge is covered in detail in the main walkthrough. The pumpkin patch is indicated on the annotated level map, and the gourd-toss locations are marked on the map with orange dots.
THE PUMPKIN PATCH
Here's the pumpkin patch where you'll pick the gourds. It's in the southwest corner of the upper village, near strongbox #8. It is also marked on the map. (Click screenshot to enlarge.)
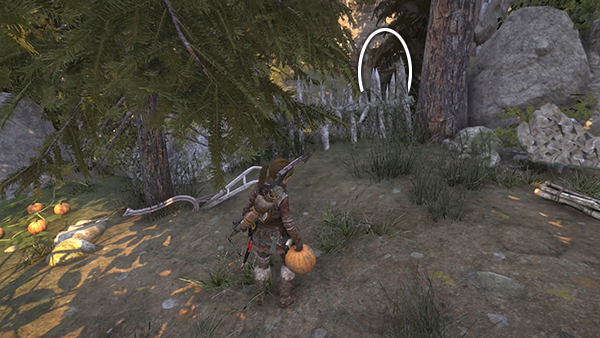
GOURD TOSS 1
The first barrel is just to the left (southwest) of the pumpkin patch. Look over the barrier made of fallen trees to spot it. Toss the gourd into the barrel to initiate the challenge. Again, check the main walkthrough for additional screenshots and tips. (Click screenshot to enlarge.)
GOURD TOSS 2
The next barrel is just a little to the northeast of the first, just beyond the boulder and white birch trees near the pumpkin patch. (Click screenshot to enlarge.)
GOURD TOSS 3
The third barrel is just northeast of the second, a little closer to the shelter with the strongbox, behind a spiked log fence. (Click screenshot to enlarge.)
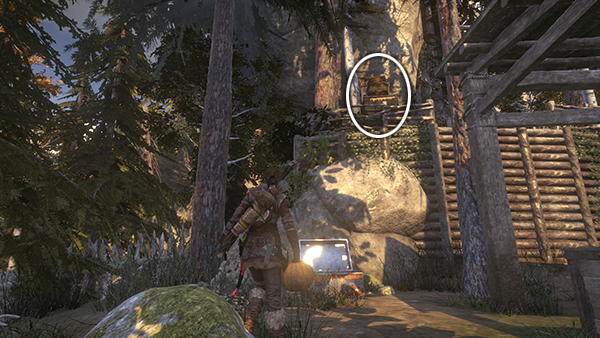
GOURD TOSS 4
The next barrel is on the ledge above and behind the strongbox. You can toss the gourd in from below, or throw it up onto the roof of the wooden shelter, climb up, and toss from there. Again, see the walkthrough for details. (Click screenshot to enlarge.)
GOURD TOSS 5
The last barrel is a little way off from the others. Grab a pumpkin and carry it back through the village and around to the back of the first cabin on the right. The barrel is behind another spiked log fence adjacent to the cabin. (Click screenshot to enlarge.)
Top of Page | Collectible Guides | Main ROTTR Page
†UPDATE HISTORY: 6/11/16 - Page first posted online.
6/25/16 - Added the warning against using grenade arrows for the Bull's-Eye Challenge, thanks to a tip from John M.
WAS THIS WALKTHROUGH HELPFUL? If not, I apologize and invite you to contact me with any questions. If you need help right away, I recommend the r/TombRaider subreddit. Other fan-run forums are listed at tombraiders.net/stella/community.html. If this site was useful, please consider supporting it financially or in other ways. For details, visit tombraiders.net/stella/support.html. As always, I welcome your corrections/suggestions. Thank you!
Copyright © 2015 - Stellalune (). All rights reserved. Feel free to copy or print this walkthrough for personal use. By all means, share it with friends, but please include this credit line so people can send me their feedback. No part of this walkthrough may be reproduced on another site without permission. Follow this link for details about this site's advertising and privacy policy.
Stella's Tomb Raider Site: tombraiders.net.