LEVEL 5: KAZAKHSTAN - PROJECT CARBONEK |
Updated: 1/6/10(†) |
Items: health packs, grenades, grenade launcher, assault rifle, submachine gun, ammunition
Enemies: mercenaries, Amanda's creature
Rewards: 5 bronze, 3 silver, 1 gold (*)
Time Trial: 27:10 (**)
As Lara arrives at the military installation, Zip and Alister share their recent findings. Apparently, while delving into the properties of one of the sword fragments, some catastrophe occurred here, and the KGB tried to shut the project down. Despite the firefight raging between the Kazakh soldiers and Amanda's mercenaries, Lara decides that locating the command center is next on the agenda.
DROPPING IN FOR A VISIT: From CHECKPOINT 1, jump off the cliff, triggering an interactive cut scene. Press the control indicated by the icon that appears on-screen to make Lara pull the ripcord and release her parachute. Otherwise, thud. . . and reload. The correct controls are:
PC: Down PS2: Triangle Xbox: Y PSP: Triangle GameCube: Y
MILITARY COMPOUND: If you are successful, Lara glides to the rooftop below, landing next to a conveniently placed machine gun and CHECKPOINT 2. The area below is swarming with mercenaries—11 soldiers in all. Press Interact to grab onto the big gun and use it to sweep the area, concentrating on the closest mercenaries first. Then take out the men in the windows and wait for a few stragglers to emerge. The fuel barrels make lovely explosions, so target them as well. When the coast is clear, pick up the RC650 ASSAULT RIFLE (or ammo if you have the rifle) to the right of the machine gun.
Drop down behind the building and move out toward the corner so you can see the truck in front of the building where the soldiers were. This triggers the appearance of 5 more mercenaries. Either run out and deal with them, using the crates and truck for cover, or use the crates behind the building to climb back onto the roof and, once again, use the machine gun to mow down the mercenaries.
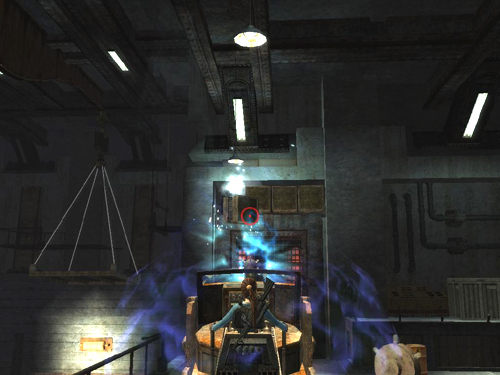
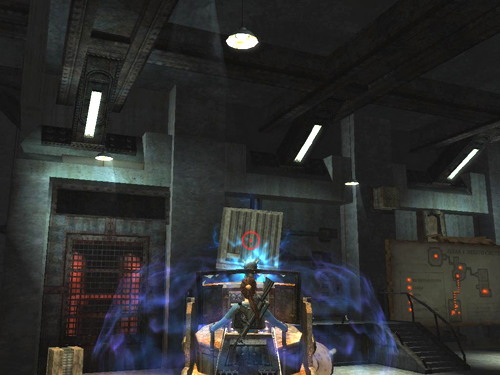
Before dropping down again, climb onto the higher roof on the right. (If you've already climbed down, use the crates in front of the building to get back up to the roof with the machine gun. Then climb onto the higher roof on the left.) Jump to grab the horizontal bar on the flagpole. Swing around it and jump to grab the crates stacked against the next building. Pull up. Use manual aim to shoot the wooden box and then snag the bronze reward (1/5) inside with your grapple. (screenshots)
Drop down and pick up all the rifle rounds, health packs and grenades Lara can carry.
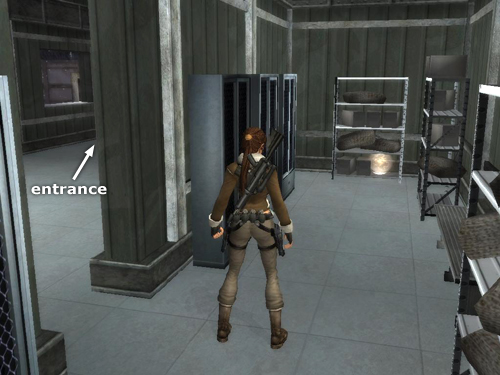
The big building with the train tracks is locked. The gate in the fence doesn't open either. So enter the building where the soldiers were. In the back room, there's a bronze reward (2/5) on a shelf in plain sight (screenshot). Return to the main room and locate the ladder on the back of the support column. Climb up through the hole in the roof to CHECKPOINT 3.
FAR SIDE OF THE COMPOUND: Kill the soldier on the watchtower ahead. Jump onto the open skylight then over to the tower where the soldier fell. Pick up rifle ammo, health and/or a grenade.
Four more mercenaries appear below. Slide down the planks onto the rooftop to the left. Try and deal with the 2 roving soldiers in blue first. They'll move in and shoot up at Lara with rifles. The man wearing yellow and white and carrying a grenade launcher and the one manning the machine gun can't hit Lara as long as she remains on the roof. So you can take your time with them. Grenades work well here, as does targeting the explosive barrels. If you prefer direct confrontation, slide down the angled cable to the ground or just climb down and fight the mercenaries on their level.
After the fight, pick up any goodies you need—health packs, rifle ammo, hand grenades, and the GRENADE LAUNCHER if you want it.
The gate with the keypad leads to the COMMAND CENTER, but you can't get through yet.
Head for the low tower surrounded by a razor wire-topped fence. If you stand with the gate separating this area and the previous one on Lara's left, you'll see a hole in the fence surrounding the tower. From a safe distance, use pistols to shoot the fuel barrel through the small hole in the fence. When it explodes, it destroys a big section of the fence so you can get in. If the explosion doesn't shatter the wooden box containing the silver reward (1/3), use pistols with manual aim to shoot it. (Check these screenshots for details.)
Alternatively, go around to the side of the enclosure near the INFIRMARY (the building with the green cross near the machine gun). Shoot the rickety wooden crates alongside the fence to reveal an opening. Go through. Then, either blow up the fuel barrel or just use manual aim to break the wooden box with the reward inside.
INFIRMARY: Enter the building with the green cross painted on it.
A cut scene ("Allies Under Fire") shows Lara rescuing a pair of Kazakh soldiers from one of the mercenaries. Conversing in Russian, the soldiers agree to give her the gate code, thinking she'll sound an alarm in the control center if she uses it without the key. She politely thanks them in their own language.
CHECKPOINT 4 follows the cut scene. Pick up the rifle ammo the mercenary dropped and exit the infirmary into an ambush.
Just beyond the machine gun, 5 mercenaries appear, including one wearing yellow and white carrying a grenade launcher. If you run straight out to the machine gun and immediately start firing, you should be able to kill all the enemy soldiers. But if they start lobbing grenades at Lara, you'll be better off moving out so you have room to dodge while shooting. These guys drop the usual health, ammo and grenades, along with a GRENADE LAUNCHER.
When you're ready to move on, go to the keypad on the cement wall opposite the infirmary. Use it to open the gate.
COMMAND CENTER: As soon as you do, the 2 soldiers at the top of the hill start rolling explosive barrels down toward you. The most direct strategy here is to run through the gate past CHECKPOINT 5. The gate then closes behind Lara, so there's nowhere to go but up. Run up the hill along the snowbank at the left edge of the road, so the barrels won't hit Lara. If you run with weapon drawn, tapping Interact as you go, you should be able to destroy all the barrels. (screenshot) If the soldiers survive the explosions, finish them off when you reach the top.
Alternatively, run back to the machine gun and use it to shoot the soldiers from a distance. (This didn't work for me in the PC version, but other players have recommended it, so I'll mention it.) Or, stand at the foot of the hill, just outside the gate. The barrels will explode right in front of Lara but will almost never injure her as long as she stands behind the seam between the textures at the threshold. (screenshot) Then use the rifle in manual aim mode to target the barrels at the top, killing the soldiers in the process.
At the top, pick up any dropped health packs, grenades and ammo you may need and enter the building.
A cut scene ("Command Center") shows Lara accessing the base computers. She finds a map revealing the secret lab and a train that will take her there. Zip informs her that the train she wants is about to depart.
RUN FOR THE TRAIN: There is no actual time limit here. The train won't leave until you actually engage the soldiers guarding the track. So there's no need to rush. Climb the ladder to the roof and CHECKPOINT 6. Jump from the open skylight to grab the ladder on the radio tower. Climb to the top, grab the angled cable and slide down toward the compound, landing on the tower next to the INFIRMARY. Grab onto the second cable and slide across to the roof with the machine gun, where you started the level. Or, let go of the second cable before reaching the roof to land on the concrete platform.
There are 6 mercenaries here. The one on the cement platform wearing yellow and white has a grenade launcher. So, while you don't need to waste time killing every soldier, you may want to take him out first. Then run for the tunnel at the end of the tracks. (Or, if you drop directly onto the cement platform, just run toward him, kill him and keep going.)
As soon as you've killed two of the soldiers, you'll see a brief cut scene of the train pulling away and hear Zip on the headset telling Lara it's leaving. That's the signal you'd better get moving. You have about 40 seconds before the timer runs out. Then it's Game Over and you must try again from CHECKPOINT 6.
Two soldiers guard the motorcycle just inside the tunnel. If you have time, kill them and take any health and ammo they drop. But the main goal is to reach the bike, press Interact to get on and go.
MOTORCYCLE CHASE: A new area loads and Lara is on the bike, passing CHECKPOINT 7. This is similar to the motorcycle sequence in Peru. Throughout this stage, avoid hitting trees and rocks, run over the red health packs whenever possible, and try to maintain speed. If you go too slowly, the train gets away and the game restarts at the previous checkpoint. You'll get a warning from Zip over the headset before this happens, though, so you'll have a chance to speed up. If you go too fast, you run the risk of leaving enemies behind, which can trigger a bug (see the note below). Throughout the area, thugs on motorcycles try to get in your way. They become more numerous as you go. Later, bad guys in black Jeeps join them. Propane tanks scattered here and there can be detonated as usual with the Interact key.
NOTE: I highly recommend saving the game manually at the start of the motorcycle sequence. There are several potential bugs here. For details, see the bug note at the bottom of the page. It also includes a useful bug for the PSP version.
The first part of the run, between checkpoints 7 and 8, is fairly easy. Then, shortly after Zip says he can't see what's going on, the train enters a tunnel. You'll need to stay to the right to avoid crashing and then veer left to stay on the road.
After CHECKPOINT 8 the path splits several times. At each fork, you'll have to choose the left or right path. The first time there's a slope with wooden barricades on the left. This leads up to a narrow, snowy track, where you may need to slow down a bit to stay on the road. On the right, there's a health pack at the base of a snowy ramp. If you choose the ramp, gun the engine to jump the chasm beyond.
Next, you can go to the left along another high, narrow path or to the right, over a rickety wooden bridge. Beyond that you must choose the high path to the left; otherwise it's death by rock wall to the right. Finally, the road divides once more, and you can choose the high and narrow path on the left or the health pack and jump over chasm on the right.
Just beyond CHECKPOINT 9, the road curves around to the left. Beyond this, there are 2 easy health packs, followed by a long run interspersed with trees and rocks, where you'll have to fight off numerous mercenaries on bikes and in Jeeps. Try and maintain moderate speed, shooting anyone who comes into range, and picking up health when you can get it.
Just before CHECKPOINT 10, the train enters another tunnel and you need to stay to the right. There are no more bad guys on this stretch. After the checkpoint, the road splits, with a hill on the left and a low path on the right. These two paths converge again just ahead. A bit farther on, the road splits again, and you can choose the a high, narrow path on the left or the wooden bridge over a chasm on the right.
Beyond that, the road curves around to the left. Steer into the curve and then speed up the wooden ramp to jump over the train track. After landing, steer around to the right onto another wooden ramp and jump over the train once more. Finally, follow the road around to the left and up a narrow ledge with icicles hanging from above. Drive forward along the ledge beside the moving train. Then jump the bike onto the train by veering to the left at the spot where the embankment comes to a point. (These screenshots show the jumping sequence.) Once on the train, keep driving forward, staying in the middle as much as possible.
A cinematic (titled "Runaway Train") cuts in. Lara makes her way forward to the engine. The bad guy driving the train doesn't seem happy to see her, but before he can do much, the train crashes into a fuel tank and jumps the tracks.
As soon as the next area loads, CHECKPOINT 11 registers and an interactive cut scene begins. Press the controls indicated as soon as they appear on-screen to help Lara escape the train wreck unscathed. These are:
PC: Down, Right, Left
PS2: Circle, Triangle, Square
Xbox: B, Y, X
PSP: Circle, R, Triangle
GameCube: B, Y, X
At CHECKPOINT 12, a short cut scene indicates the route to the exit, around and over the burning train.
ENTERING THE SECRET LAB: (The following is shown in a series of screenshots.) Kick the 2 small crates out of the way if you like. Grapple the crane arm with the dangling rope and pull it toward Lara. Release the grapple and jump to grab the rope before it swings away. When the crane moves back to its original position, swing on the rope and jump to land on the platform ahead. Climb the ladder and jump to grab the top of the sign with the red star. Climb to the left and then jump to grab the horizontal pipe. Swing around the pipe and jump across the flaming wreck to grab the next pipe. Swing and jump to the sign on the wall ahead. Let go to land at CHECKPOINT 13.
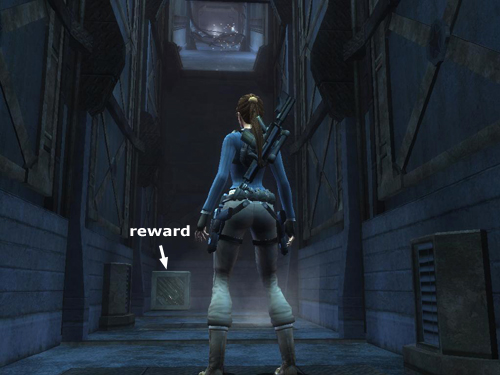
Drop down into the dark corner behind this platform to find a wooden crate containing a bronze reward (3/5). Go around the platform and use the larger crate to climb back up. (This is also shown in the previous set of screenshots.)
Turn to face the next dangling rope. Again, use the grapple to pull the crane arm toward you and jump to grab the rope. Climb up the rope a bit if necessary down the rope a bit so Lara doesn't get singed by the flames. Then swing and jump to the next platform. Jump from the platform to grab a handhold on the wall ahead. (If Lara slips, pull the metal box out from under the platform and use it to climb back up.) Jump up to the circular opening and shoot the spinning fan before trying to pass.
VENTILATION DUCTS: Follow the duct past CHECKPOINT 14 to a slope. Slide down. Take a running jump to clear the tangle of live wires (holding Jump keeps Lara in the air a little longer). Duck or roll to get under the second set of wires. Cross CHECKPOINT 15.
Pick up the health pack and note near the dead scientist. (The note must be retrieved by pressing Interact.) Lara reads the note, which hints at Project Carbonek's purpose, and she and the guys discuss the poor chap's untimely end.
Go through the doorway to the left. Jump to grab the horizontal pole. Swing and jump to grab the rope. Swinging and jump to the opposite opening. If Lara falls, use the box to climb up and try again. Slide down the next ramp, jumping to clear the live wires. Follow the passage to the right, shoot the fan and duck/roll under the wires. Continue along the passage to the left. Slide down another ramp, shooting another fan and jumping over more electrified wires as you slide. Take a running jump over the next set of wires; duck/roll under the next. Follow the hall to the right. Then slide down another slope, jumping to clear another tangle of wires.
It's easy to bypass the secret in the second pit. Instead of immediately swinging across, drop down to the floor and get the bronze reward (4/5) in the box. (screenshot) To get out, go to the opposite end of the pit, climb onto the larger box, face the middle of the pit and double-jump to grapple the metal projection above. Turn around, shorten the cable a bit, then swing to the opening.
Press Interact to shoot the spinning fan at the bottom of the next slope. Then slide down into the room below.
GENERATOR ROOM: Just beyond CHECKPOINT 16, Lara and Zip notice that Amanda hasn't started the generator here. Before doing that, go after a reward: Turn around to face the duct where you just came in. To the left of it are 2 small louvered vents or cabinets that look like they might once have been white. Climb up so Lara is hanging from the higher vent. Then traverse to the left and pull up onto the catwalk.
Go up the steps to the left. Lara comments on the map below. Grapple the cage door ahead and pull it open. Jump across the gap in the walkway into the cage, shoot the crate and retrieve a silver reward (2/3). (These screenshots show how to reach the reward.)
Drop to the floor and cross the room to the generator. You can grapple and pull the valve on the front of the generator, but it won't start without fuel. Climb onto the formerly white metal box on the left. Jump to grab the whitish louvered vent on the wall between the yellow pipes. Climb to the right and then jump to grab the edge of the catwalk; pull up. Follow the catwalk, jumping the gap, and continue around behind the generator. Or, for a shortcut, jump onto the narrow metal railing on the right side of the generator. Jump from there to grab the catwalk behind it on the right and pull up. (Thanks to MMAN for this.)
Jump from the catwalk to the dangling rope. Lara's weight pulls down a pipe, refueling the generator. Go around to the front of it and use the magnetic grapple to pull out the valve. The generator starts, lighting up the map on the wall and unlocking the door in the corner. Go through this door to CHECKPOINT 17. (These screenshots show the refueling sequence.)
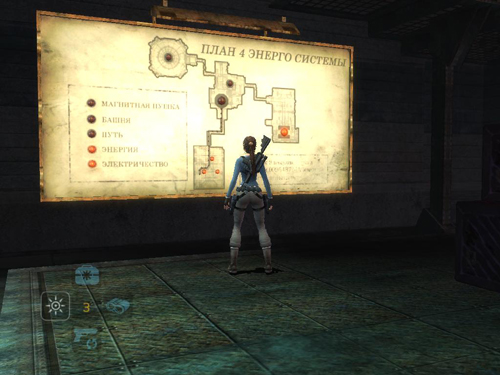
NOTE: For those of us who don't read Russian, Andreas has kindly provided translations for the sign. Title: Energy System Plan. Section with lighted buttons at bottom left: Magnetic Guns, Tower, Path, Energy/Power, Electricity. Apparently, since the "you-are-here" light is lit for this room, "Electricity" indicates the generator you just activated. (screenshot)
HALLWAY WITH TOXIC GAS: Zip and Alister comment on the poisonous gas spewing from the pipes ahead. To avoid it, jump to grab the small metal ledge ahead; pull up. From there, jump to grab the horizontal pipe. Swing and jump to grab the next metal ledge and pull up. Jump to grab the horizontal pole. Adjust Lara's position left to right if necessary. Then swing and jump to grab the dangling rope. Swing forward and jump to the corner ledge. Hop over to the next small ledge. (There's more toxic vapor below.) Move to the edge and jump straight up to grab the ledge above; pull up.
Observe the electrified pipe above on the right. When the spark moves away, jump up to grab the pipe. Climb along behind the spark, taking care not to touch it. At the end, the spark skips back to the beginning of the pipe, giving you plenty of time to continue nearly to the end, jump back and grab the metal duct on the opposite wall. Climb around the corner to the right and drop to grab the retracted ledge below. Jump to the ledge behind.
Here there's another electrified pipe above and more toxic gas below. When the spark moves off, jump up to grab the pipe. Swing along hand over hand, following the spark but not touching it. (Tap Interact if necessary to climb faster.) Drop onto the platform on the other side. Hop down to the floor and go through the automatic doors to the next room.
Lara discovers that Amanda did survive after all. She tries to apologize to her old friend, but Amanda is not interested. She stalks off, leaving her bodyguards to deal with Lara. One soldier tosses a grenade onto the catwalk, preventing Lara from following. (This cinematic is titled "Reunion with Amanda".)
NOTE: There is a shortcut from here to the end of the level. This is highly useful in Time Trial mode but prevents you from getting the remaining rewards. (These screenshots show the sequence.) Shoot the explosive barrels to the left of the Tesla gun. Move one of the large crates into the corner next to the railing where the barrels were. Climb onto the crate and jump to grab the edge of the hanging platform ahead. Jump from the hanging platform to the catwalk that leads to the exit. Go through the door with the green light and pick up the walkthrough below at the next to last section, HALLWAY WITH TOXIC GAS & ELECTRIFIED PIPES. (I believe this shortcut was first discovered by Jana from tombraidergirl.com.)
LARGE ROOM WITH TESLA GUN AND TOWER: CHECKPOINT 18 is just inside the room. Zip is practically drooling into his microphone with excitement over the apparatus. Unfortunately the Tesla gun needs more power to be fully operational. You'll have to see to that. For now, leave the explosive barrels alone. You may want to use them when you return to this area later.
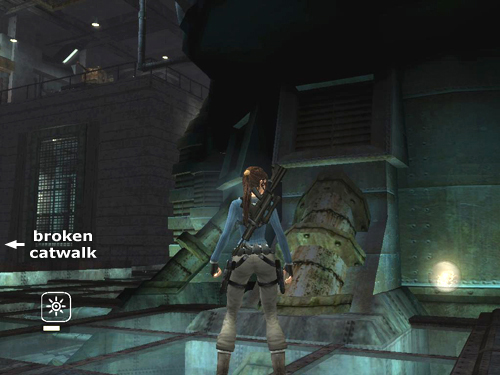
First move to the edge of the balcony near the broken catwalk. If there's a mercenary on the opposite walkway (he may or may not appear), you can take him out with pistols as long as you stay behind the railing and move from side to side while shooting.
NOTE: After playing this level numerous times, I've noticed that the soldier on the walkway opposite the Tesla gun only appears occasionally. If he's not there, there will be three soldiers on the lower level instead of two.
You can probably kill the soldier below on the right with a well-aimed grenade. Or, slide down the broken catwalk and confront him up close. When he's dead, pick up his rifle ammo, grenade and health pack.
Then deal with the soldier in riot gear at the base of the tower on the left and possibly another man on the right. The armored soldier's shield makes him difficult to hit, so you may want to use a grenade on him as well. Or, try hitting him with an aerial attack—i.e., run toward him while holding down the Target Lock button and jump twice when you get close. Lara will spring into the air in Trinity-style slow-mo. Then just tap the Fire button to finish your opponent with a few well-placed shots. This soldier drops a grenade, health pack and SUBMACHINE GUN (or ammo if you have the gun). The other man has the usual rifle ammo, grenade and/or health.
Zip advises climbing to the top of the tower to find the power source. Good idea, but first go around to the right side to find a bronze reward (5/5). (screenshot)
CLIMBING THE TOWER: Return to the vertical pole with the electric charge on the other side of the tower. Wait for the spark to move upward and then grab on. Climb the pole, following the spark but taking care not to touch it. When the spark skips back down to the bottom, climb all the way to the top and jump onto the ledge ahead. (This is CHECKPOINT 19.)
Climb onto the higher ledge and turn around. Swing across the two horizontal poles to the dangling rope. Turn left and then swing and jump to grab the vertical pipe. Climb almost to the top. Ahead are more electrified vertical poles. When the spark on the nearest pole is at the very top, about to jump to the bottom, jump to grab the pole. Climb up and jump to the top of the metal cage before the spark reaches Lara. (screenshots)
Cross the cage to the left and drop down near another dead scientist. Pick up the health pack and note he dropped.
Lara tells Zip and Alister about the contents of the note. Apparently, while experimenting on the artifact, the scientists triggered some sort of massive energy discharge. After that, the KGB shut down the project, sealing some of the researchers inside.
To get the silver reward (3/3) in the cage, face the cage door and back up into the corner. Then shoot the explosive barrel through the hole in the cage. (screenshot) As long as Lara stands back, she won't be hurt. You can also use a grenade to blow open the cage. Then go in and get the reward.
Lara asks Zip if it's possible to power up the device from here. He says not without the core. Then he speculates that the tracks in the floor must be for moving the core to the tower.
NOTE: It's possible to open the door to the Tesla tower and go inside, but Lara will be electrocuted. If you want to try it anyway, stand to the left of the door with the high voltage symbol. Use the magnetic grapple to slide the door open, then quickly release the grapple and run/roll through the door before it closes. Ouch!
Just beyond the dead scientist, cross CHECKPOINT 20. The door with the red light on the other side of the room doesn't open yet. So follow the track on the floor through the door with the green light.
HALLWAY WITH DANGLING SOCKETS AND TOXIC GAS: The dangling wires aren't live. . . yet. Follow the hall until you reach the poisonous gas. Climb onto the metal ledge and jump to grab the horizontal pipe ahead. Swing and jump to the next ledge. From here you can see activity in the next room. Take a running jump to grab the horizontal bar in the opening. Either drop down onto the narrow beam above the door or swing and jump into the room.
ROOM WITH TRACK AND POWER CORE: CHECKPOINT 21 is just inside the room. There are 5 soldiers in all, three clustered on the left side of the room, one in the middle and one on the far right, also several explosive barrels and a little sparse cover. I found it easiest to jump in and toss a grenade or two into the group on the left, shoot any survivors, and then turn and deal with the men on the right.
You can also stand on the ledge in the doorway and try to shoot some of the mercenaries from there. This can be somewhat hazardous, though, since the soldiers soon notice Lara and start shooting and throwing grenades. If Lara is knocked back off the ledge, the grenades can still injure her through the closed door. So if she does fall, quickly climb onto the metal ledge and get back into action.
When the fight is over, gather any dropped rifle ammo, grenades and health packs you need.
Zip suggests turning on the power in the control room above in order to charge up the core. Lara will have to do some acrobatics to get there. First, go to the end of the track on the floor, where you'll find the power core inside a rolling cage. Use the magnetic grapple to pull it along until it runs up against a bit of debris blocking the track. Climb onto the cage and jump to grab the ladder. Climb up and jump to the right to the broken metal ledge. (The climb from the floor to the control room is shown in a series of screenshots.)
Amanda cuts in over the headset to quiz Lara on her knowledge of Arthurian lore. (This short cinematic is called "Headset Highjack".)
Carefully jump from the bent edge of the ledge to grab the horizontal bar. Swing around and jump to the next ledge. Turn right to face out over the room. Jump to grab the dangling rope. Swing and jump to grab the contraption with the big, blue ball hanging from the ceiling. Climb around to the far side of the contraption. Jump back to grab the next horizontal bar. Swing around and jump to the ledge against the far wall. Turn right, carefully move to the broken edge and jump to grab the ladder against the wall. The ladder extends to the floor, so if Lara falls after this, you can climb up here. Climb the ladder and jump to the ledge on the right.
Shoot the fuel barrel behind the barred window to break the bars. Then take a running jump off the bent part of the ledge to grab the dangling rope. Adjust Lara's angle and climb up the rope a bit if necessary. If you swing while hanging too low on the rope, Lara bangs into the ledge behind her and falls. Swing and jump into the control room.
Retrieve the note and health pack dropped by the dead scientist. Lara learns a bit more about the fateful experiments from the note. Cross CHECKPOINT 22 and pull the lever to turn on the power.
In a brief cut scene, electricity arcs between the various bits of machinery down below, blowing away some of the junk blocking the track.
Climb down to the floor on either side of the control room. Take Zip's suggestion and use the magnetic grapple to move the electrified power core further along the track. Grapple, tug and release, then get out of the way of the electrical explosions. After one or two such pulls, the cage will move between the huge electrode thingies on the ceiling causing current to arc between the various parts. Grapple and pull the cage once more to send it sliding toward the door. It blasts aside the remaining debris and moves on through. Follow it past CHECKPOINT 23 and into the hallway, keeping a safe distance.
HALLWAY WITH DANGLING SOCKETS AND TOXIC GAS (AGAIN): To avoid the poisonous vapor, once again climb onto the ledge, jump to grab the horizontal pipe and swing to the next ledge. Drop down and continue along the track to the corner, where you cross CHECKPOINT 24.
This time when you reach the dangling sockets, they're crackling with current. To get past the first one, stand on one side of the hallway, squarely facing the socket ahead. Use the magnetic grapple to hook the socket, pull it toward Lara and release. While the socket is swinging, the spark goes out and it's safe to run or roll under it. Do that quickly before it charges up again. Repeat the process with the second socket. When you round the corner, you need to deal with 2 sockets side by side. To get past them, grapple one socket, pull it as high as it will go and then quickly release to start it swinging. Immediately grapple the other, pull and release. With good timing, you can get both swinging—and no longer live—at the same time. Quickly run or roll underneath. Repeat the same process with the final pair of sockets. (I've included screenshots for both the single and double socket sections.)
If the cage gets stuck at the end of the hall just before the door, move into the gap between the cage and the wall, hugging the wall so Lara doesn't touch the electrified cage. This should open the door. Then the cage will pass through along the track. CHECKPOINT 25 is just ahead.
LARGE ROOM WITH TESLA GUN AND TOWER (AGAIN): The cage moves along the track until it reaches the tower. Then it stops. Stand to the left of the door with the high voltage symbol. Use the magnetic grapple to slide the door open. The cage rolls inside, completing some circuit, and the main power comes on. (screenshot)
The doors on the far side of the room (i.e., to the right when facing the tower) are now unlocked but going haywire with the power overload. To avoid a nasty shock, stand facing the electrified doors and run or roll through just as they start to open.
Approaching the shield on the table triggers a cut scene ("Shields and Maps"). In it Lara and friends speculate on the shield's significance. Could it have been belonged to Lancelot?
Nearby is another dead scientist with a health pack and a note describing his research. Like Takamoto, this man believed the sword to be much more than a thousand years old. Cross CHECKPOINT 26 and go carefully through the next set of electrified doors.
IMPORTANT: I highly recommend saving the game here. There is a serious potential bug in this area, as well as several simple mistakes players might make which could prevent them from obtaining the gold reward and/or finishing the level. Having a convenient save to revert to can help avoid a lot of frustration.
Do not return through both sets of electrified doors or drop down to the lower level. You can go back into the shield room to get the health pack if you need it, but avoid going through the other set of doors to the area with the tracks on the floor, and do not drop down to the lower level and try to climb back up. If you cross checkpoint 25 (near the tower door with the high voltage sign) and subsequently reload the game, you may not be able to get back through the electrified doors. If this happens, you will have to reload an earlier save. Or try the other alternatives described in the bug-fix footnote.
USING THE TESLA GUN: Three soldiers in riot gear emerge onto the ledge across the room. You can take them out using the Tesla gun, which is now fully operational. Using the gun effectively may take a little practice, though. It works as a powerful electromagnet. When the gun is pointed at an object that can be manipulated, the targeting reticle turns red. Press and hold the Target Lock button (G/L1/LT) to pull/pick up objects and the Fire button (left mouse/R1/RT) to push/throw them.
To use the gun against the soldiers, pick up an object, such as one of the explosive barrels and hold the Target Lock button to keep the object suspended. Then swing the gun around toward the soldiers and press Fire to throw the object. For heavier objects, like the metal boxes, it helps to aim high, since these projectiles tend to arc downward due to gravity. This isn't necessary with the barrels, though. Aiming straight at the soldier you want to hit should do it. You can also use the metal boxes set into the wall above the ledge where the soldiers are standing. A brief tug with the gun should pull each crate out of the wall and drop it onto the soldier below. There are more small metal boxes above the duct to the right of the gun. (They're shown in this screenshot. You need to remove them anyway to get the gold reward, and they make handy projectiles.)
NOTE: Do not use the large, metal crate on the cement ledge to the right as a projectile. You'll need it to get the gold reward. If you've already done this by mistake, you can get around it as long as one of the metal crates near the entrance is still available. Use the Tesla gun to lift and toss it onto the ledge. (screenshot)
If you've run out of things to throw, use regular weapons to kill any remaining soldiers. Grenades can be very effective, but you need to move right up to the railing and aim as high as possible, otherwise the grenades fall short of the ledge. To use guns, move up to the railing and aim for the solders' legs below their shields. The targeting reticle won't turn red if you're using pistols, but you can still hit. Duck when the soldiers shoot back. The railing protects Lara as though it were a solid wall. Watch out for the gap in the railing where the walkway was. The broken walkway is gone and it's now a long fall. Also, the soldiers can easily hit Lara if she's standing there. CHECKPOINT 27 is just in front of that gap in the railing.
NOTE: If Lara does fall down to the lower level, do not attempt to climb back up via the Tesla tower. Instead, quit and reload the game at CHECKPOINT 27 to avoid the possible bug described above.
GOLD REWARD: (Refer to these screenshots and gameplay video if necessary.) Use the Tesla gun to move the hanging platform along the track on the ceiling to the right. Notice how the track curves down, runs along level and then slopes back up at the right end. That upward slope makes it difficult to slide the platform all the way to the right. To do it, aim the gun so the targeting reticle is over the metal coupling just below the track (as shown above). Then use the gun to pull the platform to the right (by holding the Target Lock button and moving the camera) until just before the track begins to slope upward. Quickly switch to push (Fire button) and tap the button repeatedly to nudge the platform up the track and all the way to the right. Once you get the platform moving from left to right, it's best to keep it going; otherwise it won't have sufficient momentum to make it up the slope. If this doesn't work the first time, pull the platform back to the left and try again.
NOTE: If you're replaying the level and don't need the reward, just move the platform to the gap in the railing. That will enable you to jump across to the exit. Or, move one of the large, metal crates into the corner to the left of the Tesla gun, and use it to reach the platform, as shown in these screenshots.
Next, if you haven't already done so, use the Tesla gun to remove the 4 small, metal boxes set into the wall above and to the right of the gap in the railing. Point the gun and pull by pressing Target Lock (G/L1/LT).
Leave the gun and go to the right to the cement ledge with the metal crate on it. Push the crate to the end of the ledge. (If you accidentally tossed the crate earlier, it's OK, as long as you still have at least one of the other large crates. Use the Tesla gun to move it onto the cement ledge. Then push it to the end.) Climb on top of the crate and jump to grab the opening you revealed by pulling out the 4 small boxes.
Jump straight up to grab the ledge above. Then climb around the corner to the left and drop onto the small, metal ledge. Turn around and jump down onto the hanging platform. Walk to the right side and jump to grab the catwalk above. Pull up, step to the left to use CHECKPOINT 28 and then turn around and move to the other end of the ledge. From here you can see the reward in the alcove ahead. Jump to grab the horizontal bar. Swing around and jump into the alcove with the gold reward (1/1).
Jump back to the horizontal bar, swing around it and jump to the ledge against the wall. Go to the far end and jump down to the walkway near the exit. Pick up any supplies the soldiers may have dropped—SMG clips or the SUBMACHINE GUN itself, health and grenades. Go through the door to CHECKPOINT 29.
HALLWAY WITH TOXIC GAS & ELECTRIFIED PIPES: Climb onto the metal ledge to avoid the poisonous vapor. Shoot the broken pipes ahead to get them out of the way. (Use manual aim if necessary.) Grapple one of the light fixtures ahead. Tug on the cable then release it as the sliding ledge on which Lara is standing moves along its tracks. At the corner, jump onto the next sliding ledge. Again, use the grapple to start the ledge moving. Quickly release the grapple and duck under the electrified pipe as the ledge slides under it, crossing CHECKPOINT 30.
Jump onto the next sliding ledge. Once more, shoot the broken pipes to clear the way and then use the grapple to start the ledge moving. Quickly release the cable and jump over the next electrified pipe. Here it helps to do a running jump. Hop down to the floor and go to the right, since the left hallway is blocked by debris. Pass CHECKPOINT 31 and enter the final room of the level.
In the following cinematic ("Amanda's Pet") Lara catches up with her former friend in the lab's main control room. As Amanda explains her "relationship" with the monster they discovered in Peru, she fondles the pendant at her throat. If you look closely, you'll see it's the same stone she pulled from the door in the ruins near Paraíso. When Amanda uses the stone to unleash the creature, Lara is outraged.
IMPORTANT: If you are replaying the game using cheat codes, refer to the Time Trial Tips for an important bug note. It contains a storyline spoiler, so I don't want to include it here. This bug does not affect gameplay the first time through.
LARA VS. THE CREATURE: (The following sequence is shown in a series of screenshots as well as a gameplay video.) A boss health bar for the Unknown Entity appears at the upper right corner of the screen, but you do not need to fight the creature directly. You can't destroy it yet. So just try and stay out of its way and avoid the flaming spots on the floor, which indicate where the monster's fireball attacks will land next.
Run around the perimeter of the room, jumping or rolling if necessary to move faster and avoid the monster's attacks. As you go, activate each of the 4 circuit breakers by pressing Interact. When each box has been turned on, the indicator light on top of it changes from red to green and a short cut scene shows one of four mechanical arms retracting from the central structure on the ceiling.
When all four breakers have been used, another cut scene shows four large electrodes descending from the ceiling. The sword fragment is held in some kind of force field at the center.
Now run to the Tesla gun in the middle of the room and press Interact to get on. Target the large, dangling electrodes. Tap the fire button to push each electrode away until it makes a connection with the pair of live electrodes against the wall. (Two good pushes should do it.) When that happens, electricity arcs between the electrode you are pushing and the neighboring electrodes. Repeat the process with the other three electrodes, swinging the gun around to target each one in turn. You must do this quickly for all four to be activated at the same time. Then the force field around the sword fragment is removed. Get off the gun, point the camera at the sword fragment hanging directly above the gun, and quickly press Grapple to snag it.
A few additional tips that may make things easier:
As soon as Lara grapples the sword fragment, a cut scene kicks in, in which Lara takes the fragment and the machine begins to overload. Amanda sneaks off as the device blasts a big hole in the floor. Lara drops down into a tunnel below. Soon Zip and Alister make contact over the headset. Alister says, "You're never going to guess where this leads. . . Cornwall!" And here I can only assume he means the clues turned up in his research, not the tunnel. Crawling through a pipe from Central Asia to England would be extreme, even for Lara! (This cinematic is titled "Prize Obtained".)
NOTE: If you're playing the PC or PSP version of the game and want to skip the last area, you're welcome to download a savegame file from the checkpoint at the start of the next level. Instructions for downloading and installing Legend saves are linked to that page.
†UPDATE HISTORY: 5/11/06 - Added savegame for beginning of England level.
5/12/06 - Added shortcut from Room With Tesla Gun & Tower to end of level. A few cosmetic changes.
5/21-22/06 - Made a few minor changes and typo corrections. Also added Time Trial info.
6/20/06 - Added bug notes, checkpoint 9 save file and train sequence screenshot. Added checkpoint 11 (missed last time) and renumbered subsequent checkpoints. Fixed a few typos and made several corrections and additions inspired by readers' questions and suggestions.
10/16/06 - Added more info on the motorcycle chase loop bug, controls for interactive cut scenes and link to new time trials page. Fixed a few mixed up lefts/rights and made a few other minor clarifications.
11/17/06 - Added missing checkpoint 24, thanks to a tip from Turza.
12/19/06 - Added GameCube controls for the interactive cut scenes, thanks to Treeble.
2/15/07 - Added alternate strategy for hill with rolling barrels, thanks to Eric S. and Jo. Reformatted the bug notes for the motorcycle sequence as a separate footnote. Added PSP useful bug, thanks to Nick. Added note on not using cheats for final sequence, thanks to Engineernerd.
3/31/07 - Added info on the actual timer trigger in the "Run for the Train" sequence, thanks to Tom J. Removed note on PSP bug that turned out to be due to a faulty memory card, rather than an actual bug in the game. Apologies for any inconvenience this may have caused.
4/29/07 - Refined bug description in the Tesla tower area.
9/10/09 - Continuing updates on entire Legend walkthrough. Revised strategy in a few areas, made various changes for clarity, and added numerous screenshots, as well as videos for the gold reward and Unknown Entity sequence. Also added the alternate path to the exit for those who encounter the bug in the Tesla tower area, which I believe was first reported on Tomb Raider HUB. Thanks to Tom W. for telling me about it.
9/28/09 - Added PSP save files, thanks to Dave A.
1/6/10 - Credited Jana from tombraidergirl.com for the brilliant shortcut to the end of the level. This has been in the walkthrough for a long time, but I didn't know who had discovered it. Thanks to Dimi for letting me know.
ACKNOWLEDGEMENTS: Thanks to Drew, Evelyn, Lara Man and Treeble for help with the console controls and to Abby, Advis, Alex R., Andreas, Andy, Ashley, Baz, Brad N., Chris R., Daniel L., Daniel L., David C., Debbie, Emily, Engineernerd, Eric S., Ian, JFB, Jo, Justin B., Nick, Paula P., Philip, Roger B., Sean G., Sergio, Tom J., Tom W., Turza and Victoria for various help with this level. (Several people sent in the same ideas but I like to credit all contributors if possible.)
*NOTE ON REWARDS: Finding rewards (formerly known as "secrets") unlocks various extras in the game. For a complete list of these bonuses and how to get them, see the Legends Rewards page.
**TIME TRIAL: After completing any level, you can replay it in Time Trial mode to unlock cheat codes. (See the Legend Rewards and Time Trial Tips pages.)
BUGS IN MOTORCYCLE SEQUENCE: Above I mention several potential bugs that can be triggered during the motorcycle chase. These are as follows:
If you run into a glitch here while playing the PC game and reloading an earlier save doesn't fix it, you are welcome to download another save file. My Kazakhstan PC save files include checkpoints 7, 9, 10 and 12. Instructions are here.
USEFUL BUG FOR MOTORCYCLE SEQUENCE ON PSP: Nick99994 sent me this tip for the PSP game. "On the second long run, I have been fed up with crashing into trees and rocks. You said that you must kill all other bikers? Well, if a player keeps on dying, PLEASE include in the guide not to worry and not to kill the game. I have found a glitch. When Lara is on the motor bike, accelerate and SLOWLY nudge yourself up against the train. you may bounce off, but if you keep trying you will eventually rest, floating off the train, at a nice comfy angle. It might take longer than simply taking the risk and shooting at the bikers, but all you have to do is hold down Accelerate (X) and Fire (R). Lara will continue to rest on the train while shooting. But WATCH OUT! if you don't concentrate and don't see the cliff coming...splat. Reload. The train will go back and forth through about 4 tunnels. Don't panic. Lara will catch up."
BUG-FIX ALTERNATIVES - TESLA TOWER AREA: If you run into the bug described above in the room with the Tesla gun and don't have another save you can reload, here are a couple of alternatives:
WAS THIS WALKTHROUGH HELPFUL? If not, I apologize and invite you to contact me with any questions. If you need help right away, I recommend the r/TombRaider subreddit. Other fan-run forums are listed at tombraiders.net/stella/community.html. If this site was useful, please consider supporting it financially or in other ways. For details, visit tombraiders.net/stella/support.html. As always, I welcome your corrections/suggestions. Thank you!
Copyright © 2006- - Stellalune (). All rights reserved. The screenshots and videos included here were made using Fraps. Feel free to copy or print this walkthrough for personal use. By all means, share it with friends, but please include this credit line so people can send me their feedback. No part of this walkthrough may be reproduced on another site without permission. Follow this link for details about this site's advertising and privacy policy.
Stella's Tomb Raider Site: tombraiders.net.