Stella's Tomb Raider 3 Walkthrough - Updates for Tomb Raider 3 Remastered Coming Soon
INDIA LEVEL 4: CAVES OF KALIYA
Updated: 4/29/24(†)
Secrets: none Pickups: 10, including GRENADE LAUNCHER and IInfada Artifact Kills: 15 Save/power-up Crystals: 2
LEVEL MAP by VGCartography (used with permission)
Caves of Kaliya Video Walkthrough by Eldincy
Objectives: Make your way through the maze of corridors to the bottom of the level. Fight Tony and claim the Infada artifact.
The beginning of this level is basically a three-tiered labyrinth. Below that is an anteroom and finally the room with the India boss, Tony. There are a number of paths you can take to reach the bottom. I have provided maps below. The most direct route, which bypasses the second level entirely, is marked with red dots. For all kills and pickups, be sure to explore each level thoroughly, using the maps and text as a guide.
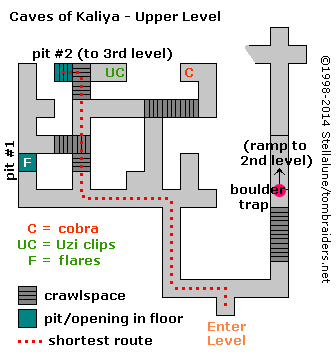
UPPER LEVEL: From the start of the level (at the lower right corner of the map), turn left, then right. When you come to the next intersection, which has passages leading off in several directions, turn left and head all the way forward to the next corner, where you can only turn right. (screenshot) Drop down into the pit (#1 on the map) and retrieve some flares (1).
After picking up the flares, climb up one level, then climb up again on the left side of the pit. Turn right and crawl through the low passageway. Turn left and continue crawling forward into another crawlspace. Crawl forward then to the right to find some Uzi clips (2) in a dead-end passageway. Turn around and crawl out to the left. (Ahead is pit #2, which leads down to the third level. If you want all kills and pickups, don't go there.)
As soon as Lara can stand again, turn left and proceed forward to another crawlspace. Crawl through and follow the passage to a dead end, where you'll meet a cobra (1). Shoot it and return to the crawlspace you just came through. Crawl forward, turn left, and then crawl forward a little more until you're able to stand up again. Follow this passageway forward to the wall. Turn left, then immediately turn right, in order to head back toward the start of the level.
At the next corner you can only turn left. After that, continue past the passageway on the right, which is where you came in from the river. At the next corner, turn left (again, you have no choice here) and enter another crawlspace. When you emerge and are able stand again, save the game if you can.
BOULDER-TRAPPED HALLWAYS: This area is between the upper and second levels but is included on the second level map, below. The long ramp ahead leads down to the second level. When you slide down, a boulder drops from the ceiling behind you and rolls down after you. (The second level map, below, marks the origin of this boulder at #1 and it's resting place at #1a.) Avoiding this boulder is especially tricky. I found it helped to hold the Forward button as Lara slides. Just as she reaches the bottom of the slope but before she lands on the flat floor ahead, jump forward. Then run without jumping into the passageway on the left as the boulder passes behind you. If you jump a second time, Lara will bang her face into the low cling and then get run over by the boulder. Sliding down the slope and then sprinting along the passageway can also work, but the timing is a bit tricky, since Lara hesitates for a second as she slides onto the flat ground at the base of the slope. Again, it helps to save beforehand since you'll probably need to try a few times. (This sequence is shown in a series of screenshots and a short short video walkthrough.)
Once you've cleared the first boulder trap, follow the passageway to the left, but get ready for another rolling boulder. It drops down from the ceiling as you approach the short ramp. (The path of this boulder is indicated by the numbers 2 and 2a on the map.) To avoid it without too much fuss, stand on the seam in the floor textures just beyond the little alcove on the right, facing the ramp. Then walk forward 6 steps and roll. When you do, you'll trigger the boulder and a blast of tense music. Immediately run forward (i.e., back the way you came) and into the alcove, which is now on your left. The boulder then rolls past and comes to rest in another alcove near the first boulder. Now go to the top of the little ramp and climb up through a short crawlspace into the second level. (Again, check the screenshots and/or video if necessary.)
NOTE: Technically the first and second levels are at about the same elevation, since you slide down the long ramp from the first area and then climb up again. I've formatted them as separate areas to keep the maps more compact.

SECOND LEVEL: After emerging from the crawlspace at the top of the short ramp, turn left and follow the passageway to a dead end with a cobra (2). Shoot the snake and go back the way you came. Pass the crawlspace where you entered this area (it's now on your right) and continue forward into the passageway with the brown floor. Proceed to a 'T' intersection. Turn right and follow the passage to the end to find some shotgun shells (3). Turn around and return to the 'T' intersection. Pass by the opening on the left and continue forward. When you come to the low step at the next intersection, turn right and follow the passageway to a dead end with a small medi pack (4) guarded by a cobra (3). Shoot the snake from a safe distance before picking up the health.
Turn around and go back the way you came. At the low step, continue straight ahead to a dead end. This is actually a movable block. Push it forward to reveal a perpendicular passageway with gray stone floors. Turn right and follow this passageway to the end. The passage twists and turns, and there are a few little alcoves along the way, but you can't really get lost. At the end of the passageway, drop down through a hole in the floor. (This is pit #3 on the second- and third-level maps.)
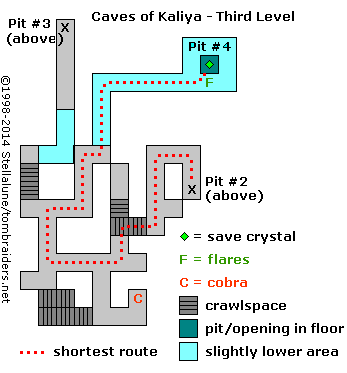
THIRD LEVEL: If you're taking the most direct route through the level, you'll drop into this area from the upper level via pit #2, on the right side of the map near the middle. Follow the path marked with red dots to reach the exit.
If you're going after all kills and pickups, you'll enter this area from the second level via pit #3, at the top right corner of the map. Follow the mossy, green passageway and drop into the slightly lower area ahead. Round the corner, climb up again, and then crawl through a low tunnel. When Lara can stand again, turn left, then immediately turn right. Go forward, turn left before the next crawlspace, then right again. Follow this passage around to the left, to a dead end with another cobra (4).
When you've shot the snake, turn around and head back the way you came. That is, turn right at the crawlspace instead of crawling in, then left at the next intersection, right, and right again. Follow this passageway to the end. There's a slight drop-off where you must hop down into a lower area, but no more intersecting passageways.
At the end of this tunnel is a small, square room with flares (5), a save/power-up crystal (1), and a hole in the floor, which leads to the end of the level. (This is pit #4 on the map.)
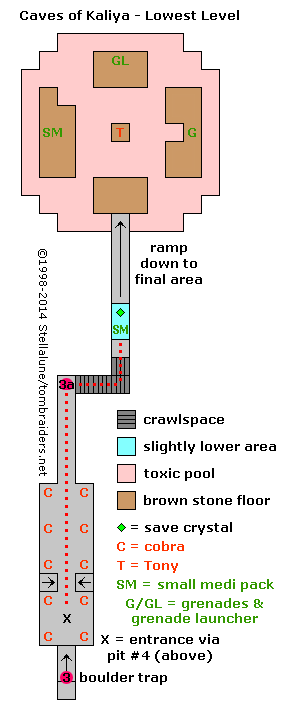
LOWEST LEVEL AND BOSS CHAMBER: At the bottom of pit #4 is a dark room containing 10 cobras (5-14). Drop a flare down into the pit so you can see where you're going. (To drop a flare rather than throwing it, light the flare and then draw pistols.) Safety drop into the hole. If you then take a single walking step backwards, Lara should be in the middle of the floor tile between the first 4 cobras, out of their striking range. You can then shoot them one at a time by turning in place. (screenshot)
Do not step between the angled blocks yet. This sets off a boulder trap. (This boulder rolls from 3 to 3a on the map.) When the first group of cobras is dead you can trigger the trap and jump back into the clear area with the dead cobras to get out of the way. (screenshot) Now advance slowly into the next area, kill the remaining 6 cobras, and head for the end of the passageway where the boulder landed.
Alternatively, if you don't care about getting all the kills you can hang from the edge of the pit with the doorway where you entered behind and to Lara's left. Then drop down and run past all the cobras to the end of the passageway. The boulder will roll down after you, so you'll need to go fast. At the end of the passageway, either duck and crawl into the low tunnel on the right or position Lara in the right corner so the boulder lands just beside her. (If you do get bitten and you're playing the PC or Mac game, you should be able to make it to the next power-up crystal before Lara succumbs to the poison.)
Crawl through the low opening next to the boulder. Drop down into the lower area ahead and get the small medi pack (6) and save/power-up crystal (2). Save the game before sliding down the ramp to meet the boss.
FIGHTING TONY: The unstable explorer, whom Dr. Willard called TONY (15), stands in the center of a large room with stone platforms set in a pool. As soon as you enter, he starts warming up his fireball attack. The initial blast poisons the pool, turning it steamy and pink. Do not fall into the water or Lara will die. Tony isn't too tough and he doesn't move from his little platform, but if one of his fireballs hits Lara, she'll catch fire and that'll be the end. Here are a few strategies for beating him. All are covered in the accompanying screenshots and this short video walkthrough.
Slide down into the room on on either side of the ramp, rather than in the middle. Draw weapons before you you slide so you can start shooting right away. The shotgun is obviously more powerful, so things will go more quickly if you use it, but pistols are just fine. As you reach the bottom of the ramp, you'll see Lara take aim, and you can get off a few shots before she hits the floor. Then take a few sidesteps toward the platform's nearest edge. If you slid down on the left side of the ramp, sidestep left. If you slid down on the right, sidestep right.
Now continue shooting at Tony as you flip from side to side to avoid his fireballs. There's no need to jump frantically, just watch Tony and when he throws a fireball up toward the ceiling or directly at Lara, flip to the other side of the platform so you're safely out of the way by the time the fireball lands. Wait until he throws another one and side flip back to the other side. Repeat this until Tony keels over and explodes. It takes about 20 seconds of sustained pistol fire or about a dozen shotgun blasts to kill him—maybe 15 if you miss a few times due to all the hopping around.
Alternatively, slide down the middle of the slope without drawing weapons first. Then immediately take a running jump onto the platform where Tony is standing. Draw the shotgun, start firing, and keep shooting as Tony powers up and sends out his initial energy burst. He'll then start throwing fireballs up toward the ceiling. Sidestep left and right to avoid them as they fall. You won't have to keep this up for long, though. At close range, about six shotgun blasts will finish him. (screenshots)
When he dies, Tony leaves behind the INFADA ARTIFACT (7), which was embedded in his chest. Don't pick up the artifact yet, since doing so ends the level. First hop around the various platforms to retrieve a small medi pack, the GRENADE LAUNCHER (loaded with 2 grenades), plus another pair of grenades (10). Take the artifact last to finish the level.
IMPORTANT: If you decide to employ the TR3 useful weapon glitch to fight Tony—for example, combining the MP5 and Rocket Launcher—make sure you do not defeat him before he has had a chance to set off the initial blast, heating the water in the surrounding pool. If you kill him prematurely, he will not drop the artifact.
NOTES: For more info on how grenades and other ammo are tracked in your inventory, see the TR3 Controls page. If you're curious about the origins of this level's name, check out this Wikipedia entry about Kaliya, a poisonous naga from Hindu mythology, who purportedly lived in the Yamuna River in northern India. According to legend, "the water of the Yamuna for four leagues all around him boiled and bubbled with poison." After an epic battle, Kaliya was eventually vanquished by Krishna.
An FMV sequence follows. Lara meets up with Doctor Willard on the river and agrees to work with him to recover the Infada Stone's companion artifacts. The dialogue is included on the cut scene transcripts page. You can also re-watch the movie on my YouTube channel.
WORLD MAP - SUGGESTED ORDER FOR PLAYING THE MIDDLE LEVELS: After the movie and level stats screen, you're presented with a globe that lets you to choose where you want to go next. Although you can play the three middle locations—Nevada, London and the South Pacific—in any order you like, I recommend choosing Nevada first. If you don't mind a minor spoiler, use your mouse to highlight the hidden paragraph below for spoilers.
SPOILER: At the beginning of the second Nevada level, High Security Compound, Lara is captured and all of her weapons and ammo are confiscated. You're left with only one small medi pack (and your save crystals if you're playing the PS1 version). You must then escape and re-acquire the various weapons. You'll never get back the other items you lost, but if you go right from India to Nevada, you'll have more levels to collect new gear before the end of the game.
BUG NOTE: If you're having trouble going on to the next location after finishing the India levels, check out the details under "Location Loop Bugs" and "Game Returns to Main Menu After India Levels" on the Tomb Raider 3 Warnings page.
†UPDATE HISTORY: 3/28/14 - First major update since this walkthrough was created in 1998. This revision includes many new screenshots as well as various other corrections and clarifications.
5/11/14 - Added the note about fighting Tony with the useful weapon glitch.
2/5/24 - Added VGCartography's level maps, with permission. Visit VGCartography on DeviantArt for high-res versions, and follow on Twitter/X and YouTube for more fantastic game maps.
4/29/24 - Added sequential kill and item counts, which will hopefully be helpful for both the classic and remastered versions. More remaster updates coming eventually. Thanks for your patience.
ACKNOWLEDGEMENTS: Special thanks to participants in the alt.games.tombraider newsgroup, without whom some parts of this walkthrough could not have been written. Thanks also to Nick H., for his suggestions for evading the cobras and defeating Tony even more quickly, and to Mari and Dr. John Oakland for pointing out the possible issue when fighting Tony using the weapon glitch.
WAS THIS WALKTHROUGH HELPFUL? If not, I apologize and invite you to contact me with any questions. If you need help right away, I recommend the r/TombRaider subreddit. Other fan-run forums are listed at tombraiders.net/stella/community.html. If this site was useful, please consider supporting it financially or in other ways. For details, visit tombraiders.net/stella/support.html. As always, I welcome your corrections/suggestions. Thank you!
Copyright © 1998- - Stellalune (). Feel free to copy or print this walkthrough for personal use. By all means, share it with friends, but please include this credit line so people can send me their feedback. No part of this walkthrough may be reproduced on another site without permission. Follow this link for details about this site's advertising and privacy policy.
Stella's Tomb Raider Site: tombraiders.net.