Stella's Classic Tomb Raider 3 Walkthrough
NOTES ON THE REMASTER: This guide has not yet been updated for the remastered game. Revisions are in progress but will take time. I hope this version, based on the classic game, will still be helpful. Thanks for your patience.
ANTARCTICA LEVEL 2: RX-TECH MINES
Updated: 2/27/25(†)
Secrets: 3 Pickups: 26, including a CROWBAR, BATTERY, and WINCH STARTER Kills: 20 (24)* Save/power-up Crystals: 5
*NOTES: The number of kills varies depending on the actions of your enemies (the mutants) and allies (the white-suited guys with flamethrowers). If you kill everything that moves, the total will be 24. If you kill all the enemies and none of the friendlies, it will be 20. (There is one mutant, #4 by my count, that can't be killed by the player, as far as I know.) If you avoid certain confrontations and let the flamethrower guys help you kill the mutants, your total will be even lower. Be sure to find all the secrets so you can access the bonus level at the end of the game.
NOTE FOR THE REMASTER: This guide has not been fully updated, but the two achievements/trophies related to killing mutants are worth mentioning. "Pest Control" requires you "Solve that mutant problem in RX-Tech Mines" by killing 21 mutants, either directly or indirectly. For "Who Goes There?" you'll need to "Make flamethrower guards meet seven mutants in one [playthrough]." It is possible to unlock both achievements in the same playthrough. The running kill count should help with this. Note, however, that using grenades or rockets can glitch the kill count, preventing you from unlocking "Pest Control." So I recommend using other weapons to kill mutants for this achievement/trophy.
LEVEL MAP by VGCartography (used with permission)
RX-Tech Mines Video Walkthroughby Eldincy‡
Objectives: Make your way to the mine cart junction at the heart of the mine. Ride each of the three cars through different areas. In one area you'll get a crowbar, which will help you get a battery. In another, you'll find a winch starter. Use the battery and winch starter in the third area to activate the winch. This will enable you to reach the excavation site and enter the Lost City of Tinnos.
IMPORTANT: You're coming into the home stretch. I recommend that you save nearly all of the Desert Eagle ammo you pick up from now on to use in the final boss fight. You'll need at least 50 Desert Eagle rounds for that, but it helps to have a few extra just in case. It will also help to have a supply of grenades or rockets for the tougher enemies ahead, so don't waste them.
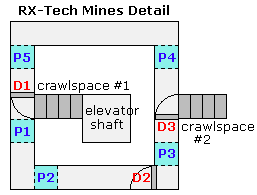
ELEVATOR SHAFT AND SURROUNDING HALLWAY: From the starting position, turn right and pull up into a crawlspace. Crawl through until Lara can stand. Now you're in a square hallway with 3 automatic doors. If you keep walking you'll go around in circles forever. Instead, refer to the screenshots and the diagram at right.
As you exit crawlspace #1, you'll see a closed door on your right. (It's marked D1 in the diagram). Head to the left. When you step on an invisible pressure pad in the floor (P1), you'll hear a door closing elsewhere. That's the door on the far side of the square hallway (D3). Go forward to the corner and turn left. As you step onto a second invisible pressure pad (P2), the door ahead (D2) opens. Continue forward and round the next corner. When you step onto a third invisible pressure pad (P3), the door ahead (D3) opens. When this door opens, it blocks a second crawlspace on the right wall. When you pass the door and step on the fourth invisible pressure pad (P4), the second door (D2) closes. Continue forward, around the corner, along the straight section of hallway with no doors, and around the next corner. As you arrive back at the start, you'll step on yet another pressure pad (P5). This opens the first door (D1) directly ahead of you, covering the first crawlspace. Walk past the door onto the first pressure pad (P1) and you'll hear the third door (D3) close again. Turn around and follow the hallway back around to the right. (Stepping on P5 has no effect this time.) When you reach the next door (D3), it will be closed, allowing you to access crawlspace #2.
NOTE: If you can't hear, this section is especially challenging. I hope the diagram and screenshots will help.
CRAWLSPACE LEADING OUTSIDE: Follow the crawlspace to a hole in the floor. It's a long way down, so back up to the edge, climb down the ladder, and drop into the room below, where you'll find some MP5 clips (1). Grab them and then watch through the fence as a man in a white suit carrying a flamethrower euthanizes a couple of mutants (1-2). (These are not technically your kills, but they do count toward the "Who Goes There?" and "Pest Control" achievements/trophies in the remaster.) Press the button to open the door and go outside. Head around the corner to the MINE CART JUNCTION where several tracks converge. (screenshots)
NOTES: You'll meet a few more of these white-suited guys as you go along. If you don't attack them, they won't harm you and will help destroy the mutants. However, if you're trying for maximum kills, you'll need to move quickly here in order to kill the flamethrower guy before he kills the mutants. After pressing the button, hop back, jump up into the doorway, and run outside. Quickly take out the white-suited guy, keeping your distance to avoid the flames. Then take care of the mutants.
MINE CART JUNCTION: There are 3 mine carts here, each of which runs on a separate set of tracks. (screenshot) You can ride either the lower- or middle-level cart first, but the upper level should be done last since it requires items found on the other levels. To minimize backtracking, and because the middle level is a little easier, I recommend going there first.
Before starting out, shoot the mutant (3) lurking below on the left. (screenshot) (If you miss him, you'll have other opportunities later.) Also notice the padlocked door at the left end of the walkway near the entrance. The CROWBAR does not carry over between levels, so you'll need to find another one to open this door. (screenshot)
MIDDLE LEVEL MINE CART: Follow the elevated tracks around to the mine cart. Get in and ride without braking past the first gap in the tracks. The crystal and other items you see off to the left on your way down the track are part of SECRET #2. You will get them later. Brake (press Jump) on the next downward slope to slow the cart as you approach the sharp curve before the bridge, otherwise the cart will tip over. Brake on the slope after the bridge. Then take the next curve without braking in order to clear the gap beyond. Swing the wrench (Action) to hit the switch. This will stop the cart at the platform ahead. (screenshots)
NOTES: The mine cart controls are simple, but using them effectively may take a little practice. Each cart runs on tracks and cannot be steered, so Lara uses a wrench to whack switches (by pressing Action) in order to direct the cart onto different tracks. She will need to crouch down (Duck) to avoid certain obstacles. To apply the brake, press Jump. As with the other vehicles, press Action to get in and Roll + Left/Right to get out once the cart has stopped.
If you miss the switch that stops the cart, Lara will continue back around to the starting point. You'll need to navigate several obstacles on the way. See the return trip section, below, for details. Once you return to the JUNCTION, just climb out of the cart, get back in, and try again.
TUNNELS AND CHASM BEYOND MIDDLE LEVEL CART TRACK: When the cart stops just beyond the first switch, get out (Roll + Right) and watch as another flamethrower guy destroys a mutant (4). (As far as I know, it's not possible to kill the white-suited guy before he kills the mutant, so there's no way to get both of these kills. Also, the mutant's corpse may despawn before you even notice it, but it does count for the two mutant-related achievements/trophies.)
Grab the save/power-up crystal (1) (or save it for later) and carefully run past (or crawl under) the drills blocking the doorway. There's a hole in the snowbank in the back left corner containing flares (2). Get them and climb back out. Then head forward to the right of the doorway with the drills. Turn around, slide backwards down the ramp, and grab the edge. In order to conserve health, traverse to the left before dropping onto the icy walkway below. Be careful not to fall into the deep chasm. (screenshots)
Turn around. The tunnel near the dark block houses a super mutant (5) but no goodies. This new type of mutant doesn't spew poison, but it's fast and powerful and will knock Lara off the ledge if it gets too close. It doesn't emerge until you step into the doorway, so you can avoid it if you like. (I recommend you don't use the grenade or rocket launcher here in the remaster. See the note at the top fo the page.) Or, step into the doorway to trigger the mutant, roll, and run out to the left. Then veer right, run behind the ice block, and jump across the chasm to the small ledge on the other side. The mutant should then fall down the gap and you can shoot it from above. If it falls down to the very bottom of the chasm, you'll have a chance to shoot it again as you climb down. (screenshots)
Safety drop into the chasm to land on onto the snowy ledge below. Turn around to face out over the edge. Then go to the left end of the ledge, jump onto the slope, slide back, grab the edge, and drop to the small flat ledge below. Be careful here; it's still a long way down. There's a mutant (6) inside the opening above. It doesn't have any goodies, but if you want all the kills, pull up into the horizontal crevice, crawl in, shoot the mutant from the opening, and back out again. (screenshots)
Traverse along the crevice to the middle and drop to grab the crevice below. (If you try and drop too far to the right, Lara will fall instead of grabbing.) Traverse all the way back to the right corner before dropping onto the ledge below to avoid taking damage. Face out over the edge and kill the mutant (7) below. If the super mutant (5) fell down to the bottom, you can shoot it from this ledge as well. There are no goodies down there, so there's no need to drop down. (screenshots)
BUG NOTE: In the remaster, save the game here, since a potential bug in the next room can cause the guard with the flamethrower in the next area to fall in the water and drown, preventing you from unlocking the "Who Goes There?"achievement/trophy.
Grab the crevice above once more and traverse back to the left. Pull up and crawl through the tunnel. In the classic game, go ahead and kill the mutant (8) as you exit the tunnel. In the remaster, you'll want to run/jump past this mutant and lure him into the next room so the flamethrower can get him. (screenshots)
CAVERN WITH POOL AND SNOWBANKS: In the next area, you'll meet another flamethrower guy and 3 more mutants (9-11) lurking in various places around the room. If you want all the kills, take out the white-suited guy quickly. Then go around exterminating mutants. If you don't care about getting all the kills, or you're attempting the "Who Goes There?" achievement/trophy, keep your weapons holstered as you lure all 4 mutants to the flamethrower. (screenshots)
The first mutant is the one that follows Lara from the entrance tunnel. The second appears near the pool as you enter. The white-suited guy should take care of them right away. The third is behind the snowbank on the left. The fourth is on the other side of the pool to the right. If Lara gets poisoned in the process, try to wait to use a health pack until the whole encounter is over. (screenshots)
NOTE: If you've been following this guide, "Who Goes There?" should unlock now. If the flamethrower guy falls into the water and dies, you'll need to reload your earlier save and try again.
After clearing the area, climb onto the metal structure above the water and retrieve the CROWBAR (3). There is also a rocket (4) in a little alcove at the bottom of the icy pool. If you face it directly across the pool then swan dive off the edge, you can pick up the rocket, roll, swim back to the opposite edge, and climb out before the exposure meter runs out. Or use the exposure meter bug if necessary. (screenshots)
If you're going for all the secrets, you'll need to do some climbing. See the small, rectangular opening high on the wall? That's where you're headed. Run over to the low snow ramp against the wall below and to the right of the opening. Walk to the top of the ramp, stand at the left side and grab the nearly invisible horizontal crevice in the ice wall. (Press Action + Forward to grab it, no need to jump.) Traverse to the left and pull up into the crawlspace. Press the button there to open a door in a little room back at the JUNCTION. This will enable you to access secret #2 when you return there. Crawl back out and drop down. (screenshots)
Now scope out the exit: It's the high opening with the dark metal panels inside. You can't reach it from below, so you'll have to make your way over there on top of the snow banks. Climb onto the pile with the blue glow near the cavern entrance. Take a series of running jumps from heap to heap clockwise around the cave until you reach the ledge below the exit. (screenshots)
NOTE: Don't forget you can tweak Lara's angle in the air slightly with the Left/Right buttons. This comes in handy when you have to line up a jump at an odd angle. The page with screenshots includes additional tips.
PASSAGEWAY WITH DRILLS AND GRINDERS: Climb the ladder and dismount on the left. Vault up onto the ledge and crawl up the passage under the 4 drills. Be sure to crawl forward as far as you can before standing. Move up the slope into the room ahead. Stay close to the far wall as you move around the first ice grinding machine. Climb the ladder in the corner. Then use careful timing to run past the next 2 grinders. If you stand close and start running just as the cylinder begins to rise, you'll get through easily. Climb up through the passageway ahead. When you come to a set of stepped blocks with a flashing light above, climb the 3 blocks and quickly move over to the left wall. Draw weapons and shoot the mutant (12) in the tunnel above on the right. As long as you stay back against the wall, you should be safe from his poisonous breath. Pull up into the opening, follow the tunnel forward, and safety drop onto the tracks. Follow them back to the mine cart. (screenshots)
MIDDLE MINE CART TRACK - BACK TO THE JUNCTION: Pick up the crystal (1) if you didn't get it before. Hop into the cart and ride on, around the same S curve you just followed on foot, then up a hill. Don't brake on the way down, but as soon as the cart jumps across the gap in the tracks brake hard. Then almost immediately swing the wrench to hit the switch. This will make the cart go right at the fork. (If you miss the switch and continue straight ahead, you'll crash.) After the switch, you'll go around a curve and down another hill. Don't brake or the cart will not clear the next gap. Duck under 2 girders on the way up the hill. As you round the next curve, duck again to avoid a third girder. Then immediately stand and brake so you don't crash on the final sharp curve leading back to the JUNCTION. (screenshots)
MINE CART JUNCTION - BATTERY AND TWO SECRETS: Before heading out again, use the CROWBAR you found in the CAVERN WITH THE POOL AND SNOWBANKS to open the padlocked door at the end of the walkway near the wall on the middle level. Inside you'll find a LEAD ACID BATTERY (5), which you will need later. (screenshots)
If you don't care about secrets, skip the next section and climb down to the ground. Pick up the walkthrough with the LOWER LEVEL MINE CART section below.
If you want all the secrets, exit the battery room and follow the catwalk forward then left up the ramp to the UPPER LEVEL. Turn left again and head for the CONTROL ROOM, taking care not to fall through the gaps between the walkways. (If you don't care about getting all the kills, don't go inside and instead just skip to the next paragraph.) Press the button in the doorway to turn on the lights if you like. Enter and run to the left. Roll and take out the mutant (13) lurking on the other side of the doorway before it can blast Lara with his toxic breath. (screenshots)
If you look out the rightmost window of the CONTROL ROOM, you'll see a small opening in the ice wall. That's where you're headed next. Go back outside and climb onto the roof above the doorway. Cross to the back right corner. Turn around and crawl back off the edge but don't let go. If you didn't kill him earlier, you may hear a mutant (3, above) growling on the floor of the cavern. Don't worry; he can't get you up here. Traverse to the right until Lara pulls her feet up onto a ladder on the back of the building. Climb down until Lara's feet are at the lower edge of the building. (Here it may help to climb down as far as possible so Lara is hanging by her hands. Then tap the Forward button twice so her feet come up onto the bottom rung.) Then jump/twist and grab the edge of the crawlspace behind you (i.e., hold Action + Roll then briefly press Jump to spring off the wall, twist in mid-air, and grab). Pull up and crawl forward to get SECRET #1—a small medi pack and grenades (6-7). (screenshots)
If you pressed the button in the CAVERN WITH POOL AND SNOWBANKS (above), the inner door will be open. This is SECRET #2. Hop down from the doorway and advance with weapons drawn. Kill the mutant (14) that crawls out from behind the snowbank on the left. Then climb up and cross the tracks to find a save/power-up crystal (2), MP5 clips, and Desert Eagle clips (8-9). Climb back up to the room where you got SECRET #1. Crawl backwards to the opening of the crawlspace and safety drop to the ground. Kill the mutant (3, above) here if you didn't do so before. (screenshots)
NOTE: If you missed the crowbar or the button that opens the door to secret #2, you can go back for them now. See this separate page for details.
LOWER LEVEL MINE CART: When you're ready to explore the lower level, get into the mine cart there and go. Duck as you pass under the 2 girders at the top of the hill. Then immediately stand and swing the wrench to hit the switch. (If you miss the switch, the cart will continue forward and crash into a dead end.) If you succeed in hitting the switch, the cart will follow the tracks to the left. Duck under the next girder, but don't brake or you won't clear the gap in the tracks ahead. After this, the tracks curve around to the left. Duck under 2 more girders. Then get out on the right when the cart stops. Grab the save/power-up crystal (3) on the ledge above the icy pool, or save it for later since you'll return this way. (screenshots)
NETWORK OF DARK PASSAGES BELOW THE TRACKS: Enter the hallway perpendicular to the track and press the button to open the door. When you go through, the door closes behind you. That can't possibly be a good sign. Follow the passage and slide down a ramp into a dark room with steam coming up from the floor. That's right! You've landed on the set of an Alien movie! Head away from the chain-link fence. As you approach the doorway on the right side of the hallway, a super mutant (15) charges out. (Again, I recommend using grenades in the original game but not in the remaster, as noted above, since this can skew your kill count. Remember, you want to conserve Desert Eagle ammo for the final boss.) Keep moving and kill it as quickly as you can with other weapons. (screenshots)
If you light a flare here, you'll notice some goodies under the floor grates. To get them, follow the dark, twisting side passage from which the mutant emerged until you come to a crawlspace on the right. Crawl through into the area below the floor of the steamy room and pick up shotgun shells and a rocket (10-11). As you do this, another super mutant (16) passes overhead and runs into the passageway where you just were. Turn around and crawl back to the passageway. Lara won't target the mutant while crouching in the tunnel, so crawl out and kill it. Then continue along the twisty passage to the steamy room, only now you're on the other side of the chain-link fence. (screenshots)
Climb the long ladder to the top and dismount on the right. Press the 2 buttons in this hallway: The first opens the exit back to the track. You'll return here shortly. The second button opens another door. Go through and follow the hallway to a crawlspace. Crawl in, turn right, and continue up a long ramp. At the top, turn around and drop out of the crawlspace into a small room with a window. (screenshots)
OBSERVATION ROOM AND POOL WITH WINCH: Turn around to face into the room. Ignore the door on the right for now and advance with weapon drawn. As you approach the far door, you'll see a super mutant (17) run past the windows as it comes around toward you. As soon as the door opens, start firing and backflip away from the mutant. When it dies, collect the small medi pack and Uzi clips (12-13) the mutant drops, and the Desert Eagle clips (14) near the door. (screenshots)
Head outside and around to the left toward the small pool with the winch. Stand with the winch on Lara's left and the windowed building on her right. Swan dive into the freezing water, retrieve the WINCH STARTER (15) from the bottom, and climb out above on the left. As you warm up, turn around to spot some more Desert Eagle clips bundled with some flares (16-17) in a little underwater alcove below the winch. Jump in (don't dive) and grab them, roll, swim back to the surface, and climb out quickly. (screenshots)
Go back into the building. If you don't care about getting all the kills, ignore the door on the left and return through the crawlspace to the hallway with the 2 buttons. Then go through the door near the first button to get back to the mine cart. If you do want all the kills, press the button to the left of the crawlspace. Immediately draw weapons as you backflip off the ledge and start blasting the super mutant (18) that charges out. Go through the door you just opened and press the button to open the door there. Jump across the gap above the ladder and go through the door on the left to return to the mine cart. (screenshots)
LOWER MINE CART TRACK - BACK TO THE JUNCTION: Grab the crystal (3) if you didn't get it before. Then get into the mine cart and head back to the JUNCTION. After cresting the first hill, duck under a girder. Then quickly stand and brake for the next sharp curve. Climb the next hill, ducking under another girder near the top. Then immediately stand to whack the switch. This will send the cart onto the track straight ahead. You'll pick up a save/power-up crystal (4) and return to the JUNCTION. If you miss the switch, you'll take the left fork back to the junction, missing the crystal. (screenshots)
NOTE: If you miss the crystal, you can go around again to get it. See this separate page for details.
UPPER LEVEL MINE CART: Follow the catwalks to the UPPER LEVEL. Get into the mine cart there and ride up a hill, around a curve to the right, and down the other side. Don't brake for the curve or you won't be able to clear the gap in the tracks at the bottom of the hill. Duck under the girders and drills as you climb the next hill. Then just ride on through the door, which opens as the cart approaches, and continue forward into a cave where the cart will stop. Climb out on the left. (screenshots)
POOL WITH WINCH AND YELLOW SUBMERSIBLE: Pick up the flares (18) on the snowbank ahead on the left. Jump over to the WINCH. Place the LEAD ACID BATTERY in the opening on the side. Climb onto the upper platform and use the WINCH STARTER to get it going. The order in which you use the two items doesn't matter. Once you've used both, the winch activates, lowering the yellow submersible farther into the pool and also opening a door on the wall of the pool below it. (screenshots)
NOTES: If you're missing the battery or the winch starter, you'll need to retrieve them now. You can also go back for the first 2 secrets. See this separate page for details.
Now comes the hard part: a long swim through freezing water. You'll need to do this sequence in stages, taking breaks in safe spots to get Lara's air, health, and exposure meters back up to 100% before diving again. Use medi packs if necessary to keep Lara from freezing to death. If things get especially dicey, you may be able to cheat through this using the exposure meter bug (i.e., save in a new slot and reload to reset the exposure meter). Just be sure you don't accidentally save as Lara is about to freeze or drown!
Stand on the winch platform near the starter handle and look over the left side into the pool. Notice the single yellow light on the wall. Dive in and swim down toward that light and into the passageway just to the right of it. Inside the opening, on the right, there's a little ledge where you can climb out of the water, get air, and warm up. (screenshots)
When you're ready for the next leg of the journey, position Lara near the right wall of the alcove, facing the opening, angle her to the left and jump in. Swim down along the wall and up underneath the submersible, where you'll find an opening you can climb into. There's a large medi pack (19) inside. (screenshots)
Next you're aiming for the small opening between the two lights on the wall below the sub. Drop into the water and swim down toward those lights and through the square opening just above and between them. Swim through the opening, turn right into a short tunnel in the ice, then turn right again. Just ahead is an opening in the ceiling where you can climb out of the water and get a large medi pack (20). (screenshots)
NOTE: The door between the two lights remains closed until you place the BATTERY and WINCH STARTER, so it's not possible to use the exposure meter bug to reach the end of the level before collecting those items.
Make sure your exposure meter and health bar are full before making the last long swim. Jump into the water and head forward into the right corner of the little icy passageway. Now swim up a long, water-filled shaft. You'll swim through a save/power-up crystal (5) on the way up. At the top, there's a small ledge on one side where you can climb out of the water and pick up a small medi pack (21). (screenshots)
EXCAVATION SITE: Climb up to the final area in the level. Apparently Willard and his cronies have uncovered more than just a few artifacts. There's a flamethrower guy here, but he's pretty much useless. From the ledge where the white-suited guy is standing, turn around to face the entrance. Then climb up to the opening above on the left and kill the mutant (19) lurking inside. Or, just leave him be since he doesn't have any goodies. Then cross the bridge over the deep chasm and kill 2 more mutants (20-21), one on each side of the Quonset hut. They can't climb without legs. So if you like, you can just stand at the end of the bridge until they emerge. Then hop back out of the range of their toxic breath and shoot them from relative safety. Just take care not to fall off the edge. (screenshots)
NOTE: In the remastered game, if all 21 mutants have been destroyed, either by Lara or by the flamethrower guys, you'll unlock the "Pest Control" achievement/trophy now.
Now head past the carved stone heads to the far right side of the ruins, where the ledge where meets the ice wall. There's a light mounted on the wall above and another ledge below. Turn around so the wall with the light is on Lara's right and jump onto the slope next to the wall, slide down backwards, grab the edge, and drop onto the lower ledge. Go into the tunnel for SECRET #3, a large medi pack, Desert Eagle clips, and grenades (22-24). (screenshots)
Return to the cave opening, turn left, and take a running jump across the chasm to the small white ledge. Turn around and take another running jump across the gap to the small, triangular ledge ahead on the left. Now take a tricky running jump to the next ledge. Set it up carefully so you have enough room to run before jumping. Turn around again and take another running jump across the gap to the next ledge. Climb onto the ledge above to find some grenades (25). Then take one more running jump from here to the lower of the two ledges below the bridge. (screenshots)
Climb up onto the bridge. Take a standing jump from the raised block supporting the bridge to grab the roof of the building above the door. (screenshot) Pull up and walk to the back of the roof, where you'll find a small medi pack (26). Return to the front of the building, drop down, and press the button to open the door. Go inside the Quonset hut to complete the level.
†UPDATE HISTORY: 9/21/14 - First major update since this walkthrough was created in 1998. This revision includes many new screenshots as well as various other corrections and clarifications.
2/5/24 - Added VGCartography's level maps, with permission. Visit VGCartography on DeviantArt for high-res versions, and follow on Twitter/X and YouTube for more fantastic game maps.
5/4/24 - Added kill and item counts. (Actual remastered updates coming eventually, but this should help.)
2/9/25- Added notes on unlocking the two mutant-related achievements/trophies in the remaster.
9/27/25 - Added the note about grenades/rockets possibly glitching the "Pest Control" achievement/trophy, thanks to a heads-up from Gouthaman.
ACKNOWLEDGEMENTS: Special thanks to participants in the alt.games.tombraider newsgroup, without whom some parts of this walkthrough could not have been written. Thanks also to Andrew, Bill, Cujo, Jeff Reid, Lucas, Lucio, Mike B., Stephen D., and Rachel for their help on this level.
‡NOTE ON VIDEO GUIDES: Eldin's videos don't always follow the same strategies I use in my walkthroughs, but if you prefer that format, I think you'll find them very useful.
WAS THIS WALKTHROUGH HELPFUL? If not, I apologize and invite you to contact me with any questions. If you need help right away, I recommend the r/TombRaider subreddit. Other fan-run forums are listed at tombraiders.net/stella/community.html. If this site was useful, please consider supporting it financially or in other ways. For details, visit tombraiders.net/stella/support.html. As always, I welcome your corrections/suggestions. Thank you!
Copyright © 1998- - Stellalune (). Feel free to copy or print this walkthrough for personal use. By all means, share it with friends, but please include this credit line so people can send me their feedback. No part of this walkthrough may be reproduced on another site without permission. Follow this link for details about this site's advertising and privacy policy.
Stella's Tomb Raider Site: tombraiders.net.