TIBET ON FOOT: A WALKING TOUR
Updated: 2/6/11(†)
INTRODUCTION: Many players have asked if it's possible to get through sections of the Tibetan Foothills without a snowmobile. In fact, you can to do the entire level on foot, and doing so unlocks the Eco-Friendly achievement/trophy in Tomb Raider II Remastered. Note that I do not include every item pickup here and some of the area descriptions are simplified. Refer to the main walkthrough for details if necessary.
LEVEL MAP by VGCartography (used with permission)
Eco-Friendly achievement/trophy walkthrough by Eldincy
LEVEL START TO HUT: From the start of the level, follow the main walkthrough until you reach the HUT & SNOWMOBILE.
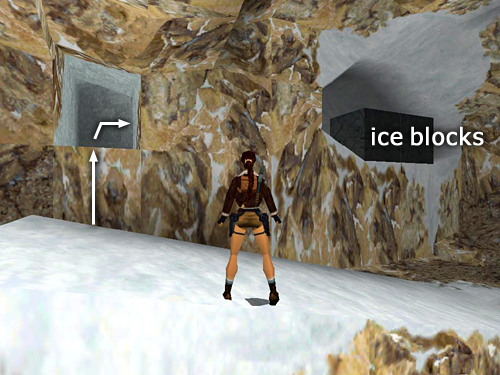
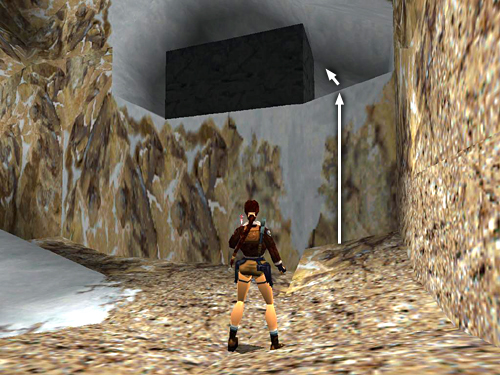
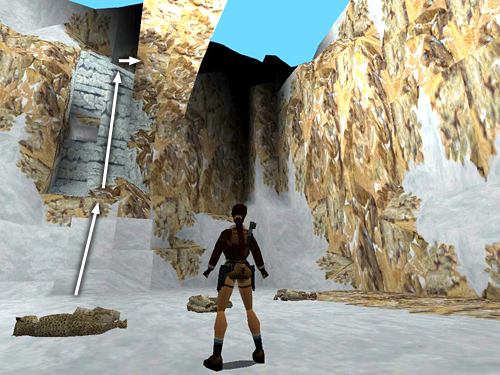
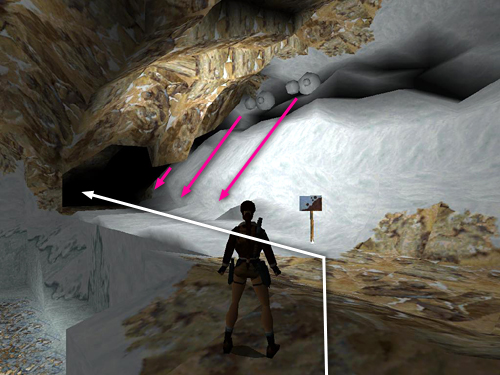
HUT TO OPEN AREA WITH RAMPS AND LEDGES: After killing the enemies at the hut and picking up the Silver Dragon near the barred passage to the right of the hut, hike into the cave on the left. After a while you'll meet another bad guy. Kill him and continue to the OPEN AREA WITH RAMPS AND LEDGES. Climb onto the snowy ledge and jump from there into the smaller opening to the left of the one with the ice blocks. (screenshot) Follow the passageway around to the wide tunnel and kill the 2 leopards that charge from the left. Or, if you don't care about getting all the kills, climb into the cave next to the ice blocks instead. As long as you don't enter the narrow passage on the left, the leopards won't appear. (screenshot)
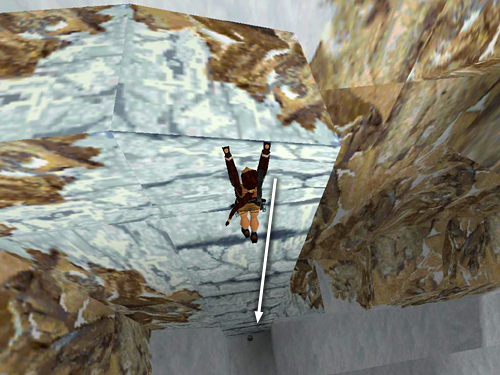
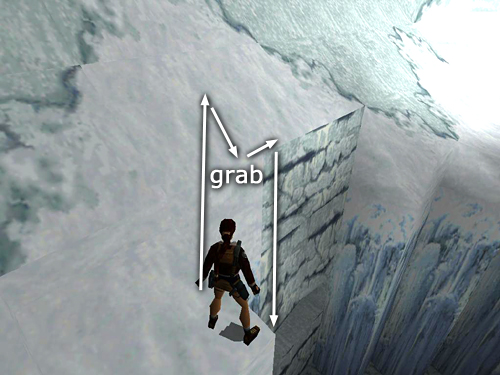
CAVES AND NARROW ICE BRIDGE: Continue through the tunnel until you reach a wide gap. This next jump is a bit tricky so save the game before attempting it. Move to the right side of the gap and set up the jump carefully: Walk to the edge and then hop back once. Take the running jump and press Action at the last minute while Lara is in the air to grab the opposite ledge. (screenshot) Pull up and keep walking.
NOTE: For more info on setting up jumps, see the general Strategy page.
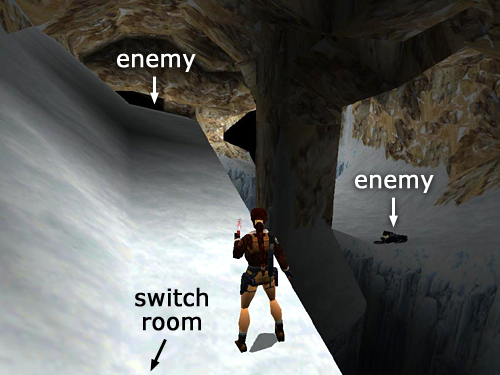
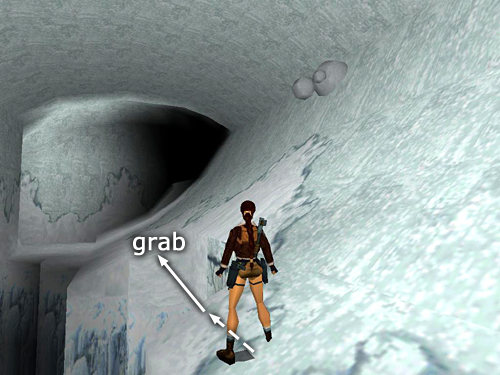
Soon you'll come to an area with a chasm in the center and a ledge on each side. Go to the right, following the ledge to a dead end. (screenshot) Climb the ice ladder and pull the switch to open a gate on the other side of the chasm. Climb back down, take out the 2 enemies here. (screenshot) Then return along the ledge, make a U-turn near the cave entrance and follow the wider ledge along the other side of the chasm, using a simple running jump to clear the gap. Go through the gate you just opened, head down a ramp through a tunnel then over a narrow ice bridge, where you'll meet another bad guy. After crossing this bridge, continue through the next dark tunnel, killing 2 more enemies on the way.
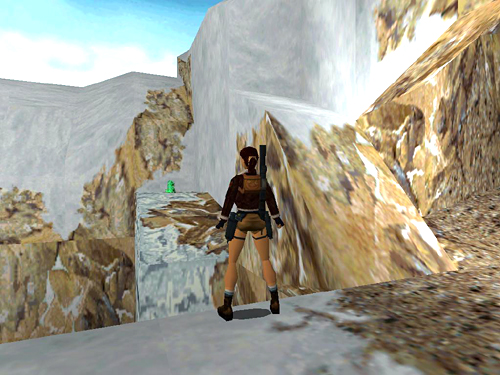
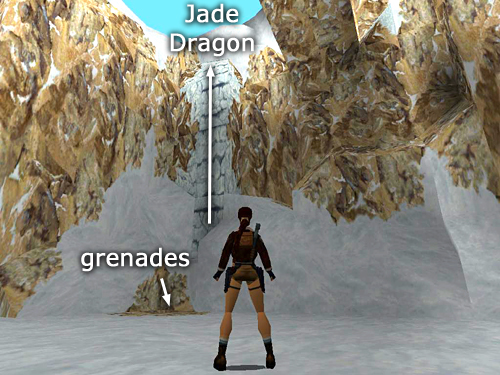
CANYON WITH TWO RAMPS (THE BIG GAP): Next you'll come to the big gap, which can only be crossed using the snowmobile. Instead, jump to the ledge on the right of the opening, take the Jade Dragon (screenshot), turn around and kill the 2 leopards on the ramp. They can't reach Lara here, but it's a good idea to take care of them now since you'll be returning this way later and may have forgotten about them. Then climb down the ice ladder to the canyon floor. (screenshot) Shoot 3 more leopards here. Then cross the canyon floor and climb the ice ladder there to reach the ledge on the other side of the big gap. (screenshot) There's a small opening to the left of the ice ladder which is blocked by a wooden gate. You'll open it soon from the other side.
DRAWBRIDGE KEY: Ahead is a large chasm with snowballs perched above. Walk out toward the right side of the opening and let the snow roll. Jump onto the slope above the ice ladder (where the snowballs just passed), slide back and grab the edge. Climb down the ladder as far as you can, release and grab the ledge below. Pull up and take the DRAWBRIDGE KEY. Go down into the small opening and kill the thug behind the ice wall. Go into the next room, trip the dangling icicles and pull the switch to open the gate. (screenshots) Go through the gate to emerge near the ice ladder in the canyon. Climb back up the ladder and return to the snowball area. (screenshot)
This time stand at the right side of the hole, so the slope is on Lara's right, and take a running jump to grab the opposite edge. (screenshot) Pull up and continue through the dark, low-ceilinged cave to the drawbridge area.
DRAWBRIDGE AND HUT KEY: Use the key to raise the bridge. (screenshot) Then head up the ramp and cross the bridge. Turn left and cross the flat area beyond the little sign, moving carefully to avoid the avalanche. (screenshot) As you enter the snowy cave ahead, you'll hear a huge rumbling and the screen will shake as the snow tumbles down, blocking the opening behind you. Continue around to the left to a deep pit. Jump onto the sloping ledge on the left side of the pit, slide back and grab the edge, then traverse across the pit to the other side. Then slide down the slope on the left to emerge near the DRAWBRIDGE.
Pick up the HUT KEY on the ground near the snowbank and take care of the baddie on the snowmobile. There's a safe spot on the snow block just to the right of the key. If Lara stands at the front edge of this block, the bad guy can drive behind her but not run her over. (screenshots)
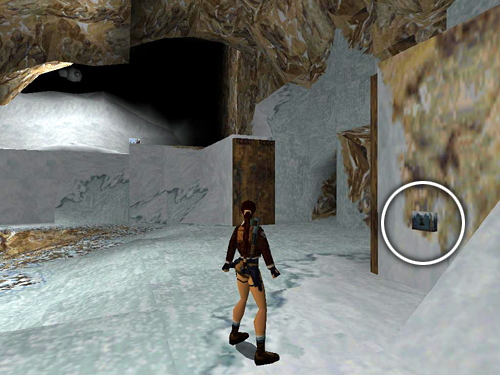
BACK TO THE HUT: When the coast is clear, return to the hut near the start of the level more or less the same way you came: Hike out to the chasm with the cave opening on the right the snowball area above on the left. This time you can't jump directly across because the block you'd jump from is lower than the one on the other side. So instead jump to the slope on the right, slide back, grab the edge and traverse to the right until you're above the ice ladder. Climb down, drop to grab the opening below, and return through the tunnel to the canyon floor. (screenshot)
Alternatively, in the dark, low-ceilinged cave between the drawbridge area and the chasm with the snowballs, there's a small, wooden door. Use the switch next to the door to open it. Follow the passage to the cave opening above the chasm with the snowballs. Take a running jump from the right side of the opening down to the snowy ledge beside the chasm. Then head to the right and climb down the ice ladder near the BIG GAP to reach the canyon floor. (screenshots)
Cross the canyon floor and climb the ice ladder on the opposite side to the ledge where you found the Jade Dragon earlier. (screenshot) Jump from there to the ramp where you killed the leopards. Continue through the caves to the next gap, which you cross again with a simple running jump. Keep going to the next wide gap and cross this one on the left, using a running-jump-and-grab combo.
Proceed through the OPEN AREA WITH RAMPS AND LEDGES and into the tunnel on the other side. Just around the next corner there's a low ledge with 2 leopards prowling above. They won't come down off the ledge. So you can climb up to get their attention and then hop back down and shoot them from below. From there, continue to the HUT.
FROM THE HUT TO THE EXIT: The rest of the level is the same as the original version, since you'd have to leave the red snowmobile at the ledge with the leopards anyway. So pick up the main walkthrough from here.
†UPDATE HISTORY: 2/6/11 - First major update since this walkthrough was created in 1998. This revision includes many new screenshots as well as various other corrections and clarifications.
WAS THIS WALKTHROUGH HELPFUL? If not, I apologize and invite you to contact me with any questions. If you need help right away, I recommend the r/TombRaider subreddit. Other fan-run forums are listed at tombraiders.net/stella/community.html. If this site was useful, please consider supporting it financially or in other ways. For details, visit tombraiders.net/stella/support.html. As always, I welcome your corrections/suggestions. Thank you!
Walkthrough text copyright © 1998- Stellalune. All rights reserved. Feel free to copy or print this walkthrough for personal use. By all means, share it with friends, but please include this credit line so people can send me their feedback. No part of this walkthrough may be reproduced on another site without permission. Follow this link for details about this site's advertising and privacy policy.