Stella's Tomb Raider 2 Walkthrough - Updates for Tomb Raider 2 Remastered Coming Soon
LEVEL 15: TEMPLE OF XIAN
Updated: 4/26/24(†)
Secrets: 3 Pickups: 39/40, including Dragon Seal, 3 keys, and 3 secrets Kills: 37
NOTE: The number of pickups includes the three dragon statuettes and the items awarded for finding all three secrets. . In the remastered game, there is one extra pickup, the large medi pack at the top of the ladder in the cave across from the Gold Dragon, bringing the total number of items to 40. In the classic version this item is only reachable by cheating. (See here.)
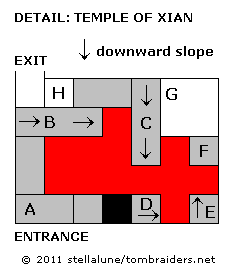
LEVEL MAP by VGCartography (used with permission)
Temple of Xian Video Walkthrough by Eldincy
OBJECTIVES: This is another complicated level with lots of side areas and backtracking. From the pool near the start, swim through an underwater tunnel to a cave with two temples with closed doors. Find a secret switch to open a trapdoor back at the pool. Go through this trapdoor and navigate several trappy areas to find the switch that opens one of the temples you saw earlier. Return there and pass through more hazards to reach a large room with a dragon statue, where you'll obtain the Dragon Seal. Escape from this room and return to the first temple, where you can use the seal to open a new area. Explore there to find a Gold Key, which opens the gate in the pool where you started. Swim through the flooded area behind this gate to reach the spider cave, which in turn leads to the Silver Key. This key unlocks the second temple in the cave near the start. Go through the second temple to reach the main chamber. Finally, navigate the traps there to reach the end of the level.
THE DAGGER...ALMOST: Go through the antechambers with the torches and approach the pedestal at the center of the large room. There it is: the Dagger of Xian! But of course it's not that easy. As you approach, the floor collapses and Lara slides down a chute until she's spat into a pool at the end. Here's how to minimize injury and nab a secret in the process: Light a flare before stepping out so you can see where you're going. When the floor drops away, fall onto the slope below, slide and grab the edge. Drop and slide, press Look to regain Lara's perspective and then jump over the blade and continue sliding. The rolling boulder will pass overhead. When the brick chute ends and Lara lands on the wet, gray slope, press Jump and Roll so Lara lands facing uphill and can grab the edge at the end. Traverse to the left and pull up into an alcove where you'll find SECRET #1, the Gold Dragon (1). (screenshots)
NOTE: High above the pool on the left, you may notice another ladder on the rock wall. (screenshots) There is a room at the top with a large medi pack inside. In the classic game, there was no way to get there, short of using a flight patch or editing a save file to put Lara at the top of the ladder. (You can download a PC savegame file with Lara at the top of this ladder here. Instructions for using save files are here.)
In the remastered game, the ladder is actually climbable, so it's possible to reach the room with the medi pack. You'll even get an achievement/trophy, "Hero of Reaching Unreachable Supplies," for doing so. If you're playing with modern controls, you can go after it from the alcove where you find the gold dragon. There are a number of YouTube videos showing how. Once you have it, just drop into the pool and continue as usual. If you're playing with tank controls, it's much easier to get it when you reach the wooden bridge with the rolling blade later in the game (see below).
SHORTCUT: There's a major shortcut here that will enable you to bypass most of the level. Details and screenshots are included on a separate page. Note that if you use it, you will miss 2 secrets.
When you have the Gold Dragon, dive into the water and allow Lara to be swept over the falls. Swim to the far right corner of the pool (i.e., right when Lara's back is to the waterfall). Climb out on the wooden platform and shoot the 2 carp (1-2). Note the keyhole on the wall here, the gate on the left and the ladder on the right leading up to a closed trapdoor. Apparently you'll need a key.
There are two underwater openings in the rock wall across the pool. They both lead to the next area, but there's a pickup in the one on the right. So swim down into that tunnel. (screenshot) On the bottom right side of the right tunnel is a narrow, underwater passage. Swim inside to find a small medi pack (2) and a glimpse of a GOLD KEY you can't reach yet. Return to the wider tunnel, turn right and swim up into the temple area.
TEMPLE ENTRANCE: There are two buildings here: a larger one with wide steps straight ahead and a smaller one on the right. You don't have the key for the second building yet. Pick up some shotgun shells (3) on the rocks on the left side of the pool. Then ready weapons. As you approach the temple doors, 2 tigers (3-4) emerge. The first comes from the left behind the stairs as you approach; the second appears at the top of the stairs on the right as you come up. If you like, you can run back to the water, where Lara will be safe. Then wade in toward the shore just far enough so you an draw a weapon and shoot the tigers from there.
Go around the left side of the building. Stand in the corner facing the building and run onto the springboard, holding Action to bounce up onto the roof. Cross the roof and throw the switch to open the trapdoor you saw earlier near the pool below the waterfall. Kill the bird (5) that flies in from the far side of the cavern. Then drop down, swim back through either underwater opening to the pool below the falls and climb out on the ledge with the ladder and keyhole.
CAVE WITH STONE LEDGES AND LAVA: Climb the ladder, kill a spider (6) in the passage above, and continue to a ledge above a room with a large wooden pillar in the center and lava below. Turn around, step back off the ledge and grab the edge. Climb down the ladder as far as Lara will go. Then drop and grab the ledge below. The ladder continues, and you can see the Silver Dragon below, but that drop is too far for Lara to fall and grab. So instead, traverse to the left along the ledge, which soon narrows to a small crevice. (You may need to pull up, move to the left of the ladder and then drop back again if Lara wants to climb the ladder instead of hanging to traverse.) When the crevice widens again, pull up onto the ledge, walk around the corner to the left. Climb down the next ladder to the bottom and again drop and grab the ledge below. Pull up and walk around the corner to the right. Drop and hang from the ledge, traverse to the right and pull up into the alcove with SECRET #2, the Silver Dragon (4). (screenshots)
Hang from the ledge once more and traverse back to the left. Pull up and follow the ledge around the corner. Move to the end of the ledge, roll and shoot another spider (7) that approaches from the corner. Then jump across the lava to grab the ladder on the pillar. (screenshot) Climb up and follow the passage to a room with ladders and spikes below.
SMALL ROOM WITH SPIKES AND CLIMBABLE WALL: Drop into the room and either go around the spike pit to grab onto the wall of ladders or take a running jump across the spikes to grab on. Climb until a horizontal crevice prevents you from going any farther. Traverse to the right so Lara is hanging below the flat part of the ledge above and not the spikes. Then backflip onto the slope behind and immediately jump forward to land on the flat spot above where you were just hanging. (screenshot)
LAVA POOL WITH BREAKAWAY TILES AND SMALL CAVE WITH SPIKES: Walk over the rise and position Lara at the middle of the ledge facing out over the breakaway tiles and lava pool. Run across the tiles and stop on the last one. When they break, Lara will fall onto the pedestal below, where you'll find some shotgun shells (5).
Take a running jump from the pedestal over the lava and into the doorway. Lara will immediately start to slide into a little cave with spikes on the floor. Jump just before the end of the slide to land on the angled block ahead. Almost immediately jump again to clear the second set of spikes and grab the ledge above. Pull up, then slide down the angled block on the right to land safely near the grenades (6). To get out, pull up onto the tall block next to the slope where you slid into the room and then climb the stepped blocks on the left. Grab the horizontal crevice, traverse to the left and pull up onto the ledge. Use the switch to open the main doors back at the FIRST TEMPLE. Follow the short passageway to the left of the switch, dive into the water and swim back through either of the underwater openings to the TEMPLE ENTRANCE. (screenshots)
INSIDE THE FIRST TEMPLE - ROOM WITH MECHANICAL WARRIORS: Enter through the doors you just opened and go to the rear, avoiding the mechanical guards. You'll see some M16 clips (7) lying on the floor. Approach them from the back to avoid being sliced by the mechanical warrior's sword. Go through the right doorway in the rear wall. (The one on the left requires an artifact to open.) Inside the right doorway, you'll see a grillwork gate, which also doesn't open yet. Climb the ledges to a room with many angled stone ledges and a lava pool below.
CAVE WITH ANGLED BLOCKS ABOVE LAVA: You'll need to make a complicated series of sliding jumps to get through here. To make it easier, I've included a diagram (at right) as well as a set of screenshots. Here's the sequence:
Position Lara in the doorway (A) so she's facing the long slide that slopes down to the right (B). Walk to the edge and then hop back once. Turn just a little to the right to make sure Lara will land on slope B facing downhill. Save the game. Now take a running jump across the room and onto the slope. Slide almost to the bottom and then jump to land on the next angled block (C). (C is perpendicular to B and slopes down to the right.) Slide almost to the bottom of slope C and jump across the lava onto the small angled block ahead (D). Now HOLD Jump and Action to jump onto the fourth sloped block (E) and immediately jump and grab the final angled block (F). Pull up and climb the flat ledges ahead to the top of the room (G). Turn left so the long cave wall is on Lara's right. Then take a running jump to grab the ledge below the exit (H). Pull up and climb to the doorway above.
SPIKED WALL TRAP ROOM: Do not rush into the alcove ahead. The switch there is a decoy. No matter how you approach it, the floor collapses and you slide into the room below, where spiked walls begin to encroach. Grabbing the small medi pack (8) on the floor and getting out alive is a challenge, but it's possible. Position Lara in the middle of the doorway and run onto the collapsing floor. Don't press any other controls as she slides down the chute. When she lands, she should be positioned in the middle of the walkway with the medi pack and the skeletons. Jump forward and press Action. Lara should land right on the medi pack and pick it up without hesitation. As soon as she stands up again, jump forward, run to the real switch and pull it to open the exit, which is directly behind her. Immediately do a backflip with a mid-air twist (Jump + Back + Roll in rapid succession). Lara should land facing the exit. Take a running jump, then keep running through the door. (screenshots)
If you don't care about getting all pickups, just slide down the chute, run/jump to the far side of the room, flip the switch to open the exit, roll and rush through.
ROOM WITH RAMPS AND METAL BALLS: Continue to the next room. Here are three stone ramps with a giant metal ball perched above them. If you advance cautiously, you can trigger each one and get out of the way without being flattened. Start up the first ramp, then quickly hop back and jump to the left to get avoid the first ball as it rolls down toward you. Proceed to the top of the first ramp. Here another ramp slopes down to the right. To trip the second ball, which drops down from above and rolls down to the right, run up the ramp and off the left edge into the shallow pit. Then climb up onto the third ramp. To trigger the third ball, step forward onto the second tile in the ramp. Then hop back twice and grab the edge of the ramp and hang there. The ball will roll down toward Lara and pass harmlessly overhead. Pull up and continue. (screenshots) Climb back to the top and follow the ladders up.
DARK ROOM WITH SWITCH: Drop into the dark room. Cross to the far right corner and throw the switch, which opens a gate to the left on the same wall as the switch, and also frees a tiger (8) that charges from behind you. Once you've killed it, climb up through the opening to a ladder rigged with slicing blades.
LADDERS WITH BLADES AND SMALL ROOM WITH ROLLING BLADES: Light a flare before jumping and grabbing the ladder. Climb down until Lara's feet are just above the blade. Just as the blade begins to open, release Action to drop past it. Quickly press Action again to grab the ladder below. Repeat the process with the second blade, then drop/slide into the room below.
To get past the 2 perpendicular rolling blades here, take them one at a time. Stand facing one blade with the other on Lara's right. Wait for the blade ahead to roll to the right and then run past it to the wall. Turn left, wait for the other blade to roll to the left and then run past it into the doorway. Follow the passageway to emerge in the rafters above the mechanical warriors. Kill the 2 birds (9-10) that fly in from the right.
NOTE: Save the game before continuing. If you accidentally fall from the rafters, it's easier to just reload and try again. If Lara does fall to the floor below, return to the right doorway on the back wall of the room with the mechanical warriors. Now, the grillwork gate just inside on the right is open (screenshot). Follow this passageway to get back up to the rafters.
ROOM WITH MECHANICAL WARRIORS - UPPER LEVEL - TIMED RUN OVER THE RAFTERS: Make your way across the ledges to the button on the wall to the left. This button opens the big doors at the opposite end of the room. They only stay open for about 10 seconds. So you'll need to hurry. Press the button, roll, then do a series of running jumps across the wide, wooden beams: The first two can be taken at a smooth run, the third needs an extra step beforehand. That is, hold Forward and Jump for the first two running jumps, then release the Jump button to let Lara take a few steps and press it again when she reaches the edge to leap from the second beam onto the tiled ledge near the doors. Keep running through before the doors close.
TRAPPED ROOMS BEYOND RAFTERS: Beyond this doorway is a room with a narrow walkway over lava. Four spiked balls swing from the ceiling. Stand to one side of the walkway and run past each ball in turn as it swings away. (screenshot) Then stop short just beyond it. The shadows on the floor can help to gauge each ball's position so you don't accidentally run into the next one. Alternatively, you can run past the first ball, hang from the edge of the walkway and traverse past the middle two. (screenshot) Then pull up and run past the fourth.
Next comes a doorway with buttons on each side and a lava-filled hallway with breakaway floor tiles beyond. The button on the right raises a grate between the solid floor and the tiles; the one on the left opens the gate beyond. Press the right button, side flip, press the left button, and run through the doorway. When you reach the end of the tiles, a boulder rolls down from above and behind. You can try and outrun it, jumping at the end of the bridge to grab the ledge opposite. Or, you can backflip over the boulder as it rolls along. However, I found it easier to cross the broken tiles, stop immediately on the first solid block and then quickly hop back, grab the edge of the floor and hang there as the boulder passes above. Then pull up and continue at a leisurely pace. (screenshot)
LARGE ROOM WITH LAVA POOL AND DRAGON STATUE: At the end of the walkway, take a running jump over the lava to grab the small ledge ahead. Pull up and take the DRAGON SEAL (9). Then turn right and take a running jump to the flat ledge next to the dragon. Climb up to the room above and behind the huge statue. Grab the automatic pistol clips (10) on the step near the door. Then enter the dark room, pick up 2 more sets of automatic pistol clips (11-12) and pull the switch. This causes part of the walkway to disappear and raises blocks in the lava out in the main room. Exit through the doorway on the far side of the dark room. As you go, 2 spiders (11-12) appear behind you. Shoot them on the way out. (screenshots)
Climb down the block steps along the right wall (i.e., right when facing in the same direction as the dragon) and slide down onto the flat ledge just above the lava. Take a running jump across the lava to the small, square ledge just ahead and another running jump the next small ledge. Turn left to face the short, angled block near the stone pillar supporting the walkway. Carefully set up the next running jump by walking to the edge, hopping back once and then turning just slightly to the left. (This will ensure that Lara lands on the sloping block facing downhill.) Then take the running jump onto the slope and immediately jump again to grab the edge of the taller angled block ahead. Pull up, slide down the back of this block and immediately jump to land on the tall, flat block ahead. Turn right and take a running jump to grab the taller block against the wall. Pull up. (screenshots)
NOTE: Alternatively, after exiting the dark room with the switch, you can take a shortcut over the dragon's back: Hop down to the ledge just below the doorway. Jump over to the flat spot on the dragon's shoulder. Step back to the outside edge and take a standing jump forward, pressing Action to clear the ear and land on the middle of the back. Turn to face out over the dragon's head and step forward to slide through its neck and land on the small, square ledge where you found the DRAGON SEAL earlier. From here, take a running jump to the tall, brown pillar against the left wall. (screenshots)
Once Lara is standing on the tall, brown block above the lava pool, turn so the wall is on her left. You should now be facing the sloped wall with various ledges, where you first entered this area. Take a running jump down to the next brown block below. The ornate square ledge in the lava just ahead, which was a burner when you entered, is actually a springboard. Walk to the edge of the brown block nearest the springboard. Hop back, then do a standing jump onto the springboard. Hold the Forward control so the springboard propels Lara onto the ledge above. Immediately hop back and grab the edge to avoid the rolling ball that comes down the slope toward you. When it passes, pull up onto the ledge. (screenshots)
Now you need to make your way across the slope to the upper right corner. Begin by taking a standing jump across the tan slope to land on the flat area above and to the right. Immediately run and jump to the brick ledge ahead and a little higher up the slope to avoid another rolling ball. Walk to the far edge of this ledge and jump across the next slope to the slightly higher brick platform ahead. (This one is set against the side wall of the room.) Turn around and jump back across the slope to the next higher ledge. Kill the bird (13) that flies in from in from the room at the top of the slope. Then turn to face uphill, walk to the upper right corner of the ledge and take a standing jump to grab the edge of the brick ledge above and to the right. Pull up. (Again, check the screenshots if you need a visual.)
Turn around to face down the slope. From here, you can see the Jade Dragon on a high wooden ledge on the right side of the room. Step off the edge and slide down the tan slope to the springboard at the bottom. Hold Action as you slide and Lara will spring into the air and land on the wooden ledge high above. Turn right and take a running jump to grab the edge of the ledge on the opposite side of the room. Pull up and take possession of SECRET #3, the Jade Dragon (13), with a bonus of 8 sets of Uzi clips (14-21) for finding all secrets. (Again, check the screenshots if necessary.)
Stand near the left wall facing the slope below and take a running jump down to the long brick ledge on the left side of the slope. Take a standing jump from the middle right edge of this ledge to grab the edge of the brick ledge just up the slope on the right. Pull up, taking care not to step into the spike pit just ahead. Turn right and take a running jump across the next slope to the ledge beyond. This is the same ledge where you stood earlier just before sliding down the slope to the springboard. But this time, instead of sliding down, turn left and take a running jump across the slope to the other flat ledge on this same level. Walk to the corner and take a standing jump up to the ledge near the red doorway at the top of the room. (screenshots)
RETURNING TO THE TEMPLE: Pull or push the movable block with the face on it into the small room beyond. Use the switch to open a trapdoor in the floor. There's a ramp below with a metal ball at the top. It doesn't roll until Lara moves down the ramp a bit. So run down ahead of the ball and when you reach the bottom of the slope, turn left. The ball will stop at the corner. Slide down the next ramp to emerge in the rafters above the mechanical soldiers.
Now, if you must have all the kills, you'll need to make a detour back through the big doors opposite the button. Do that the same way you did before (see the "Timed Run Over the Rafters" section above). Beyond the timed doors, head to the left and you'll see things have changed here. Climb up into the area above the swinging spiked balls. Here you'll meet another tiger (14). When you've killed it, continue forward to emerge in the DRAGON SEAL ROOM. Use the flat brick platforms to climb back up to the little red room at the top left corner of the slope. Go through the trapdoor and down the ramps.
ROOM WITH MECHANICAL WARRIORS (again): When you re-emerge in the rafters above the room with the mechanical warriors (whether or not you've made the detour to kill that extra tiger), there will be 2 more tigers (15-16) lurking below. If you dangle Lara from the beams to get their attention, you can shoot them before dropping down. Use the DRAGON SEAL to open the gate at the back of the room.
ROOM WITH SPIKED CEILING AND MANY SWITCHES: Enter and follow the passage to a rolling blade. Run down the hallway, ducking into the alcoves to avoid the blade. The last alcove is actually a slide leading down to a room with shallow water on the floor. The spiked ceiling descends and you need to flip 3 switches to open the exit. There are also a number of decoy switches, but if you look carefully, these aren't realistic enough to trip you up. The real switches are on the wall directly opposite the slide, in the near right corner next to the small waterfall, and on the left side of the room just beyond one of the skeletons. The exit is the panel with the serpent face to the left of the waterfall. There is also a small medi pack (22) on the floor near the other skeleton. You should have time to pick it up if you move quickly.
POOL WITH SIDE TUNNELS AND LEVERS: As you exit the switch room, you emerge in another flooded room with a waterfall. Climb onto the block on the right and take a running jump to grab the higher one. Climb up and take a dip in the pool to draw out the carp (17). Kill it with pistols before proceeding.
This next section has a complex series of underwater levers and gates. Here's the drill: On the left side of the pool is an underwater opening with a strong current that prevents you from swimming through. On the right is a closed gate and a lever. It's the first of 5 in this area so we'll call it lever 1. Swim down and pull it to close a door at the end of the passage with the current, raising the water level in the pool and slowing the current. Then swim up to the ceiling where you'll find 2 air pockets. Use the one just above if you need it. Then swim across to the other air hole on the far side of the room (i.e., just above where you entered). Climb out of the water and pick up a large medi pack and grenades (23-24). (screenshots)
Now swim down and to the left, through the wide tunnel, which slopes upward then down again. When you come to the door with the serpent face, ignore lever 2 on the left for now. Instead swim through the little opening on the upper right opposite the lever. Swim forward and pick up the small medi pack (25).
NOTE: If Lara is running out of air at this point, swim out of this tunnel and pull lever 2 (the one you passed a moment ago). It's on the far wall of the wide tunnel, just below and to the left. (screenshot) This lowers the water level and sweeps Lara back into the big pool so she can breathe. Then use lever 1 again to raise the water level and swim back to the passageway where you found the medi pack.
In the same narrow passage where you got the medi pack, pull lever 3 to open the gate directly opposite. Roll, swim forward and pull lever 4. This opens the gate out in the big pool. Roll, swim out of this tunnel and turn left at lever 3. When you come to the wide tunnel, swim across to the opposite wall to find lever 2, just below and to the left. Pull it to open the door with the serpent face once more. This lowers the water level and sweeps Lara back into the big pool, where she can breathe. (screenshots)
The gate you just opened using lever 4 is on the other side of the pool, to the right of lever 1. Swim through and locate lever 5 on the right wall of this dark room. Pull it to open the exit, high in the ceiling of the pool room. Swim back out to the pool. Use lever 1 once more to raise the water level. Roll, swim up to the air pocket in the ceiling and climb out of the water at the gate you just opened. (Again, check the screenshots if you need a visual.)
ANOTHER SPIKED WALL AND THE GOLD KEY: You're now in the room below the one with the encroaching spiked walls. Kill a fish (18) in the water before retrieving 2 boxes of shotgun shells (26-27) under the water and some M16 clips (28) on the pedestal.
In the next room, a spiked wall comes from the right. To get through, run into the room, head for the switch on the far wall a bit to the left and pull it to open a nearby trapdoor. Side flip to the left twice and then backflip to fall through the trapdoor. Lara will slide into a flooded tunnel, and the current will carry her to the GOLD KEY (29). Pick it up and swim straight on through the gate, which opens as you approach. Grab the small medi pack (2) on the bottom of the passage if you didn't notice it at the beginning of the level. Then swim out of this tunnel and up to the left to surface in the pool at the foot of the waterfall near the level start.
UNDERWATER AREA BEHIND GATE: Climb out of the water on the ledge with the gold keyhole and use the GOLD KEY to open the gate on the left. Swim through, fill Lara's air meter and then swim down and forward, to the right, and then right again. Swim through the opening next to the serpent face panel into a small, dark room with closely spaced pillars. The gate closes behind you, and another pesky fish (19) appears. You may be able to kill it with harpoons, but this takes time (and air) so you're probably better off just ignoring it and using a health pack if necessary.
Swim between the two pillars with the serpent faces, find the lever on the back of the first pillar and pull it to open the exit. If you're running out of air, continue around the first pillar and through the exit, which is located on the same wall as the entrance. Otherwise, after pulling the lever, turn around and swim down along the left side of the second pillar to find a small medi pack (30) on the floor. Grab it and continue around to the right, then right again, keeping the outer walls of the small room on Lara's left. Then swim forward through the exit. (screenshots)
Pulling that last lever also opened a trapdoor farther along the underwater passage. To reach it, continue swimming forward. (Unless you're about to run out of air, ignore the passage between the wooden support columns on the left. This leads back to the pool with the waterfall.) At the end of the wide passage, swim straight up through the open trapdoor and head for the surface. Swim to the right side of this pool and climb out of the water into the cave opening with wooden support pillars. Shoot the fish (19) that followed you from the lever room and a second fish (20) that just appeared. (The previous set of screenshots also shows the path from the lever to the trapdoor.)
NOTE: After pulling the lever in the small, dark room with the pillars, if you need air quickly, you can also swim out and back up the passage to the left to surface in the pool with the waterfall. Climb out on the ledge with the keyhole and shoot the fish from there. Then swim back down the flooded passage, turn left and then swim up through the trapdoor.
SPIDER CAVE: This area is very dark. There is no in-game gamma control so you may want to turn up the brightness on your TV or monitor in order to see where you're going—and conserve flares. Enter the dark, web-spangled cave with guns drawn. (Lara can probably spot those spiders better than you will.) There'll be 2 small spiders (21-22) to start—one just inside the tunnel, one just ahead where the tunnel widens. Turn left and approach the flares (31) on the ground. Two more spiders (23-24) drop down into the alcove on the right. Kill them and take the flares. Turn so the alcove is behind Lara and advance slowly toward the alcove on the other side of the cave. Two more small spiders (25-26) drop down there. Shoot them as they approach. (screenshots)
Now turn right so the alcove where the last pair of spiders came from is on Lara's left. Move down the path into the open area below just far enough to trigger the appearance of a giant spider (27) in the opening ahead on the left. Then hop back up the path shooting. When the giant spider is dead, grab the Uzi clips (32) lying on the ground to the right and head for the opening where the spider came from. Another small spider (28) drops from the alcove to the left of that opening. Kill it and proceed.
Follow the tunnel to an opening overlooking a big, open area with a glowing egg sac suspended above. When you step into the opening, a giant spider (29) drops from the ceiling. Get a lock on it and keep firing as you back up into the cave where you came from. Now return to the opening overlooking the cavern with the egg sac. As soon as you hop down off the ledge, another giant spider (30) drops from the ceiling ahead on the right. Try to shoot it as it approaches. Then move around to the far side of the cavern, roll or turn around quickly and shoot a fourth giant spider (31) that drops from the ceiling. (Again, check the screenshots if necessary.)
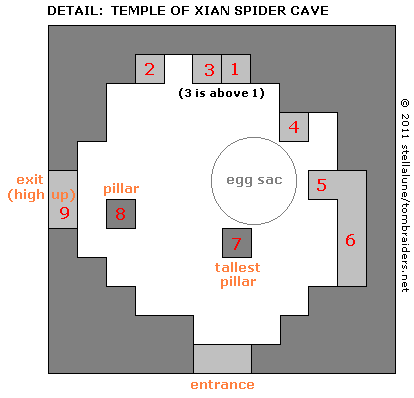
Now you must climb the ledges around the edge of the cavern to reach the doorway high above. This sequence is shown in another series of screenshots. The steps are also indicated with numbers in the diagram at right. Begin by climbing onto the one stone block you can reach (number 1 in the diagram). It's against the wall on the far side of the cavern from the entrance. Turn so the cave wall is on Lara's right. Take a running jump to grab the next higher block (2). Pull up, turn around, walk to the edge and take a standing jump to grab the thin ledge jutting out from the wall above (3). Pull up. You should now be level with the egg sac, which is on Lara's right.
Take a running jump to the next small, square ledge (4) then a standing jump to the next ledge, which is L-shaped (5). A giant spider (32) will drop down in front of you here. To avoid being knocked off the ledge as you fight, immediately backflip onto the previous ledge (4) and shoot the spider from there. Then jump back onto the L-shaped ledge, walk around the corner and turn to face the egg sac. Now take a running jump from the middle of the longer section of the L-shaped ledge (6) down to the tall pillar at the center of the cavern (7), which is almost directly under the egg sac. Take another running jump along the right side of this block to grab the pillar below the doorway (8). Pull up and walk to the opposite edge of the pillar. Take a final standing jump from the edge of this pillar to grab the doorsill (9) and pull up.
ROCK FORMATION IN POOL AND SILVER KEY: Follow the passage up to an opening above the pool near the SPIDER CAVE entrance. Take a running jump from the opening to grab the rock formation ahead. Climb up and take the SILVER KEY (33). (screenshot) Dive into the pool, swim down through the trapdoor where you came in and follow the tunnel back to the pool with the waterfall. (From the trapdoor its down and forward, right, then left and up the sloping tunnel.) Take a breath and swim through either of the tunnels on the right side of the pool to get back to the TEMPLE ENTRANCE.
Now that you have the SILVER KEY, you can use it in the silver keyhole to open the door of the building on the right. (screenshot)
INSIDE THE SECOND TEMPLE BUILDING: Enter and climb up on the lowest block. Stand at the back left corner, and jump forward to grab the front right corner of the next higher block. There's no danger yet as long as you don't pull up onto the block. When you do pull up, a metal ball rolls down from above. To avoid it, turn just slightly to the left and immediately jump forward and grab the front left corner of the next higher block. Again, you're safe here until you pull up. When you do, immediately pivot left and jump forward to get out of the way of a second rolling ball. Continue forward and pick up some automatic pistol clips (34) on the floor where the boulders originated. (screenshots)
NOTE: If you can't manage the quick timing here, you can also jump to grab the second block, pull up and then jump to the right to avoid the first ball. Then climb back up to the second block, jump to grab the third, pull up and jump to the left to avoid the second ball.
Return to the top of the slope and climb into the opening on the right. Step out onto the wooden bridge and kill the tiger (33) that emerges from the room on the other side, then a bird (34) that flies in from the right when Lara reaches the middle of the bridge. Keep your weapons ready as you enter the red room on the other side of the bridge. There's a second tiger (35) waiting here. When you've dealt with it, climb onto the lower of the two angled pillars and backflip to land on the higher pillar. Turn around and jump to the flat ledge ahead. Climb onto the red ledge on the left. (On the right is a STEEP SLOPE WITH TIERED SPRINGBOARDS. The doors at the top are closed now, so don't bother going up there yet.) Beyond the red ledge is a room with a rolling blade moving back and forth along a ledge.
If you like, you can take a detour for an ammo pickup. Otherwise, skip this paragraph and continue past the rolling blade. To get the ammo, position Lara in the doorway on the left, just before the rolling blade, and jump forward to land on the slope ahead. Slide back and grab the edge to avoid falling into the lava below. Climb down to the bottom of the ladder, let go and catch the ledge below. Pull up and take the Uzi clips (35). Then continue to the end of the hallway and drop through the hole in the floor into the pool outside the temple. Re-enter the building where you just were and return up the ledges, across the wooden bridge and up to the rolling blade. (screenshots)
With careful timing, it's possible to jump up the ledges past the rolling blade. Or, you can move to the far end of the room. Grab the ledge on which the blade is rolling and traverse as far to the right as possible. Wait for the blade to roll away to the left and then pull up. Lara is safe here at the corner of the ledge. Wait for the blade to roll toward you then away again and take a standing jump onto the ledge above. (screenshot)
WOODEN BRIDGE WITH ROLLING BLADE: Enter the room with the motionless blade and pick up 2 sets of Uzi clips and a large medi pack (36-38) near the skeleton. The blade doesn't start rolling until you move out onto the wooden bridge. The first section of bridge is safe, so you can step out and take a look around if you like. (If you're playing the classic game or don't care about achievements/trophies, skip the following note.)
NOTE: Off to the right of the bridge, as you emerge from the room with the rolling blade, there's a ladder on the rock wall and a little room at the top containing a large medi pack (39). This item is inaccessible without cheating in the classic game (see above) but easily obtained in the remaster. To get it, take a standing from the bridge to the nearest stone ledge. Run forward off that ledge to land on the block below, losing a little health in the process. Then take a running jump to grab the ladder. Climb to the top, then up into the room with the medi pack. (screenshot) Taking it unlocks the "Hero of Reaching Unreachable Supplies" achievement/trophy. To get back up to the bridge, dive into the pool, allow the current to sweep Lara over the waterfall, swim through the underwater openings on the left, and surface near the TEMPLE ENTRANCE. Re-enter the SECOND TEMPLE (i.e., the one on the right that you unlocked using the SILVER KEY) and retrace your steps through the building (no rolling balls this time), across the first wooden bridge, and through the next building (with the rolling blade) to get back to the room with the skeleton and the doorway to the second wooden bridge.
Step out onto the long wooden bridge. Run across ahead of the blade and move to the left side of the ledge to get out of its way. Push the button to open the doors at the top of the STEEP SLOPE WITH TIERED SPRINGBOARDS back in the temple. Then kill another bird (36).
Now return across the bridge to the room on the other side. There are several ways to do this: You can follow the blade as it rolls away, taking running jumps to go farther faster and veering left into the room at the end of the bridge. Or, stand on the ledge near the button, angled toward the middle of the bridge. Wait for the blade to emerge from the doorway moving toward you. Just as rolls out onto the bridge, hop back once. Then take a running jump past the oncoming blade onto the middle of the bridge. Continue running into the room ahead and veer to the left to get out of the blade's way. Or, dive into the pool, go back through the door you unlocked earlier with the SILVER KEY and make your way up the ledges, across the first bridge and into the temple. (screenshots)
If you returned from the button via the wooden bridge, continue through the room with the skeleton to the one with the rolling blade on the ledge. Carefully jump down past the blade to the floor below. Then move out onto the ledge overlooking the room where you killed that last tiger. Or, if you returned to this room via the pool and ledges, climb up to the level just below the rolling blade the same way you did before.
STEEP SLOPE WITH TIERED SPRINGBOARDS: Stand facing the first in a series of springboards, at the base of the slope on the left. Walk to the edge, hop back once and then take a running jump onto the springboard. Continue holding Forward and Lara should bounce up the slope using all four springboards. Hold Action as she lands on the fourth one to sail up and land on the ledge above. Or, press and hold Action after she takes off from the fourth springboard to grab the ledge. Then pull up. (screenshots)
Turn around and shoot the bird (37) that dive-bombs you at the top. Then climb into the doorway above. These big doors are the ones you just opened by pressing the button on the far side of the wooden bridge.
MAIN CHAMBER: Enter this large, lava-filled room. Move to the end of the walkway and jump over to the small, square ledge near the keyhole. (You'll be getting the key shortly.) From here jump to the larger ledge on the right. Run across, jump onto the raised block and quickly climb the ladder before the spiked wall moves in from the right. Dismount on the ledge above. (screenshot)
Climb up the angled stone ledge to the next room. Enter and turn right. Then run forward, staying close to the right wall and keeping ahead of another moving wall of spikes. Jump over the spike pit, grab the ladder on the wall ahead and climb out of the room.
At the top of the ladder, turn right and follow the hallway past two small gates and a trapdoor, all closed now. Pull the switch to open one of the gates you just passed. Return to this gate, which is now on the right, and step through onto a ledge overlooking the lava pool and a giant dragon statue surrounding a tall, square column with a shiny key on top.
FIRST DRAGON COLUMN: Turn left and take a running jump to grab next ledge; pull up. Move to the outer corner and take a standing jump onto the ledge ahead on the right. Turn right, walk to the edge and take a standing jump to grab the top of the tall column. Pull up and take the MAIN CHAMBER KEY (40). Drop down on the left so Lara lands on the flat part of the dragon's neck. Step off onto the slope so Lara slides down the dragon's twisting back facing downhill. When Lara slides off the third slope onto the last and shortest slope below, immediately press Jump and Action to leap across lava and land on the flat block below. (screenshots)
Once you've reached the safe block at the bottom, turn around, hop down to the lowest step and from there take a running jump to the long ledge where you came in. This is a tricky jump, but if you walk to the edge, angle Lara so she's facing just to the right of the open door (use the Look button to check and adjust if necessary), and then hop back once before taking the running jump, you shouldn't have any trouble. (screenshot)
Again, go to the end of the walkway, jump across to the keyhole and use the MAIN CHAMBER KEY. This opens a trapdoor somewhere up above and raises a grate on the stone column behind you. Jump back to the walkway by the door and then take a running jump over to the grate. Then jump from the grate to the block below the ladder. (screenshot) Climb up and dismount on the ledge on the right, since there's a lit burner on the left.
NOTE: You can also backflip off the ladder to land on a ledge behind you. The switch here turns off the burners temporarily, but it isn't necessary to do this, since there's nothing on the other ledges.
Turn around and jump over the spikes and grab another ladder. (screenshot) Climb to the top to emerge back in the small, dark hallway, this time through the trapdoor in the floor. Go forward up the little ramp and turn left. Now the second gate here is open.
SECOND DRAGON COLUMN: Step out onto the ledge overlooking another square column with a dragon statue twined around it. (In case you get disoriented, the dragon you're going for now is the one with the column extending all the way to the ceiling. The other is the one where you found the key.) Turn left and take a running jump to grab the next ledge; pull up. Take a standing jump to the ledge in the corner. Then turn right to face a block that slopes down toward the dragon. Take a running jump onto it and immediately jump again to land on the flat area on the dragon's neck. (screenshot)
VERTICAL SHAFT WITH LADDERS AND BLADES: Climb the ladder on the square column until you come to a blade. Position Lara's hands two rungs below the blade, then backflip onto the angled block behind. Before Lara can slide off, immediately jump and grab the ladder on the opposite wall. Climb to the next blade, position Lara's hands two rungs below it and press Jump and Roll, then hold Action to make Lara leap from the ladder, twist in the air, and grab the ladder behind. Continue climbing nearly to the ceiling. Dismount in the red hallway on the right and go forward to finish the level. (screenshots)
CUT SCENE: Lara emerges above the chamber where the Dagger of Xian rests, only to find that Marco Bartoli has beaten her to it. She watches from the shadows as the cult members perform some sort of ritual. Lara stifles a gasp as Bartoli raises the dagger and plunges it into his chest. He collapses and his henchmen carry him out on their shoulders. Naturally, Lara follows. (Re-watch video on my YouTube channel.)
†UPDATE HISTORY: 4/9/11 - First major update since this walkthrough was created in 1998. This revision includes many new screenshots as well as various other corrections and clarifications.
4/10/11 - Removed a shortcut which apparently does not work on all systems so as not to mislead anyone. Apologies to anyone for whom this caused trouble.
5/5/12 - Added links to cinematics on YouTube.
6/19/12 - Fixed a couple of mixed-up lefts/rights, thanks to a correction from Martin P.
7/21/13 - Added alt strategy for first 2 tigers, thanks to a tip from Harry.
12/1/13 - Added "objectives" section for each level.
4/30/21 - Added the shortcut in case Lara falls out of the rafters in the room with the mechanical warriors. After. Twenty. Three. Years. Twenty-three years. Damn, I'm an idiot. Thanks to Shannon for telling me about this, even though I clearly don't deserve it.
2/5/24 - Added VGCartography's level maps, with permission. Visit VGCartography on DeviantArt for high-res versions, and follow on Twitter/X and YouTube for more fantastic game maps.
4/25/24 - Added notes for the "Hero of Reaching Unreachable Supplies" achievement/trophy in the remastered game. More remaster updates coming eventually.
4/26/24 - Added sequential kill and item counts, which will hopefully be helpful for both the classic and remastered versions. More remaster updates coming eventually. Thanks for your patience.
ACKNOWLEDGEMENTS: Special thanks are given to the participants in the alt.games.tombraider newsgroup, without whom some parts of this walkthrough couldn't have been written. Thanks also to Breanna, Em, Graeme, Greg D., Joop, Matthias, Roque, Ruud, Shannon, Steve, Tim and Tom C. for their corrections and suggestions for this level, and to Varatharaju, Mman and RRCarroll for the shortcut from the gold dragon area—Raj for discovering it, Mman for bringing it to my attention through his speedruns, and RR for filling me in on its origins.
WAS THIS WALKTHROUGH HELPFUL? If not, I apologize and invite you to contact me with any questions. If you need help right away, I recommend the r/TombRaider subreddit. Other fan-run forums are listed at tombraiders.net/stella/community.html. If this site was useful, please consider supporting it financially or in other ways. For details, visit tombraiders.net/stella/support.html. As always, I welcome your corrections/suggestions. Thank you!
Copyright © 1998- - Stellalune (). Feel free to copy or print this walkthrough for personal use. By all means, share it with friends, but please include this credit line so people can send me their feedback. No part of this walkthrough may be reproduced on another site without permission. Follow this link for details about this site's advertising and privacy policy.
Stella's Tomb Raider Site: tombraiders.net.