Seamless PC Controller Setup for Original Tomb Raider Games
by Chelle / "Mipo" / @the_mipodian
This guide will walk you through the process of creating a seamless method of running the six original Tomb Raider games with full modern controller support on your PC!
- Download the latest version of JoyToKey at joytokey.net and install it somewhere easily accessible, such as to a folder on your desktop.
- Navigate to C:\Documents (or wherever your default Documents location is), and you should see a folder named "JoyToKey". Cut and paste the contents of this folder directly into the folder where you installed JoyToKey. The Documents\JoyToKey folder should now be empty and can be deleted.
- Download Calmly Frenetic's JoyToKey profiles, found here, in the "Using JoyToKey" section: steamcommunity.com/sharedfiles/filedetails/?id=644307505, and place the extracted .cfg files into the JoyToKey install folder.
- Open JoyToKey.exe and use "Settings (S) > Associate profiles with applications (A)" to link the three config files to their corresponding game .exes.
Note: Depending on what versions of the games you have, the "Application path" will vary, but you only need to enter "[install folder name]\[path-to-exe]", e.g. "Tomb Raider 1\dosbox.exe" or "Tomb Raider 6\bin\TRAOD_P4.exe".
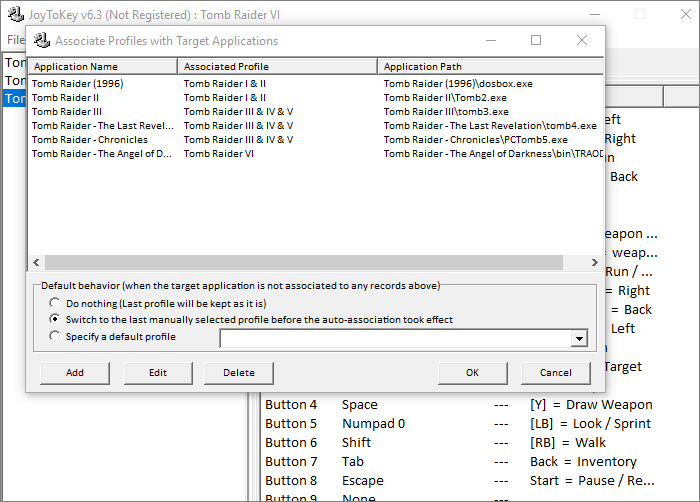
Image 1: Example JoyToKey profile associations
I recommend stopping and, with JoyToKey still running, checking that your controller works in the games at this point! If all seems well, let's continue.
Note: The Angel of Darkness has wildly different controls to the rest of the series (e.g. using the trigger as "Enter"), so keep that in mind before you think you've set it up wrong!
- Copy and paste the JoyToKey folder into each of the install folders for the Tomb Raider games. That is, we want a full duplicate of the configured JoyToKey program in each game folder. This isn't a very efficient way of doing things, but unless you're using a computer from 1996, it shouldn't be a problem!

Image 2: Example JoyToKey folder location
Here's where things get fun—time to write some code! See, for JoyToKey to work, it has to be running in the background—but unless you want to have the hassle of having to manually launch it before every game session and close it via the Taskbar afterwards, we need to automate the process to make it happen when you open and close the game!
- Right click anywhere (probably on your desktop) and create a new text document (.txt).
- Copy and paste the following code into it:
@echo off

start "" "%~dp0JoyToKey\JoyToKey.exe"

start /wait "" "%~dp0TombRaiderGame.exe"

taskkill /f /im JoyToKey.exe /t > NUL
Notes: The "%dp0" command allows the code to find the location of itself, which is very good for ensuring that the actual file the code is written in can be moved about without the filepath breaking! The "/wait" command prevents any further code from running until the following executable has stopped running—in this case, it stops the code from executing the "taskkill" function to close JoyToKey until after you've closed the game executable.
- Save this as "LaunchTombRaiderGame.bat", replacing the ".txt" file extension. Windows will likely warn you that changing the extension will risk causing the file to stop working/your computer to explode/the world to end, but just click "Yes", you're sure you want to change it! See, a "batch" file is used by Windows to run command line arguments, and is simple enough that you can just write a .txt file and change it into a .bat!
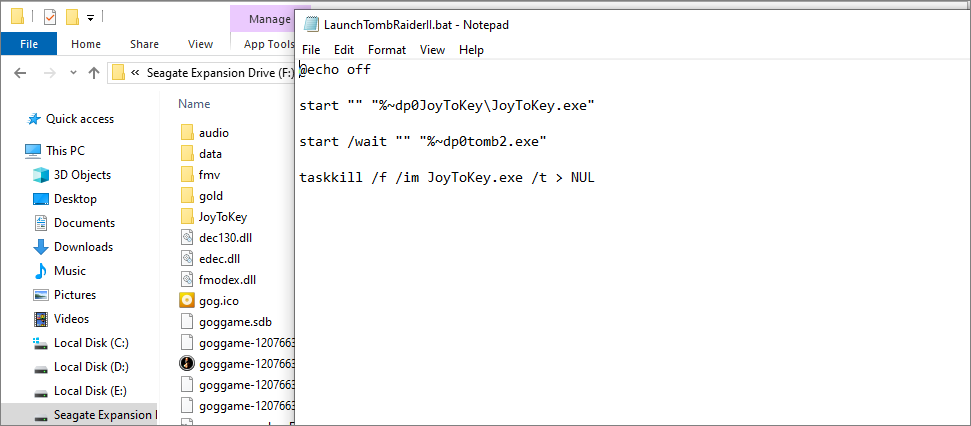
Image 3: Example code
- Copy and paste this entire .bat file five times, so that you have six total! Rename them to the names of the six games, e.g. "LaunchTombRaider1.bat", "LaunchTombRaider2.bat", "LaunchTombRaiderTheAngelofDarkness.bat", etc.
- Now, we have to open each of the .bat files and replace the "TombRaiderGame.exe" in our code with the actual game executables for the six games—and in the case of Tomb Raider 1 running via DOSBox, we need to add some more code. To edit the .bat files, we're going to need to right click on them and select "Edit", rather than simply double-clicking as before—that now runs the code!
- Edit "LaunchTombRaider1.bat", replacing the third line of code with the following line:
start /wait "" "%~dp0dosbox.exe" -conf "..\dosboxTR.conf" -conf "..\dosboxTR_single.conf" -noconsole -c "exit" - Edit "LaunchTombRaider2.bat", replacing "TombRaiderGame.exe" with "tomb2.exe".
- Edit "LaunchTombRaider3.bat", replacing "TombRaiderGame.exe" with "tomb3.exe".
- Edit "LaunchTombRaider4.bat", replacing "TombRaiderGame.exe" with "tomb4.exe".
- Edit "LaunchTombRaider5.bat", replacing "TombRaiderGame.exe" with "PCTomb5.exe".
- Edit "LaunchTombRaiderTheAngelofDarkness.bat", replacing "TombRaiderGame.exe" with "bin\TRAOD_P4.exe".
- Edit "LaunchTombRaider1.bat", replacing the third line of code with the following line:
- Next, cut and paste each of your six new, fully-configured batch files into the corresponding installation folders of the six games, just like you did with the JoyToKey folders before!

Image 4: Example .bat file location
At this point, I'd once again recommend stopping and checking that everything functions properly! Rather than double-clicking on any existing "launch" shortcuts, you should be able to double-click on the .bat file and see a command console appear for a moment, then the game should launch with JoyToKey enabled. When you close the game, JoyToKey should close itself a moment later!
Note: JoyToKey may leave multiple duplicates icons in your Taskbar, even after closing, but these are simply a minor glitch in Windows, and if you simply mouse over the icons they should vanish.
- Finally, to make everything nice and clean, right click on the .bat files and select "Create shortcut". Right click on this shortcut, open "Properties", and change the "Run:" property to "Minimised", then "Apply" to save it. This will hide the brief flurry of command console activity when you double-click to run the game. This will be how you launch the game from now on, so rename it whatever you'd like (e.g. simply "Tomb Raider II"), change the icon as you wish, and place it wherever (e.g. your desktop)!

Image 5: Example shortcut
Main Controls Page | Main Page
Copyright © 1998- Mipo and used here with permission. This tutorial may not be reproduced elsewhere without the express written consent of the author. Lara Croft, Tomb Raider, and the Tomb Raider logo are trademarks of the Crystal Dynamics group of companies. All rights reserved