If you are unable to make the jumps across the 4 horizontal poles the first time, you can still complete this room, just in a different order. Drop into the pool and climb out of the water on the ledge near the barred doorway.

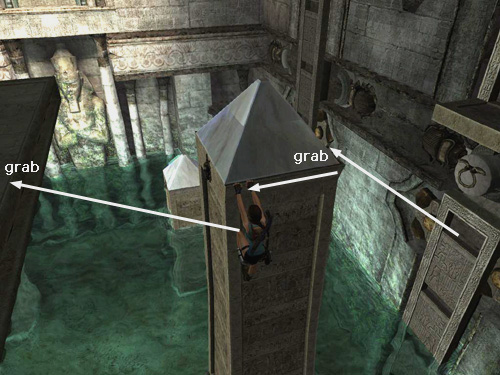
Turn left and take a running jump to perch on the pointed post sticking out of the water near the corner (shown above). Jump to grab the handhold ahead and press Interact if necessary to make a saving grab. Jump up to the handhold above and from there jump to the left to the carved panel. Jump up to the top and wait for the elevated walkway to extend, the obelisk behind you to rise up out of the pool, and the scarab mechanism to lock in place. (Assuming you have already activated the mechanism below the ladders, this will be the second one.)

Jump back to grab the obelisk behind you and climb to the top. Climb around to either side, jump to grab the elevated walkway and pull up.

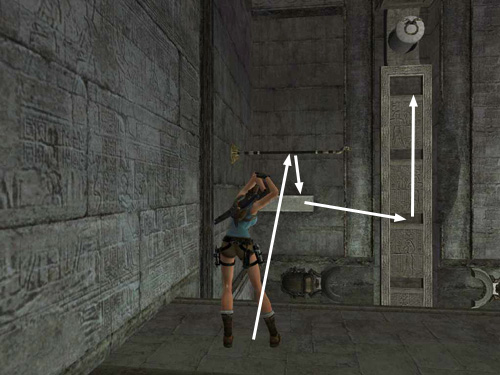
Take a few steps to the left, so Lara is standing near where the walkway emerges from the wall. You should now be facing the corner of the room with the third obelisk (i.e., the fourth one in the main walkthrough), which has not yet been raised. Take a running jump from the walkway to grab the horizontal pole. Swing around and jump to grab the handhold near the corner. Climb to the right then jump to grab the carved panel. Jump up to the top as it descends. When it locks into place, drop down and swim back to the ledge near the barred door.
Repeat the jump to the narrow post, then the handholds, then the carved panel, which is already locked in place (as shown in the second screenshot above). Jump from the top of the panel to grab the obelisk behind. Climb around to either side, jump to grab the walkway. Pull up and turn around to face the obelisk you just came from.

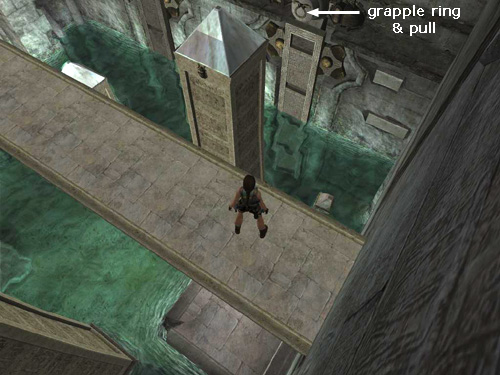
Now in order to reach the fourth mechanism, in the far left corner, you'll need to unlock the mechanism straight ahead. To do that, use the grapple to grab the metal ring attached to the stone circle at the top of the carved panel. Pull to unlock the scarab mechanism and return the panel, as well as the corresponding obelisk and the elevated walkway, to their original positions. Stay close to the wall as the ledge retracts so Lara doesn't fall. (If she does, you'll have to re-lock that mechanism, climb back up to the walkway and unlock it again.)

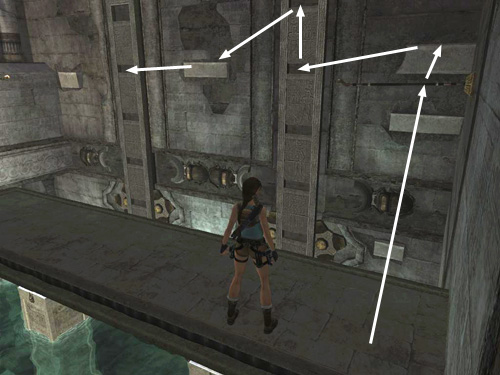
Now, to reach the panel on the far left, start by taking a running jump to grab the horizontal pole ahead. Swing, jump and grab the handhold near the corner. If Lara grabs the lower handhold, jump to the higher one. Climb to the left, jump to grab the carved panel but don't let this one lock. Quickly jump up to a higher part of the panel, and then jump to the left to grab the stone handhold on the wall between this panel and the next one. From there you can jump to the other panel. As it descends, jump to the top and let it lock into place.
Drop into the water, return to the ledge near the barred door and repeat the process to lock the final mechanism (i.e., the one you just unlocked) in place. (This is shown in the first screenshot on this page.) Now you should have all four mechanisms locked and the corresponding obelisks raised out of the pool.
[Return to the Sanctuary of the Scion Walkthrough]
Copyright © 2007- Stellalune (). All rights reserved. The TRA screenshots included here were made using Fraps. Feel free to copy or print this walkthrough for personal use. By all means, share it with friends, but please include this credit line so people can send me their feedback. No part of this walkthrough may be reproduced on another site without permission. Follow this link for details about this site's advertising and privacy policy.
|

