Stella's Tomb Raider Underworld Mobile/Cell Phone Game Walkthrough
BALDR'S TOMB 2 – Part 1 (Map 3)
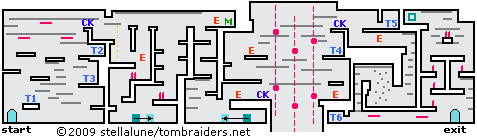
From the start, at the bottom left corner of the map (CHECKPOINT), run to the right and climb onto the wooden ledge. Jump to the left to grab the nearest handhold. Climb across the handholds to the left and drop onto the ledge with treasure #1.
Grab the handholds once more and climb to the wooden ledge directly above. Jump to the wooden ledge on the left, then to the ledge above on the right. Cross this ledge and jump to the next one to the right. Grab the handhold above, traverse to the right and drop onto the ledge with treasure #2.
Hang from the edge and drop to the handhold below. Climb to the right and drop down near treasure #3.
Now jump to grab the nearest handhold to the left. Climb the handholds and wooden ledges back to the handhold above the ledge where you found treasure #2.
This time, instead of dropping down onto that ledge, position Lara at the left end of the handhold, just below the slicing blade. When it retracts into the wall, jump up to grab the handhold above it and quickly traverse to the left out of the way. Traverse to the left toward the next blade. As it moves to the left, quickly traverse after it and Lara should be out of the way by the time it moves past again. Jump up twice and climb the next long handhold to the right. When you come to the next slicing blade, wait for it to retract and quickly traverse past it. Traverse on to the right and drop onto the small wooden ledge. (CHECKPOINT)
Drop down on the right. Traverse along the handhold to the abseil point. If you hang in front of it and tap the 5 button, Lara will use her grapple to lower herself to the ledge below.
Turn right and shoot the kraken's enormous tentacle. You can't kill the beast yet, but it will draw its tentacle into the hole in the wall so you can safely drop down to the level below. Move carefully past the spikes when they retract and quickly drop to the small ledge below. Jump down to the ledge on the left and drop to the floor.
Go to the right, press 5 to grab the movable block and push it a few steps to the right. Release it (5 again) and then use it to climb onto the ledge above. Move carefully past the retracting spikes. Then climb the wooden ledges to the top of the wall on the right.
Shoot the tentacle on the right so it retracts. Then jump across, run past the hole in the wall and grab the large medipak. Shoot the tentacle again and run past it off the ledge to land safely on the level below.
Climb down the ledges and handholds to the floor. Go to the right and drag the movable block to the left. Position it below and a bit to the left of the ledge with the undead knight. (There's a dot on the floor showing the correct spot.) Climb onto the block, draw pistols and tap 2/Up to raise Lara's arms so she aims upward. You should then be able to shoot the knight from below.
Climb onto the ledge where the knight was and go to the right. (CHECKPOINT) Take care not to run off the edge into the bottomless pit.
Watch out for falling rocks as you jump to grab the long handhold above the pit and traverse across. On the other side of the pit, drop down and shoot another undead knight.
Climb onto the ledge above, jump up to grab the handhold and climb to the left, again avoiding the falling boulders. Make your way across the handholds to the left and drop onto the ledge above the checkpoint.
Climb onto the small ledge on the left and shoot the knight on the next ledge before jumping over to it. Grab the handhold above and climb past the falling boulders to the top right corner of this area. Drop down onto the ledge. (CHECKPOINT)
Before going on, hang from the left edge of this ledge and drop to the one below, where you'll find treasure #4. Climb back up the handholds to the ledge with the checkpoint.
Jump to the ledge on the right, roll through the low opening and pick up treasure #5.
Roll back out and drop down to the level below. Turn right, shoot the kraken's tentacle so it draws back into the wall. Then run past it. Climb down the handholds to the floor.
Head to the right. Then scale the climbing wall by pressing the correct numbers on the keypad. When you reach the long handhold at the top, climb to the left and drop down the small handholds to the floor. Turn left, roll through the low opening and get treasure #6.
Now head to the right. Roll under the 2 slicing blades and continue to the exit. (CHECKPOINT) Unfortunately the door is locked.
It's possible to climb the ledges to the left of the door, but there are spikes on each one, making this challenging. It's easier to climb the handholds to the right of the door. Then you only have to go past one retracting spike. When you reach the second highest ledge, climb the handholds, carefully avoiding the 2 retracting spikes, upward then to the left. Drop onto the ledge and use the switch to open the door below.
Step off the ledge to fall and grab the handhold below. Drop to the ledge below the double spikes. Then go to the right and climb down the ledges and handholds to the exit.
BALDR'S TOMB 2 – Part 2 (Map 4)

From the entrance near the top left corner of the map (CHECKPOINT) turn right and shoot the kraken's tentacle to make it retract into the wall. Run past it and climb onto the ledge on the right.
Activate the puzzle panel to the left of the wooden door (D1). Zip explains how to solve the AQUEDUCT PUZZLE. For a recap, see the CONTROLS menu in the game. Each puzzle is random, so I have not included solutions here. If you fail, you must try again with a different puzzle. When you succeed, the door opens.
NOTE: Beating this first aqueduct puzzle unlocks this puzzle type in the PLAY > PUZZLE section of the main menu.
Drop down to the level below and roll under the blade trap. Drop down again. Pick up treasure #7 on the right. Then head to the left, roll under another blade and the low ceiling just beyond. Drop down to the level below this one. Follow the passage to the right and roll under another blade, a low ceiling and yet another blade. Drop down again and head to the left. Move carefully past the retracting spikes, another slicing blade and more spikes. Climb down the handholds to the floor.
Run to the right (CHECKPOINT) across the bottom of the map to the movable block. Grab it and drag it to the left to position it beneath the ledge with the box of explosive ammo. Climb up to get it. Then turn left and jump to grab the next ledge. Pull up and take the large medipak.
Climb back down and push the block back to the right. Position it beneath the ledge with the treasure on it. (There's a dot on the floor here showing the correct spot.) Climb up, run to the left and take treasure #8. Return to the right end of the ledge and climb the handholds to the ledge above.
Shoot the tentacle to make it retract and run past it. There's another tentacle sticking out of the hole at the end of the passageway. If you stand near the wall and angle Lara's guns upward, you can shoot it so it pulls back into the hole. You may also be able to shoot the undead knight on the ledge above before climbing up.
Continue to the right end of the passage. There are 2 more knights on the next level. Try shooting them from below if you like, or just climb up and deal with them. Now run to the left, climb up once more and deal with another knight. Proceed to the right. (CHECKPOINT)
Climb down the handholds to the ledge on the left. Shoot the tentacle to make it retract. Then run past it and pick up the small medipak. Jump back to the handholds, climb over to the ledge on the right and grab treasure #9. Climb down to the floor and finish off one more undead knight.
Climb over the block on the right and scale the climbing wall to the handhold above. Traverse to the right (CHECKPOINT) and abseil down to the floor.
Move to the right to engage the kraken. Switch to more powerful ammo by selecting it from the INVENTORY screen, but don't shoot at the kraken until you get close enough to see its health bar. This is the orange boss health meter above Lara's white one in the upper left corner of the screen. If you can't see the kraken's health bar, you won't be able to damage it. As you fight, try to avoid the tentacle rising out of the floor, as well as the falling rocks and stalactites. Run back to the left if you need a break and use health packs from your inventory as needed.
Once you've killed the kraken, jump to grab the handhold on the wall above the pit where the kraken was. Take care not to fall into the pit. Jump to the longer handhold above, traverse to the right and drop down. (CHECKPOINT)
Climb the ledges on the right side of the map to find a large medipak. Then drop down and follow the stone ledge to the left. Climb the handholds to the left, upward, then to the right. Drop onto the ledge on the right and then climb down into the shallow pit to find treasure #10.
Climb out of the pit and jump to the pedestal above on the right to get THOR'S HELVE (marked TH on the map). Jump to the handholds on the right, climb down and proceed to the exit.
Walkthrough text and diagrams copyright © 2009- Stellalune (). Feel free to copy or print this walkthrough for personal use. By all means, share it with friends, but please include this credit line so people can send me their feedback. No part of this walkthrough may be reproduced on another site without permission. As an Amazon Associate I earn from qualifying purchases. Follow this link for details about this site's advertising and privacy policy.
WAS THIS WALKTHROUGH HELPFUL? If not, I apologize and invite you to contact me with any questions. If you need help right away, I recommend the r/TombRaider subreddit. Other fan-run forums are listed at tombraiders.net/stella/community.html. If this site was useful, please consider supporting it financially or in other ways. For details, visit tombraiders.net/stella/support.html. I also welcome any and all suggestions to improve things. Thank you!
Stella's Tomb Raider Site: tombraiders.net.