Stella's Tomb Raider Mobile/Cell Phone Game Walkthrough - The Osiris Codex
 LEVEL 8 – ASCENT TO HEAVEN (MP2834)
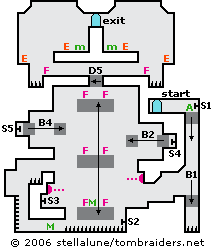
Pick up the ammo clip (GN4491) and then use the switch (S1) to ride the moving block (B1) to the level below. Quickly move off the step to the left and duck to avoid flying darts. Continue to the left.
Note the switch (S2) below, but don't try to reach it from here. Watch the flame jets on the platform above the spikes. When the flame goes out, jump over. Unless Lara's health is very low, leave the medikit for now. You may need it later. Avoid the other flame as you jump to the ledge to the left. Ignore the switch (S3) for now. Drop and hang from the ledge, let go to land in the spikes and then quickly move to the left so Lara won't die.
Turn and shoot to the right. You can't see the switch (S2) beyond the spikes, but you will hit it, causing a block (B2) to move up above. Go left, use the medikit and climb the ladder. Jump to grab the ledge with the spikes. Wait for them to retract, then pull up and quickly climb onto the ledge above. Drop down on the other side, watching out for flying darts.
Now hop back onto the platform with the flames and medikit. Stand in the center away from the flames. Shoot the switch (S3) to the left. This causes the platform to move upward.
Holster your guns and move to the right edge of the platform. When the platform passes the small, square block you just moved (B2), jump over to it. You need to do this next sequence fairly quickly so that you can catch a ride on the moving platform as it returns. So drop down on the other side of the block and use the switch (S4) in the alcove to move another block (B4) on the left side of the room. Then immeidately hop down out of the alcove, climb up onto the square block and step to the left edge. When the platform with the flame jets passes, jump back onto it and move toward the middle, away from the flames.
NOTE: If you're not fast enough and miss the descending platform, climb down off the block (B2) on the right side, hang from the edge above the dart trap and drop down to ledge below, losing some health in the process. Then jump back onto the platform.
Shoot the switch to the left (S3) to raise the platform again. This time, as it ascends, move to the right edge. When the platform passes the small, square block you just moved (B4), jump over to it. Drop down on the other side, climb into the alcove and use the switch (S5) to open a trapdoor (D5) in the ceiling high above. Hop down, climb up onto the square block and, once again, jump back to the platform as it descends.
NOTE: So far I have not been able to complete this level without losing any health, so I'm not positive about this, but I don't think it's possible to drop down on this side without dying if you miss your ride on the moving platform.
Move to the middle of the platform and use that medikit now if you didn't before. When the platform stops moving, shoot the switch to the left once more and ride the platform all the way to the top of the room. Jump straight up to grab either edge of the opening in the ceiling and pull up. (It doesn't matter if you choose the right or left side; they're mirror images and either will get you to the exit.)
Move along the ledge, stopping just before the flame jet. Jump to grab the ledge above and quickly pull up to avoid the energy blasts from the wizard or priest's wand. Crouch and shoot the snake on the ledge and pick up the medipack. Climb onto the pillar to reach the exit. (If you like, you can drop down on the other side of the pillar, kill another snake and get another medipack first.)
 |
|
NOTE ON ITEM & MAP CODES: Each level and item has a code, which can be found on the map screen or item info screen. Once you have a code, you can enter it on a page at the Tomb Raider Mobile or Eidos Mobile UK web site to access a level map or detailed item information. My walkthroughs include all of the item info, as well as my own maps, which are a bit more detailed than the unlockable ones.
Copyright © 2006- Stellalune ( or contact me via web form). In-game item descriptions copyright © Eidos, Ltd. Feel free to copy or print this walkthrough for personal use. By all means, share it with friends, but please include this credit line so people can send me their feedback. No part of this walkthrough may be reproduced on another site without permission. As an Amazon Associate I earn from qualifying purchases. Follow this link for details about this site's advertising and privacy policy.
WAS THIS WALKTHROUGH HELPFUL? If not, I apologize and invite you to contact me with any questions. If you need help right away, I recommend the r/TombRaider subreddit. Other fan-run forums are listed at tombraiders.net/stella/community.html. If this site was useful, please consider supporting it financially or in other ways. For details, visit tombraiders.net/stella/support.html. I also welcome any and all suggestions to improve things. Thank you!
Stella's Tomb Raider Site: tombraiders.net.