Stella's Tomb Raider Anniversary Mobile/Cell Phone Game Walkthrough
LEVEL 10: THE GOLDEN RULE
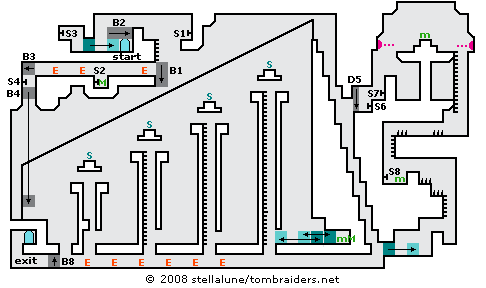
Climb onto the ledge above the door and walk to the right until Lara is standing at the edge of the ledge above a ladder. Jump across the gap to the switch (S1). Use it to lower a block (B1) to the left. Jump to the ladder and climb down. Drop to the floor and shoot the 3 enemies in the hallway.
Use the medikit in the shallow pit and pull the switch (S2) to retract the block ledge (B2) above the entrance. Climb back up and go past the entrance to the left.
Pull the movable block twice to the right. Climb over it, go to the left and use the switch (S3) to raise another block (B3) below. It also raises the block (B1) that you lowered using the first switch. So return past the entrance to the top of the ladder. Jump back to the first switch (S1) and use it again to lower that block (B1). Jump back across the gap and climb down the ladder. Go past the second switch (S2) to yet another switch (S4) on the left wall. Use it to lower the block (B4) on which Lara is standing. It descends a long way and finally stops just above a ledge. Hang from the edge and drop. Then climb down the ledges to the right.
The long hallway stretching to the right contains 3 man-sized enemies and 3 dogs. The warriors shoot magical energy bolts at Lara, so you may want to quickly kill them and then crouch and shoot the dogs.
Follow the hallway to the right, beneath several ledges. Just before the end of the hall, you'll see a room above with a pair of movable blocks and both a medipack and medikit. If Lara has less than half her health remaining, get and use one of the health packs. Otherwise she won't survive the long fall ahead. To get the goodies, climb onto the ledge, pull then push the first block all the way to the left, and then pull the second block out of the opening. Use only as much health as you need. You can return for the rest later. Then move the blocks back so you can climb down again.
Follow the long hall all the way to the right. Then climb the series of narrow ledges. At the top, jump straight up to grab the angled cable. As she slides down, Lara passes over four high ledges with statues on them. When she is directly above one of the statues, let go to land there.
Position Lara next to the statue and make sure the '?' icon is visible before pressing Action. Otherwise, Action will cause Lara to jump off the pedestal and die. Select the appropriate inventory item and then press Action again to use it. The GOLDEN BEETLE goes on the highest statue, the GOLDEN FEATHERS are for the bird statue, the GOLDEN EYE belongs to the statue of the face, and the snake statue gets the GOLDEN FANG. Each time you use an item to complete one of the statues, a door (D5) off to the right opens partway.
After activating one of the statues, carefully drop down on the left side, climb down the long ladder and drop to the floor. There is no ladder below the snake statue. Here Lara must hang from the left side of the shaft opening hang and then drop down the ledges, losing about half her health in the fall.
Repeat the process for each of the four statues: Climb the ledges at the right end of the hall, slide down the cable, drop onto a pedestal with a statue, use the correct item and climb down. If you accidentally let Lara slide down the cable past the statue you're aiming for, don't let go. Just keep sliding and she'll drop onto the elevator block (B4). Then just climb down and return along the hallway at the bottom of the map, climb up to the top of the cable and try again. When all four statues have been completed, the door (D5) will be fully open. Follow the hallway along the bottom of the map to the right, climb the steep ledges until Lara is just below the opening, jump to grab the doorsill and pull up.
Do not use the next 2 switches (S6 and S7) they only activate dart and spike traps in the room above and serve no useful purpose. Climb up to the pedestal and use the medipak if you need it. Then climb down the ladder on the right. Follow the hallway to the left. (If you accidentally triggered the spikes, wait for each set to retract before moving past them.) Climb down the next ladder and drop to the floor near another medipack.
Use the switch (S8) to raise a block (B8) near the exit in the lower left corner of the map. Climb down the ledges on the right (carefully if you triggered the spike traps here) and the ladder beyond. Go to the left and pull the movable block out of the opening.
Now follow the hallway along the bottom of the map to the left. If you haven't already used the medipack and/or medikit behind the two movable blocks, do that now. Continue to the left and climb up to the exit.
Walkthrough text and diagrams copyright © 2008- Stellalune (). Feel free to copy or print this walkthrough for personal use. By all means, share it with friends, but please include this credit line so people can send me their feedback. No part of this walkthrough may be reproduced on another site without permission. As an Amazon Associate I earn from qualifying purchases. Follow this link for details about this site's advertising and privacy policy.
WAS THIS WALKTHROUGH HELPFUL? If not, I apologize and invite you to contact me with any questions. If you need help right away, I recommend the r/TombRaider subreddit. Other fan-run forums are listed at tombraiders.net/stella/community.html. If this site was useful, please consider supporting it financially or in other ways. For details, visit tombraiders.net/stella/support.html. I also welcome any and all suggestions to improve things. Thank you!
Stella's Tomb Raider Site: tombraiders.net.