TOMB RAIDER GBC: TEMPLE C
NOTE: This is a big level and there are a number of different ways you could explore it. Each of the door keys works in either door, and you don't need to collect the colored handles in any particular order. If you come to this walkthrough in the middle of the level and you're missing a handle, you can probably figure out where to go by starting from your current save point (each one is numbered) and referring to the map and walkthrough.
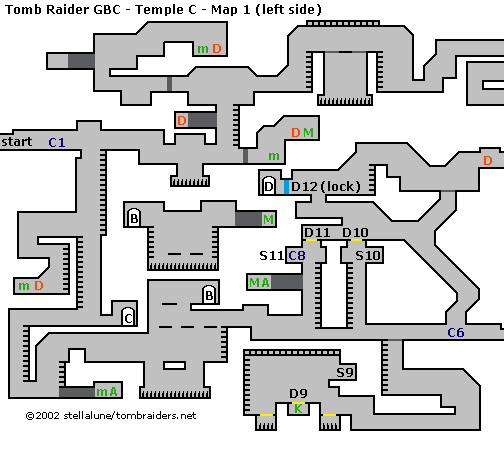
Temple C - Map 1 (click for printable map/map key)
NOTE: The first map for this level is larger than a standard 8½" x 11" sheet of paper. You can try printing it using landscape (horizontal) orientation. Or, download the left side and right side separately, print both and tape them together.
Go to the right and use the save crystal (C1). Continue right and take a running jump across the gap. Ignore the ladder leading downward for now and continue to the right. Hop down one level and continue right to a spike pit. (There's an elaborate rectangular design in green and purple here.) Take a running jump across the pit to grab the other side and pull up.
Continue to the right. If you have a stick of dynamite, you can destroy the gray door ahead. Otherwise, climb the ladder just above the gray door. When Lara is between the two light-colored bands of bricks, a little more than halfway up the ladder, backflip to land in the concealed passageway between the bands. Walk through to the left to get rapid bullets and dynamite. Take a running jump out of the passageway to grab the ladder and climb back down.
Use the dynamite to blow up the gray door at the bottom of the ladder. Enter and shoot a snake. Duck to avoid the dart traps as you pick up a small medipak on the lower level plus dynamite and a large medipak above.
Exit and climb to the top of the ladder. At the top, shoot a bat and take a running jump across the gap to the left.
Continue left to another gray door. Use dynamite to blast it open. Continue left, shoot the scorpion in the shallow pit, and keep going. There's a concealed passageway high on the left wall containing a snake but no goodies. Lara can climb into it from the ground or jump over from the ledge. From there, continue upward and to the right, over a ledge with a scorpion to a depression containing a small medipak and more dynamite. Watch out for the dart traps in the ceiling.
Return the way you came (left then down, then back to the right) to the top of the ladder with the large square design made up of four smaller colored squares.
Take a running jump across the gap above the ladder and continue to the right. Climb up one level and continue right to another ladder. Climb the ladder to the top where you'll find a series of tan ledges separated by white break-away tiles. Tread carefully; there's a spike pit below. You can either run across quickly, jump across the safe ledges or monkey swing using the vines on the ceiling.
Climb down the ladder on the other side. Shoot the scorpion before climbing all the way to the floor. Then continue to the right. Roll under the low wall and then climb up to a low-ceilinged hallway with dart traps in the ceiling and rectangular purple designs on the wall. Keep going to the right, passing over the white floor tiles for now, and killing 2 bats as you go.
Use the save crystal (C2). If you picked up the dynamite earlier, backtrack to the left and blow up the white floor tiles. (If you don't have dynamite, continue on to the right to find more.)
After blowing up the floor tiles, climb down the ladder into the hole. Kill 2 bats, hop down to the left and then go right. Descend down one more level and step cautiously to the right. Don't get too close to the edge of the pit or Lara will slide into the spikes. Instead use the thin ledge above the spikes to get over to the large medipak and heavy bullets (2x). Shoot another bat and then climb back out of this area the way you came.
At the top of the ladder in the hallway with the dart traps in the ceiling and rectangular purple designs on the wall, continue to the right and use the save crystal (C2) again if you want to.
Continue to the right. You'll pass over a gold trapdoor (D1) and another set of white floor tiles before coming to a dead end at a switch (S1). Use the switch to open the gold trapdoor and pick up the dynamite.
(NOTE: If you didn't do it before, backtrack to the left past the save crystal (C2) and use the dynamite to blow up the first set of white floor tiles. Follow the walkthrough above if necessary to retrieve the large medipak and heavy bullets in the room below. Then return to the gold trapdoor and switch. The dynamite will have reappeared.)
Use the dynamite to blow up the of white floor tiles near the switch (S1). Drop into the pit to get the YELLOW HANDLE (yellow H). Climb out of the pit on the left and drop down through the now-open gold trapdoor (D1).
There's another closed gold trapdoor (D2) in the room below. Go to the left, kill the snake and use the switch (S2) to open the trapdoor. Safety drop into the room below, which has yet another closed gold trapdoor (D3). Shoot the white break-away tiles and kill the snake in the shallow pit. Hop over the pit, use the save crystal (C3) and then use the switch (S3) to open the gold trapdoor.
Climb partway down the ladder and backflip to the thin stone ledge behind. Turn left, walk to the edge and jump to a wall with ladders on both sides. First climb down the ladder on the left side of the wall. In the room below you'll find a DOOR KEY on the lower level and a red switch (S4) on the upper level. Use this switch to open a blue door (D4) elsewhere.
(NOTE: If you didn't explore the spike pit with the large medipak and heavy bullets, above, you'll also encounter 3 bats in this room.)
Climb back up the ladder and down the ladder on the other side of the wall. You may be able to kill the spearman down below from the ladder. Otherwise, drop down and shoot him. Turn right and take a running jump across the spike pit to grab the opposite edge. Pull up. Beyond the blue door (D4) is a room with a small medipak. Get it and return across the spike pit. Follow the passageway to the left.
You'll come to a long, vertical shaft with a spike pit at the bottom. There are ladders and jutting ledges on both sides. Climb down the ladder on the right side of the shaft to the first ledge. Turn left and take a standing jump from the left edge of the ledge to land on the ledge below. (The ledge is too short for a running jump to the other ladder.) Safety drop from the second ledge down to the third and lowest ledge. Jump to the landing on the left and go through the arched doorway (marked "A" on the map) to enter a new area.
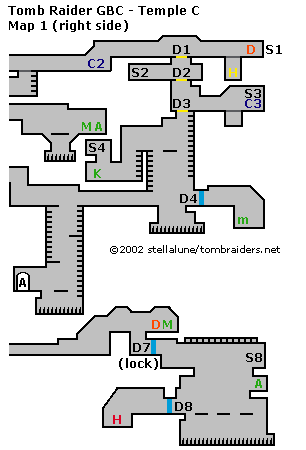
Temple C - Map 2 (click for printable map/map key)
You enter this area at the top right corner (through the doorway marked "A" on the map). Use the save crystal (C4) and jump into the water. The underwater shaft leading down to the right has only spikes at the bottom, so you can avoid it. Instead, swim down and to the left. Pass a large clump of underwater stalagmites and continue down and left. Pass another clump of stalagmites growing out of a rock shelf and then swim underneath this shelf to the right. There's an orange jellyfish off to the right a bit. Avoid it and swim down toward the spikes but don't touch them. To the left of the spikes is a large medipak. Grab it and swim back to the surface. (Go up and right, then up and left, then up and right again on a diagonal until you come to the pool near the doorway.)
Now again swim down and to the left but this time follow the sloping ceiling past several clumps of stalactites. Pass a jellyfish and when you see a second jellyfish hovering ahead, swim down for a small medipak, perched at the left end of the rock shelf. From there, swim diagonally up and left (past that second jellyfish) until you come to another opening where you can surface.
(NOTE: If you want to explore under the rock shelf, you can, but there's nothing to be found except an electric eel—it's the source of that thrumming noise.)
Climb out of the water on the left bank and pick up the large medipak. Shoot the scorpion on the level below and then hop down and continue to the left, dropping down one more level to a flat ledge with a red switch (S5). Between the scorpion and the switch you'll also encounter 3 bats. Use the switch to open a blue door (D5) elsewhere.
Backtrack to the right and again jump into the pool. Swim down and to the left, past a jellyfish, to the bottom. At the bottom left you'll find the blue door (D5) you just opened. Beyond is a small cave with an underwater switch (S6). Use the switch to alter the terrain.
Swim back through the blue door, then up and to the right to the surface of the pool. Again, climb out of the water on the left side. Continue to the left. The scorpion and 3 bats will respawn but the red switch is gone. Now there is a raised platform off to the left. Take a running jump to land on top of it. Pick up the BLUE HANDLE (blue H) and use save crystal (C5). Do not drop into the pit, as there are deadly spikes below. Instead take a running jump back to the ledge on the right and continue to the right back to the pool.
Swim across and climb out on the right side of the pool. Head to the right and kill a snake. Continue to the right. Duck and roll into the low passageway. When you see the skeleton, either shoot it from a crouching position or roll back out of the tunnel and wait for it to follow.
(NOTE: If you climbed out of the water on the right side and shot a snake here before using the underwater switch, the snake will have respawned. The solid wall on the right will have opened up into the low passage with the skeleton described above.)
Roll on through the low passage to the right. Take a running jump across the water to grab the ledge with the save crystal (C4) and pull up. If you miss the grab, you'll need to swim underwater back to the second pool, climb out on the right side, go through the low tunnel and try again.
When you make the jump, save your game and return through the doorway ("A") to the main area.
Temple C - Map 1 (again)
(You re-emerge through the doorway marked "A" on the map.) Jump to the thin ledge above the spike pit. Walk to the right edge and jump to grab the ladder on the right wall. Climb until Lara is a bit higher than the ledge behind her and backflip to land there. Climb up the ladder on the left wall and backflip to the next ledge on the right. Climb to the top. Take a running jump across the shaft with the ladders to land on the left side and continue to the left.
Climb onto the wall and cross over it, taking care to avoid the darts firing from the ceiling. If you don't have dynamite you'll find some here on the wall.
Hop down on the left side of the wall and use dynamite to blow up the white floor tiles. Drop through the opening and slide down a series of ramps to land near a save crystal (C6). Save and go to the right.
When the passage narrows, shoot a snake, duck and roll a little way into the passage and shoot a second snake before rolling the rest of the way through. Continue to the right. Climb onto a high wall with a tall column on top. Shoot the scorpion on the next ledge before jumping over to get dynamite and a large medipak. Drop down and use the DOOR KEY to open the blue door (D7).
Enter, hop down one level and continue to the right. Use the vines on the ceiling to swing across the spike pit to the opposite ledge. Use the switch (S8) to open a blue door (D8) down below on the left. Step or safety drop off the ledge to land on the ledge below, where you'll find heavy bullets. Step or safety drop off the heavy bullet ledge to the thin ledge below. Hop across the ledges to the left until you come to the blue door you just opened. Shoot a scorpion and continue to the left to a pit containing the RED HANDLE (red H). Exit the room and climb back to the previous blue door (D7) the way you came.
From the blue door lock, keep going to the left until you're back at the last save crystal (C6). Now, continue to the left to a pit sealed with white floor tiles. Use dynamite to blow up the tiles.
[NOTE: If you don't have any dynamite, backtrack to the right toward the RED HANDLE room, and you'll see some on the ledge above the door lock (D7).]
Climb down the ladder and go to the right. To avoid the dart traps, duck and roll or walk carefully, ducking when a dart passes. At the bottom, go left into a room with three compartments blocked by gold trapdoors (D9). Two contain spikes; one has a DOOR KEY.
Climb over the trapdoor structure to the left side. Three bats fly down as you explore. Climb the ladder on the left wall to the top. When Lara starts to grab the vines on the ceiling, press and hold B to grab the vines and monkey swing all the way across to the right. Drop onto the ledge near the switch (S9) and use it to open the gold trapdoors below. Do not safety drop from the ledge or Lara will land in the spikes. Either traverse back across on the vines or take a standing jump from the edge of the ledge to land on a safe spot on the platform.
Retrieve the DOOR KEY and exit to the right, the way you came. Climb the ledges and ladder out of the pit. If you want to, jump the gap to the right and head back a few steps to use the save crystal (C6) again.
Now continue to the left. Skip the first ladder leading upward (to switch S10 and trapdoor D10) and instead roll under the low overhang. You'll find heavy bullets hidden in the plants between the columns. On the other side (above the second column) is another ladder.
If you want to go directly to the end of the level, climb up this ladder now. (And pick up the walkthrough below at the *.) Otherwise, to get all pickups, keep going to the left.
Pass a broken column with vines hanging down. Continue left to a large room with thin stone ledges and a spike pit at the bottom. Jump to the first then the second ledge. Then climb to the arched doorway. Go through to emerge in a new part of the same map. (This room is actually just above the room you just came from. Both doors are marked "B" on the map.)
Climb down the ladder to the right. At the bottom backflip to land on the thin stone ledge behind. (Take care not to fall into the spikes.) Jump to the next ledge on the right and then to the ladder on the right wall. Climb to the top where you'll find a large medipak and dynamite. Continue to the right, through a concealed passageway to find another large medipak. Climb back down the ladder, cross the spike pit and climb back up the other ladder to the doorway ("B"). Go through to emerge back in the first spike room.
Step off the edge to land on the thin ledge below. Turn right and jump to the next ledge. From there, jump to the solid ledge with the ladder. Climb down the ladder to the bottom. Take a running jump to the ledge in the middle of the spike pit. From there take another running jump to the other side. Shoot the scorpion and continue to the left. Climb over the low wall and down the ladder on the other side. Try to shoot the next scorpion from the ladder before dropping to the floor.
Duck and roll through the concealed tunnel just below the ladder. (At first glance it looks like solid brick, but Lara can get through.) In the dead-end passage beyond you'll find a small medipak and rapid bullets. Roll back out and head to the left.
Climb the ladder on the back (left) side of the wall supported by the short column. Kill the spearman at the top and go to the right. Duck and roll under the low overhang to the right. Go through the arched doorway (marked "C" on the map) to a new area.
[NOTE: You don't have to explore the Dome Room (Map 3a) before using the colored handles. I only include this section for those who want all possible pickups.]
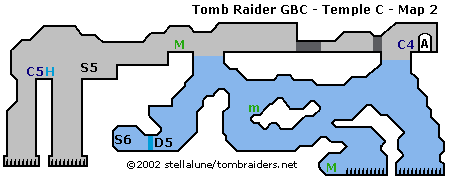
Temple C - Map 3a - Dome Room (click for printable map/map key)
You enter through the doorway marked "C". Climb up to the right and use the save crystal (C7). Climb onto the ledge above the crystal, where you'll find a huge transparent dome with boulders dangling from chains above. The yellow rectangle mounted there is a PANEL PIECE, which you can't get until the end of the level. Continue past the dome to a section of white break-away tiles. Stand at the edge of the crumbling tiles and one section will fall away. (You can shoot the others if you want to.) Safety drop into the pit below to find 2 small medipaks. Climb out of the pit, go back to the left and go through the arched doorway ("C" on the map) to return to the main area.
Temple C - Map 1 (again)
Roll under the low overhang to the left and then climb the ladder above and to the left. If you time your ascent carefully, you can avoid the dart traps. At the top of the ladder, go to the left.
Take a standing jump off the left end of the ledge to avoid dropping onto the snake below. Shoot the snake and go to the right. Take a standing jump from the end of this ledge to grab the ladder. Climb down, shoot a second snake and get a small medipak and dynamite.
Climb back out of this room the way you came. At the top of the ladder with the dart-shooting gargoyles, you'll see another ladder leading up. This goes back to the beginning of the level. You don't need to go there unless you just want to climb up and re-use the save crystal (C1).
Now you'll need to do some backtracking. Climb back down the ladder opposite the dart-shooting gargoyles. At the bottom, go left past the two columns and climb down the next ladder. Go right and climb up the next ladder (above the concealed tunnel). Continue to the right, over a low wall and past two tall columns to the spike pit (Here there's a rectangular design of a fanged head with a purple border). Use running jumps to get across the pit and then climb the ladder. At the top, go to the right until you come to the low overhang supported by two squat columns with a ladder above it.
(*) Climb the ladder. When Lara is between the two light-colored bands of bricks, a little more than halfway up the ladder, backflip to land in the concealed passageway between the bands. Walk through to the left to pick up heavy bullets (2x) and a large medipak. Take a running jump out of the passageway to grab the ladder and climb to the top.
Jump over to the save crystal (C8) and use the switch (S11) to open the gold trapdoor (D11) above. Jump back to the right ledge and climb out through the open trapdoor.
There's a spearman on the ledge above. You can shoot him from below before climbing up. Climb up one more level.
(NOTE: Off to the right a ways is a ladder leading to the series of ramps you slid down earlier. You don't need to go to the right, but if you want all kills, you can go just as far as the ladder and you'll meet a couple of bats.)
On the left is a locked blue door (D12). Use your DOOR KEY to unlock the blue door. Go through the arched doorway (marked "D" on the map) to a new area.
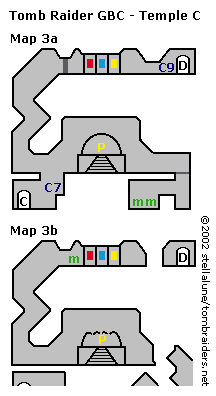
Temple C - Map 3a - Handle Room Above Dome (printable map same as 3a, above)
Enter and use the save crystal (C9). Roll under the low overhang. Then place the three COLORED HANDLES in their slots (face each slot and press A).
(NOTE: If you enter the handle room with the three handles and try to leave the room to go back to the main area, the blue door will bar your way. If you're missing any handles, you can go back to find them.)
CUT SCENE: Dangling boulders fall and break a glass dome. Lara sees a blue glowing object, presumably one of the panel pieces.
Temple C - Map 3b - Dome Room After Using Handles (printable map same as 3a, above)
Pick up the small medipak and slide down the chute to the left to land near the dome. Position Lara at the middle of the dome below the FIRST PANEL PIECE ("P" on the map) and press the A button to take it and end the level.
WAS THIS WALKTHROUGH HELPFUL? If not, I apologize and invite you to contact me with any questions. If you need help right away, I recommend the r/TombRaider subreddit. Other fan-run forums are listed at tombraiders.net/stella/community.html. If this site was useful, please consider supporting it financially or in other ways. For details, visit tombraiders.net/stella/support.html. As always, I welcome your corrections/suggestions. Thank you!
Walkthrough and maps copyright © 2004- Stellalune (). All rights reserved. Feel free to copy or print this walkthrough for personal use. By all means, share it with friends, but please include this credit line so people can send me their feedback. No part of this walkthrough may be reproduced on another site without permission. As an Amazon Associate I earn from qualifying purchases. Follow this link for details about this site's advertising and privacy policy.
Stella's Tomb Raider Site: tombraiders.net.