IMPORTANT: If you haven't already done so, you may want to review the INTRODUCTORY NOTES on the storyline, controls, treasures/relics and saving/checkpoints. These appear at the start of the PROLOGUE walkthrough.
As always, I highly recommend that you do not rely exclusively on the autosave. Instead be sure to save manually at least once or twice each level. Then, if you miss something or run into a bug, you can reload rather than having to replay the entire level. Many common bugs are documented in this walkthrough. They are in hot pink text, like this, so they're easy to spot. I have also included an overview of major bugs without game spoilers. However, not every potential problem is covered here. So be safe; save often in new slots. In case you need them, Underworld Save Files for PC, PS3 and Wii are available.
LEVEL 1: MEDITERRANEAN SEA - PART 5: REALM OF THE DEAD | Updated: 3/23/09(†) |
Health Items: 0 Treasures: 0 Relics: 0 Keys/Puzzle Items: 0
NOTE: For more information on Lara's history with Amanda and Natla, check the new journal entries in the PDA.
ESCAPE THE SINKING SHIP: At this point it's clear the ship is not going to stay afloat much longer. You'll need to make your escape. Don't worry, though, there's no time limit.
Go through the open doorway ahead (i.e., the one without the green lights one either side, which is where you came in) and follow the hall. Where flames block the way, go to the right. Turn right again at the next corner. The doors ahead open automatically, leading into a smoke-filled corridor. Continue forward.
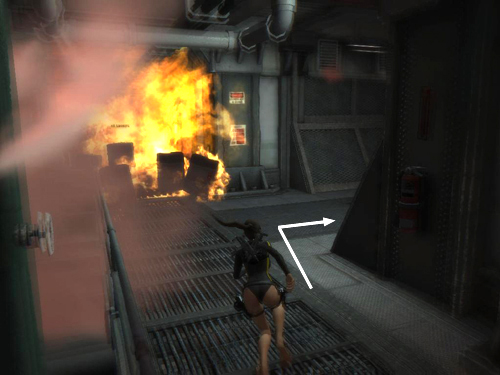
When the ship starts to list to one side and a bunch of loose containers scatter across your path, wait for them to settle and then run past them and turn right. At this point a situational adrenaline sequence kicks in. Sprint forward and then either keep sprinting or jump to the right to avoid the flaming barrels coming toward you (as shown in this screenshot). To sprint, hold Shift on the PC, L1 on the PS3 or LB on the Xbox controller along with the usual direction keys/left stick.
NOTE: If you're playing the PC game with a keyboard and mouse, it helps to steer Lara with the keyboard controls here, rather than trying to run forward while pointing the mouse the way you want her to go. So press and hold Forward and Sprint (W + Shift). Then, when you reach the corner, release Forward and hold Right and Sprint (D + Shift), or jump to the right instead.
CLIMBING THE FIRST SHAFT: After surviving the adrenaline sequence, continue to the end of the sideways hall. The wall on the left is climbable. (These screenshots show the sequence.) First jump to grab the metal bar at the bottom of the lowest exposed section of wall. Jump up to grab the round valve handles above. Then climb upward and to the right onto the ladder.
Climb the ladder a little higher and then move to the right to grab the next set of valve handles. Climb these diagonally upward and to the right. When Lara can't climb any farther, jump straight up to grab the valve handles above. Continue climbing upward and to the left until Lara is hanging onto the second ladder. Climb to the top of this ladder and then to the left and upward across another group of valve handles. When you can't go any farther, jump straight up to grab the metal bar above. Jump up twice more to reach the metal bar spanning the entire wall. Climb around the corner to the left and pull up onto the ledge above.
CLIMBING THE SECOND SHAFT: Continue forward to another dead end. Climb the ladder on the right wall. (These screenshots show this second climb.) At the top, jump straight up to grab the upper edge of the grating above. Jump straight up once more to grab the valve handles. Climb upward, diagonally up and right, then upward some more. When you can go no further, jump straight up to grab the next set of valve handles. Here you need to do a little maneuvering, climbing first up and to the right, then back to the left, then up and to the right a bit, before climbing from the valves to the straight metal bar. Climb along the bar to the left until Lara is hanging above the narrow metal beam spanning the shaft. Drop onto it. Turn around and walk carefully across. On the other side of the shaft, jump straight up three times to reach the ledge above. Step forward.
Cinematic: As the ship goes down, the second helicopter flies off with Amanda clinging to a rope ladder dangling below. Lara emerges from a hatch near the bow of the ship and takes a few potshots at the other woman, grazing her face. To save her own skin, Amanda flings the gauntlet into the sea. Lara dives after it and surfaces a few moments later holding her prize. As Amanda disappears into the distance, Lara climbs aboard her own boat and heads for Thailand.
†UPDATE HISTORY: 11/24/08 - First draft of walkthrough posted online.
12/25/08 - Fixed inaccurate listing for the PC sprint control, thanks to trjunepearl.
3/23/09 - Made several small changes for accuracy and clarity.
WAS THIS WALKTHROUGH HELPFUL? If not, I apologize and invite you to contact me with any questions. If you need help right away, I recommend the r/TombRaider subreddit. Other fan-run forums are listed at tombraiders.net/stella/community.html. If this site was useful, please consider supporting it financially or in other ways. For details, visit tombraiders.net/stella/support.html. As always, I welcome your corrections/suggestions. Thank you!
Copyright © 2008- - Stellalune (). All rights reserved. The screenshots and videos included here were made using Fraps. Feel free to copy or print this walkthrough for personal use. By all means, share it with friends, but please include this credit line so people can send me their feedback. No part of this walkthrough may be reproduced on another site without permission. As an Amazon Associate I earn from qualifying purchases. Follow this link for details about this site's advertising and privacy policy.
Stella's Tomb Raider Site: tombraiders.net.