LEVEL 21: THE STRAHOV FORTRESS |
Updated: 2/10/18(†) |
Items: 3 health items, Low- and High-Security Passes
Weapons & Ammo: 7 or 8 ammo items, Mag Vega and Scorpion X
Enemies: Guards/Cabal soldiers
Upgrades: upper body
FIRST WAREHOUSE: You begin in a large warehouse with stacks of huge metal containers. Note that your notebook has been updated: "Find the security control room". Before doing that, head straight across the room to the one open container. Inside there's a large health pack. Now you need to get over the wall to the other side of the room. There are a couple of ways to do this.
RIDING THE CONTAINER: Approach the big metal door with the red lion painted on it. This triggers a cut scene showing a huge magnet moving to pick up one of the containers. You want to get Lara on top of the container, so don't wait for it to be moved all the way. As soon as you regain control of Lara, climb onto the single container just to the left (when facing the door with the lion). Walk to the edge closest to the two stacked crates (the third one in that stack was just picked up by the magnet) and jump to grab the edge. Pull up. Turn left and set Lara up for a running jump. When the magnet brings the container down to a position just a little higher than the one Lara is standing on, take that running jump to grab the edge of the suspended container. Pull up. Then ride the container to the other side of the room. (These screenshots illustrate the sequence.) Ride the box as the magnet moves it to the other side of the room. (Skip the next paragraph.)
CLIMBING OVER THE WALL: If you miss your ride on the crate, you can get to the top of the wall by first climbing onto the single crate just to the left (when facing the door with the lion). From there, jump to grab the edge of the two stacked crates. Pull up. Turn right, head toward the end of the container and take a running jump to grab the air conditioning unit mounted high on the wall. Pull up. Now turn right and take another running jump to the top of the brick wall where there's a small gap to the left of the walkway. Take care not to keep running off the other side of the wall. To get onto the walkway, stand on the small mesh box to the left and jump over the railing. (This path is shown in these screenshots.)
Lara says something about not drawing attention to herself. There are 3 guards below. Two of them patrol the floor. The third stays inside the small office unless something happens to draw him out. You can take them on head-to-head or try and conserve health by sneaking around.
If you rode the container over the wall and want to confront the guards, drop down to the floor and take them on, preferably one at a time and preferably using your most powerful weapon at close range. The two men on patrol drop Mag clips when they die. The one in the office has a STRAHOV LOW SECURITY PASS, which you don't really need since you already obtained one from Luddick.
If you rode the container over the wall and want to avoid the guards, wait until they are looking the other way. (Their flashlight beams show where there attention is.) Then drop down and sneak across the room, using the crates and pipes for cover.
NOTE: You might want to avoid the open shelves near the stack of black pipes. There's a small, button-operated lift there, and standing on it can cause the game to crash, at least in the PC version. There's nothing useful on the shelves, so you won't miss anything.
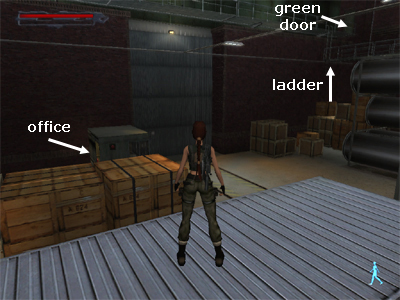
Whether or not you confront the guards, you must then make your way to the far corner of the room and climb onto the stacked crates below the ladder (indicated in this screenshot). Step back from the wall and then jump straight up to grab the ladder. Climb all the way to the top. Then go through the green door to the right. (Skip the next paragraph.)
If you climbed to the top of the brick wall, follow the walkway along the top of the wall. Climb down the short ladder to the perpendicular walkway below. Follow it to the other end and jump over the hole in the floor to grab the ladder and climb up. Go through the green door to the right. (Alternatively, climb down the ladder, take out the 3 guards using force or stealth, and then climb all the way up the ladder and go through the green door.)
NOTE: There are actually two green doors, one at each end of the walkway. They both lead into the next room, but the one on the right, at the top of the ladder leading from the area below, puts you closer to where you want to be.
LOW-SECURITY AREA WITH CATWALKS AND GUN TURRETS: Swipe your low-security pass in the card reader to open the metal door. Enter the next room cautiously. A pair of guards patrol the catwalks. As long as you don't cross their line of sight, they shouldn't bother Lara.
NOTE: If you do decide to kill the two guards on the walkway, I'd suggest confronting them one at a time at fairly close range. Each drops a Mag clip.
Look for the ladder just beside the door where you came in. Climb the ladder partway and watch the guard in the room above. When he moves away from the door, pull up into the room and immediately go into stealth mode. Sneak up and whack him. If he notices Lara before she climbs the ladder, you can also shoot him from below as he stands in the doorway, but he will fire back. He drops the MAG VEGA. Use the lever in the control room he was guarding to open the door to the crane control room on the other side of this area.
Climb down the ladder to the walkway. Off to the left, there's an opening in the floor with a ladder leading down. Don't go there yet. If Lara climbs down, ceiling mounted machine guns will kill her. Instead cross the walkway to the other side. If necessary, avoid the guards by going into stealth mode and staying out of their line of sight. Climb the very long ladder on the far wall. At the top, head to the left. Follow the walkway around to the top of the crane control room and go down the steps toward its door.
Cut scene: Lara uses the electromagnet to destroy the gun turrets.
Return to the long ladder and climb back down. If you stay on the part of the ladder with the metal rails around it, the guard won't see Lara. Wait for him to go to the left and drop down. Enter stealth mode and sneak back across the walkway toward the far left corner, where you climbed the ladder and used the lever earlier. Near the wall there's an opening in the floor with a ladder leading down. Climb down. Cross the room and go through the green door in the metal panel.
NOTE: Even after disabling the guns, I experienced a bug where Lara would not climb down this ladder. Tapping Action twice to let go and re-grab the ladder seemed to get her past the buggy spot. Alternatively, vault over the railing to land on one of the big containers below. Lara will not lose health, though she'll die if you try to jump all the way down to the floor.
STORAGE AREA WITH CRATES & BARRELS: The remnants of a circular wall surround an open area with some barrels and other debris. Four wide passages radiate out from this hub. To the left is an electrified door. Don't touch it or Lara will die. However, approaching this door triggers a notebook update: Gain access to the biodome. Straight ahead and around the next corner is a corridor lined with lasers, mines and a deadly electric force field. Avoid this area for now, but make a mental note of the 2 stacked crates at the start of this passage. Lara isn't strong enough to move them yet, but she soon will be.
The passage to the right contains more crates, several of which are moveable. Just beyond these is a chain-link fence topped with barbed wire holding back a pair of snarling rottweilers. Shoot the dogs through the fence so you don't have to worry about them later on.
NOTE: I experienced a bug here where one of the rottweilers somehow got through the fence. This only happened once but I figured I'd give a heads-up.
When you approach the chain-link fence Lara spots a pipe she can use to climb over, but she can't quite manage this yet due to the scalding steam leaking from another pipe above. In order to proceed, you'll need to shut off that steam, and in order to do that, you'll need a strength upgrade. Getting it involves moving the crates.
THE OBLIGATORY MOVABLE CRATE PUZZLE: This sequence is shown in a series of screenshots. Climb over the crates nearest the door in the fence. With Lara standing on the crate in the corner between the fence and the wall, turn so the fence is on Lara's left. Pull the crate in front of her toward the wall. Pull several times to move it as far as it will go. You won't be able to pull it all the way with Lara standing there, but you will then be able to climb over it and push it from the other side toward the wall.
Climb onto the crate you just moved and turn to face the topmost crate in the stack. (Do not climb onto the topmost crate or jump straight upward while standing here. If you do, Lara will suffer fatal steam burns.) Pull the topmost crate toward the fence as far as it will go. Again, you won't be able to move it all the way with Lara standing there. Pull it several times to gradually inch it toward the fence.
Climb down to the floor and go around to the other side of the stack. Climb onto the two crates next to the stack of three. Then sidestep to the left onto the narrow ledge formed after moving the topmost crate. If you have trouble with that, try turning so Lara's back is toward the fence and then sidestep to the right. Or, use stealth mode, which seems to work well. Push the topmost crate toward the fence to get an upper-body strength upgrade. Drop down to the floor.
NOTE: Earlier versions of this walkthrough included a more complicated solution to the crate puzzle. In case the method described above doesn't work for you, you're welcome to try the original version, described on a separate page.
Return to the open area from which the four hallways radiate. Turn right to spot the 2 stacked crates mentioned earlier. Now that Lara has gotten the upgrade, she can push the crates across the passage and beneath the ventilation unit (as shown in this screenshot). Use the stacked crates to climb up onto the ventilation unit. Turn the valve to shut off the steam. Drop down and then climb to the top of the big stack of crates. Now Lara can jump up and grab the horizontal pipe. Press Duck to tuck her legs up and traverse forward over the barbed wire fence. Drop down on the other side. If you didn't shoot the dogs through the fence earlier, you'll need to take care of them now.
Here an update is made in the notebook: Shut down power to clear a route through the Biodome to the Vault of Trophies.
Climb the ladder near the left wall and use the lever to operate the huge saws. This cuts the slab of stone and also slices open the ventilation duct above. Climb onto the beam above and just to the left of the lever. Walk across the beam toward the saws. Where Lara steps up onto the crossbeam, turn left and climb onto the square steel duct. Go to the end. Drop and hang from the edge. Let go and quickly press Action again to catch the bottom edge of the duct. Pull up.
THROUGH THE VENTILATION DUCTS: Crawl forward. At the drop-off, tap Forward and Lara will somersault out of the opening. Continue to a vent in the floor.
Cut scene: Gunderson hauls the journalist Luddick in to meet Meister Eckhardt. Apparently Luddick knew too much—or simply talked too much. Eckhardt dismisses his minion and then uses his gloved hand to silence the reporter permanently. As Luddick writhes in agony, the mysterious symbol found at the scenes of the other Monstrum killings is inscribed on the wall, as if by magic.
BUG NOTE: If you're playing on PC and the game crashes during this cutscene with the error GAME_ERROR_STRUCTURED_EXCEPTION_HANDLE, try adjusting your settings. On the splash screen with the red buttons at game startup, click Settings. Then, on the General tab, un-check the boxes for Multi Threaded, Intel SSE, and Intel SSE2. On the Intel HD Graphics tab, un-check the box for VMR9. If these changes don't fix the problem, you can download a save file to skip this section.
HALLWAY WITH LASERS & SECURITY CONTROL ROOM: Crawl forward to the end of the duct. The camera shifts to a wide-angle view. When the guard moves away from the opening, tap Forward to somersault out of the duct and take him out. (You may be able to use stealth here, but this guard doesn't stand still for long, so it's difficult.) When he's dead, take his STRAHOV HIGH SECURITY PASS.
Mines and lasers block the way to the left, and there's an electric field over the doorway to the interrogation room. So, for now, head to the right. The security control room is at the end of the hall. Climb the stairs, swipe the high-security pass in the card reader to open the door, then kill the guard inside and take a Mag Vega clip off his body. Two more guards are having lunch in the small lounge in the back. You may be able to avoid them using stealth, but if you kill them you can pick up 3 more Mag clips, two from the bodies and one sitting on a table, as well as a chocolate bar from the other table. There are also couple of clips for the Scorpion X in the cabinets near the door. Use the control panel in the office.
NOTE: The clips in the cabinets may not actually count. In the PC version of the game, I could see Lara taking them but my ammo did not increase. Crystal, the PlayStation raider who pointed out the clips, picked up both but only one registered.
Cut scenes: Lara traces the route she needs to take and notes an ominous biohazard symbol. She wonders what requires the kind of security shown on the schematic. Then she shuts off the power to clear a path through the biodome. Next, we see a rather nasty critter escaping confinement and terrorizing some poor guards. (Shades of Half-Life!) Lara says she must move fast before the power comes back on, but I don't believe there is a specific time limit here.
GETTING PAST THE MINES & LASERS: Swipe the keycard again to exit the control room and return along the hallway toward the lasers. Shoot the red fire extinguisher near the big, upright cable spool. Be sure to stand back to avoid taking damage when it explodes. The cable spool rolls down the hall, detonating two of the three mines. Head toward the lasers.
Enter the short hallway on the left, just beyond the duct opening where Lara entered this area. The electric field that had been blocking the way is now off. Swipe your security pass in the card reader to get in. Here you'll find Luddick's smoldering body, along with bandages in a locker and the SCORPION X on the bed. (This will be a clip if you already got the gun from Luddick.)
Return to the hallway and pick up a Mag clip on the shelf across the hall. (This looks like the gun, and I assume you'll get the gun if you don't already have it.) Turn left and commando crawl (Duck + Stealth) under the deadly lasers, staying to the left to avoid the remaining mine. With the power off, the electric force field at the end of this hallway is down as well. Continue around the corner to the left to find yourself back at the hub where you moved all those crates. Follow the right wall to the door that was previously electrified. Here, your notebook is updated: Gain access to the biodome. Use the keycard in the card reader to unlock the door and go in.
†UPDATE HISTORY: 1/16/07 - Added an easier method for the movable crate puzzle, thanks to John W., Liora and Andrew. Fixed a couple of left/right mix-ups, added a missed pickup, and changed the sequence around the security office at the end. Tidied up a few confusing sections and added more screenshots.
5/20/07 - Added additional pickups in the guards' lunchroom, along with a note about the glitchy ammo, thanks to Crystal.
2/3/18 - Added the note about settings tweaks to fix the STRUCTURED_EXCEPTION_HANDLE error.
2/10/18 - Fixed the details on the pick-ups in the control/lunch room, thanks to a correction from Krzysztof.
WAS THIS WALKTHROUGH HELPFUL? If not, I apologize and invite you to contact me with any questions. If you need help right away, I recommend the r/TombRaider subreddit. Other fan-run forums are listed at tombraiders.net/stella/community.html. If this site was useful, please consider supporting it financially or in other ways. For details, visit tombraiders.net/stella/support.html. As always, I welcome your corrections/suggestions. Thank you!
Copyright © 2003- - Stellalune (). I am eternally grateful to the members of the alt.games.tombraider newsgroup, whose contributions to this walkthrough are numerous. Thanks also to the developers of Fraps, the program used for all AOD screenshots. Thanks also to Andy W., Andrew, Heather K., Jeff C., John W., Liora, Melissa and Michael P. for their corrections and suggestions to improve this level. Feel free to copy or print this walkthrough for personal use. By all means, share it with friends, but please include this credit line so people can send me their feedback. No part of this walkthrough may be reproduced on another site without permission. As an Amazon Associate I earn from qualifying purchases. Follow this link for details about this site's advertising and privacy policy.
Stella's Tomb Raider Site: tombraiders.net.