Stella's Tomb Raider 3 Walkthrough - Updates for Tomb Raider 3 Remastered Coming Soon
IMPORTANT: If you are playing the GOG or Steam version of TR3, most of the serious bugs in this game have been fixed. If you are playing the original PC CD version, I strongly encourage you to install the Tomb Raider 3 patch (for Windows 95/98/Me) or the multi patch (for Windows XP/Vista/7/8) before starting the game. In any case, if you're playing on the PC or Mac, it's a good idea to save the game in different save slots at least a few times each level in case you run into a bug and need to reload an earlier save.
I have attempted to provide information about potential bugs and how to avoid them in the walkthrough for each level. An overview of major bugs is also available here.
If you have not patched your game (or have the PlayStation version) and have encountered "invisible walls" near the middle of this level, try reloading an earlier save or restarting the level and using the bug-avoidance strategies outlined in the walkthrough below. If you're playing the PC or Macintosh game you could also download a save file.
INDIA LEVEL 2: TEMPLE RUINS
Updated: 2/5/24(†)
Kills: 30 Items: 36, plus 5 keys and 2 SCIMITARS Save/power-up Crystals: 8 Secrets: 4*
*Note that one of the regular pickups here will be the SHOTGUN if you didn't get it in the previous level. Be sure to find all secrets to unlock the bonus level at the end of the game.
LEVEL MAP by VGCartography (used with permission)
Temple Ruins Video Walkthrough by Eldincy
Objectives: First, find a way into the ruins. Locate 2 keys to unlock the gate in the room with the six-armed statue. Ascend to the upper level and find 3 more keys to unlock the exit.
From the starting position, step forward and turn right. Go through the opening in the tree trunk and pick up a small medi pack. Draw pistols and walk forward slowly. A cobra will rear up from the undergrowth. Shoot it before trying to pass. Continue walking forward through the greenery. A second cobra pops up. Shoot it as well.
If Lara gets too close and either snake bites her, the health bar turns yellow and begins to flash and gradually diminish. (screenshot) Use a medi pack to neutralize the poison. If you know you'll be meeting several snakes in a row, as you do here, you may want to wait until you've killed them all before using the medi pack. Just keep an eye on Lara's health. As always, if it runs out, she'll die.
NOTE: At this point it is possible to take a shortcut, climbing directly to the TREETOPS. You'll miss several kills and pickups, but no secrets. Instructions and screenshots are here. If you decide to take the longer route described below, you won't miss the items in the treetops. You'll just approach them later from a different angle.
TUNNEL AND SECOND AREA WITH POOL: After killing the second cobra, continue forward into the corner with the mossy, green blocks. Use the switch to open the trapdoor at the top of the low steps. (screenshot) Drop down through the opening and crawl through the low, wide tunnel ahead. Pick up another small medi pack in the alcove on the left. The smaller tunnel beyond the medi pack leads back to the beginning of the level. Don't go that way now. Instead follow the larger passageway. Kill the cobra just beyond the first left turn in the passage and continue to the next room where there are 2 monkeys. Shoot them. Then climb through the opening above the low step to emerge near a pool.
NOTE: Unlike the monkeys in the first level, the ones you'll meet from now on are generally hostile, and you will need to either avoid or kill them.
Pick up the MP5 clips and shotgun shells at the top of the green, stone blocks in the corner to the left. (screenshot)
Now face the pool and move around to the right side of the big tree. This pool is infested with piranhas. So try and avoid the deeper water if possible. Instead of swimming, take a running jump across the water to grab the stone platform in the middle of the lake. If necessary, press the Left direction button while Lara is in the air so she veers slightly toward the platform, making it easier to grab. Pull up and get the small medi pack. Then take another running jump to the shallow area on the far side of the pool. If you miss any of these jumps and fall in, either reload an earlier save or swim as fast as you can to either bank. (screenshots)
Once you reach the far side of the pool, pull the switch in the right corner to open the underwater gate between the submerged ledges. Swim through the gate and follow the twisting passageway to a hole in the ceiling where you can surface. (screenshots)
COURTYARD WITH HUGE MUDSLIDE: Climb out of the water into this open area. Kill 2 cranky monkeys. Then cross in front of the mudslide and climb onto the second angled block. Step to the highest point and jump straight up to grab the ledge above. Pull up onto the ledge and pick up the Uzi clips in the low depression just ahead. (screenshots)
Cross the mudslide along the flat strip at the same level as the stone ledge where you pulled up. Jump to the flat, brown corner ledge, then to the stone ledge that runs along the opposite side of the courtyard. Follow it around to the far end, shooting 2 more monkeys along the way. (screenshots)
Before going into the passageway on the right, you can take a short detour for some Uzi clips if you like. They're sitting on the ledge ahead, just to the right of the wall with the curved top. To get there, you'll need to take a carefully angled running jump. Once you have the ammo, you can do a running jump back to the previous ledge, but it has to be done fairly precisely or Lara will fall. If you can't land it, drop down and retrace your steps over the mudslide and along the ledges. (The page with screenshots includes a few additional tips.)
Enter the passageway at the end of the ledge. Another monkey meets you inside and tries to bite Lara's legs. Shoot it and continue to a ledge with a save/power-up crystal overlooking the area at the beginning of the level. Jump from the end of the ledge to the wide branch on the left. (screenshots)
NOTE: If you're in a hurry, you can leave the next two pickups in the treetops and continue on your way. Just skip down to the POOL WITH WATERFALL CLIFF section below.
TREETOPS ABOVE STARTING AREA: Walk toward the tree trunk then take a running jump to the branch ahead and to the right (the one that bends upward at the end). Turn right and take a running jump to the next branch, between the tree trunk and the stone wall. For this jump, be sure to start from the very end of the bent branch, which is higher, and don't press Action or Lara won't jump far enough. Pick up the flares in the alcove on the right. Walk back out to the middle of the branch, turn left and take a carefully angled running jump to grab the next branch. Pull up, face the next branch, and aim for the inverted 'V' where the branch slopes downward in the middle. Then take another running jump, without pressing Action, to land there. Move in toward the trunk and take a standing jump to the branch with the Desert Eagle clips, then a running jump without grabbing back to the branch above the water. (screenshots)
NOTE: If you miss a jump while exploring the treetops, you can get back up into the branches using the shortcut described at the beginning of the level. (screenshots) If you fall into the piranha-infested pool, either reload and try again, or try and maneuver Lara into the corner below the trees near the start of the level and climb out on the bank. (screenshot)
If you let the current carry Lara into the tunnel, you can swim through the side passage on the right to emerge in the tunnel you crawled through earlier. (screenshot) You can't reach the trapdoor that leads back to the starting area from below, however. So you'll have to take the long way around, through the courtyard with the mudslide. It's probably quicker to just reload your last save.
POOL WITH WATERFALL CLIFF: While standing on the branch above the water, turn to face the waterfall on the far side of the pool. Take a running jump to grab the stone ledge jutting out of the wall. Pull up, turn right, and then take a running jump to the branch with the small medi pack. Step to the outer corner of this branch and take a standing jump with Action to land on the raised, wet block to the right of the tree trunk. (screenshots)
NOTE: You don't need to grab the edge of this block, but pressing Action lowers Lara's arc slightly so she doesn't bang her head on the branch above. Alternatively, you can jump from the branch where you got the medi pack to the wide ledge behind the waterfall on the left side of the tree trunk. Then climb up the rocks behind the tree and down the other side to reach the slippery slope described below. (screenshot)
The whitish slope ahead is slippery. Jump onto it so Lara lands facing uphill, slide back, and grab the edge. Traverse to the right, under the falling water, until you can pull up near some shotgun shells. Take them. Then crawl to the right until you can stand up. (screenshots)
Turn to face out toward the wide, green ledge on the other side of the gap. Draw pistols. After a moment, a monkey emerges from the little cave ahead on the left. Try to shoot it from here to avoid being bitten. Then holster your weapons and take a running jump across the gap to that green ledge. (screenshots)
If you don't want all the kills and pickups, you can enter the cave now (and skip the next paragraph).
If you want everything, climb down the rocks to the flat, green spot near the water. Take a running jump into the opening behind the lower waterfall. (screenshot) Enter the cave, kill the cobra, then continue forward to find some flares. Return past the cobra and jump back across the water to the flat, green ledge. Then climb the tan rocks in the corner to get back to the wide, green ledge where you killed the monkey.
TUNNEL LEADING INTO THE RUINS: Crawl into the low, wide opening where the monkey emerged. Kill the cobra lurking on the right, then slide down the slope and shoot a second cobra just inside the next passageway. Slide down the right side of the next slope; the left side is a boulder trap. (screenshot)
NOTE: If you are playing on the PS1 or the unpatched PC version patch, do not save in the next room, and do not return there after leaving. Otherwise, you risk coming up against one of the infamous "invisible wall" bugs.
ROOM WITH FIRST SIX-ARMED STATUE: Drop into the next room, where there is a six-armed statue, a Yaksha or Sevaka, or temple guardian. To the left of the statue you'll find some shotgun shells. (If you don't already have the SHOTGUN, you'll get it here instead of the ammo.) In the far right corner is a movable block. Stand in the shallow trench facing the block. Pull it once, pick up more shotgun shells behind it, then crawl through the low opening that was previously hidden behind the block. (The ammo and movable block are shown in this screenshot.)
ROOM WITH LARGE GATE AND TWO KEYHOLES: When you crawl into the next room and move forward, the six-armed statue here comes to life and attacks. If you like, you can move up the muddy slope and climb onto the ledge with the save/power-up crystal. The statue can't reach Lara here. However, as soon as you start shooting at the statue, it will react by standing still and crossing its swords over its chest to protect itself. When it does this, it is invulnerable. You'll notice blood spray when you're hitting it and hear bullets ricocheting off the swords when you're not. (screenshots)
If you prefer the cautious approach, use pistols and shoot at the statue from the safe ledge where the crystal was. When the statue stops and crosses its swords, hop down off the ledge to get it moving again. Then quickly climb back up, take a few more shots. Repeat this several times until the statue falls down and turns back into stone. (screenshots)
If you'd rather go head-to-head, when you first enter the room, instead of climbing onto the ledge, draw your shotgun and run forward, shooting at the statue as it transforms. You can probably hit it several times before it raises its swords to protect itself. When it does, hop back once or twice until the statue opens its arms again. Then fire. If it gets too close, side-flip out of its way and run around behind it. It will pursue Lara but fairly slowly. As it does, it opens its arms so you can shoot it again. As long as you don't let the statue back Lara into a corner, you should be OK. If this does happen, keep firing and use a health pack if necessary, and you can probably still defeat it. If you're careful with ammunition and only fire when the statue's arms are open, 6 shotgun blasts should do it. When the statue has taken enough damage, it will fall down and turn back into stone. (screenshots)
NOTES: If you've used the all-weapons cheat or have already completed the game and are replaying with all weapons and unlimited ammo, crawl into the room and step forward just far enough to see the statue without bringing it to life. Then hit the statue with 2 rockets or 3 grenades to destroy it before it animates. You can also shoot it with harpoons before it animates, but you'll need to tilt Lara back by holding the Look button and pressing Down. Otherwise she'll aim at the mud hill and not the statue. You'll know your harpoons are connecting when you see blood spurting out of the statue. In the PC game it takes 17 harpoons to kill it. The statue does not disappear, as it does when you use rockets or grenades, but when you step forward, it animates then immediately falls down again. Note that grenades, rockets, and harpoons are also very useful against the statue once it has come to life. It can't guard against any of these. Also note that the game mistakenly counts each kill made with grenades or rockets as two kills.
When you're done fighting, take a look around the room. There's a large gate flanked by 2 keyholes, for which you must find keys. There are also 2 smaller gates on the left and right, and a trapdoor in the floor near the right gate. (screenshot) The platform where the crystal was has 2 switches, one at each end. (screenshot) Use both. One opens the smaller gate on the left (when facing the large gate). The other unlatches the trapdoor in the floor to the right of the large gate.
ROOMS BELOW THE TRAPDOOR: Step on the low block near the trapdoor to open it. Drop through the trapdoor and throw the switch in the passageway below to open the second small gate in the room above. Don't climb back up yet, though. Next to the switch in the pit is a movable block. Push it once and enter the room beyond. This is SECRET #1. Proceed carefully, crawling under the poisoned darts or hugging the right wall to avoid them. As with snake venom, if you are struck by one of these darts, Lara's health will gradually run out unless you use a medi pack to antidote the poison. (screenshots)
Just around the corner is a shallow pit containing a small medi pack. This is a boulder trap. The boulder doesn't move until you actually step into the pit, but once it lands there, it prevents you from getting the medi pack. So walk to the edge, step off into the pit, and immediately press Action to grab the medi pack. Then quickly jump forward out of the pit before the boulder arrives. Or, once you have the medi pack, run forward and stand against the wall of the pit. The boulder will then land behind Lara without squashing her, and you can then climb out safely. (screenshots)
Now make your way carefully around the room, avoiding the darts and picking up flares, shotgun shells, and another small medi pack from the various alcoves. Return past the darts to the pit with the switch and movable block. Then climb back up into the room with the large gate, where you defeated the guardian statue.
IMPORTANT: At this point, it normally doesn't matter which path you take first. You'll need to go both ways eventually in order to find the two keys that open the large gate. However, because of potential bugs, if you are playing on the PS1 or have not installed the PC patch, I recommend exploring the side areas in the order described here. Then if you encounter one of the invisible wall bugs on the way to the first key, you can reload an earlier save or restart the level and not have to replay as much.
OBTAINING THE FIRST GANESHA KEY: Go through the small gate to the left of the large gate with the 2 keyholes (not the gate on the right near the trapdoor). Follow the passage, climb over a carved stone block about halfway along, and continue to the next room.
BUG NOTE: If you encounter an "invisible wall" blocking this passageway, you may still be able to go on. This bug is apparently triggered by saving in the room with the first six-armed statue (i.e., the statue that doesn't animate) or returning there after the first time. If you're playing the PS1 game, restart the level and avoid doing that next time. If you're playing the PC or Macintosh version, either reload a save from before that room and try again, or download a bug-free save file.
ROOM WITH EMPTY POOL AND LEVER: Kill the 2 monkeys and cross the room with the empty pool. Notice the FIRST GANESHA KEY behind the small gate in the pool. You can't reach it yet. The lever that opens the gate only works when the pool is filled with water. For now, exit through the doorway on the far side of the room. (screenshot)
ROOM WITH POOL AND FIRE-BREATHING STATUES: In the next room there's a pool flanked by fire-breathing statues. Swim across, surface and climb out on the middle of the ledge to avoid being toasted by the flames. If this happens, quickly jump into the water and then use a medi pack to heal the damage. Pull the switch to open the underwater gate just below. Swim through the gate and follow the tunnel, hugging one side or the bottom to avoid being hit by poisoned darts. (screenshots)
TALL ROOM WITH POOL AND LEDGES: When you emerge from the tunnel, stay close to the bottom in the middle of the room for a moment so Lara doesn't get crushed by falling rocks. Once the debris has settled, surface and climb out on the low, green ledge on the right, where you'll find a small medi pack. Grab it. Then swim across the pool to the opposite ledge. (screenshots)
The mossy, green wall with the horizontal grooves is a ladder. Climb up until Lara is hanging slightly above the ledge behind her. Then press Jump to backflip off the ladder onto the ledge. Take a carefully angled running jump to the small stone ledge on the wall beyond the ladder. Turn left, walk to the edge, and take a standing jump up to the next higher ledge. Turn around, walk to the edge, and take another standing jump to grab the ladder rungs on the block above. Climb to the top. Take a standing jump to the next ledge, just beyond the protruding corner of the room, then a running jump to the ledge with the cobra. If you land on the left side of that ledge and then back up toward the wall, Lara can shoot the snake without being bitten. When it's dead, take a standing jump from the corner of this ledge to the next one. (The page with screenshots includes a few extra tips on setting up the various jumps in this sequence.)
Jump into the doorway and immediately run forward and around either corner to avoid being flattened by a rolling boulder. Or, jump into the doorway, hop back, and grab the doorsill. Wait there until the boulder rolls overhead and drops into the pool. Then pull up. Move carefully past the poisoned darts and slicing blades or simply crawl under them to the edge of the pit lined with sharp blades. Pick up the small medi pack around the corner on the left. (screenshots)
NOTE: You may notice a crawlspace at the bottom of the pit. There's a secret down there, but ignore it for now. You'll return this way in a few minutes.
To cross the blade-lined pit either take a standing jump from one edge to grab the other and pull up, or take a running jump, being extra careful not to back up into the slicing blades beforehand. Get the save/power-up crystal in the next room. (screenshot)
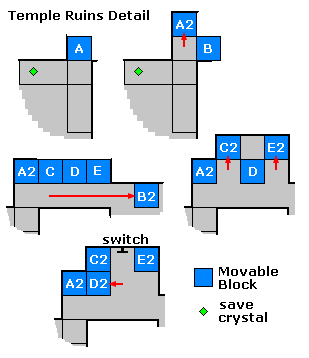
MOVABLE BLOCK PUZZLE: This sequence is shown in a series of screenshots and in this diagram. The letters in parentheses refer to the ones in the diagram.
Locate the first movable block (A) in the corner to the right of the crystal. Push it once (to A2). Turn right to face another movable block (B). Push this second block four times into the next room (to B2). Turn around and go back into the passageway. There are three more movable blocks (C-E) next to the first block you pushed. Push the second from left (C) and the rightmost block (E) once each (to C2 and E2). Push the middle block (D) to either side. (Here I've pushed it to the left so it ends up at D2, between blocks A and C.) Doing so reveals a switch. Use it to fill the pool back in the ROOM WITH THE EMPTY POOL AND LEVER, where you saw the FIRST GANESHA KEY.
If you want the next secret, ignore the room beyond the block you pushed four times. That area contains a boulder trap but no goodies. So you won't miss anything if you skip it completely. If you don't care about the secrets, proceed through the boulder trap area. Skip the next two paragraphs and refer to the ALTERNATE ROUTE below.
SECRET ROOM BEYOND BLADE PIT: To get the second secret, return past the movable blocks to the room where you found the save crystal. Take a standing jump from the edge of the blade-lined pit to grab the opposite edge. Traverse to the left and drop down to the flat area in the corner. (Don't drop down on the right or Lara will slide into the blades.) To avoid taking damage from the sharp blades, duck before moving into them and then crawl through the blades into the low tunnel. Crawl forward a bit until Lara can stand once more. Then follow this passageway to another crawlspace. Continue through into a small room containing SECRET #2. Kill the cobra just inside on the right and claim some Desert Eagle and Uzi clips, plus a save/power-up crystal. (screenshots)
The square doorway overlooks the pool where you entered this area. Drop down into the pool on the left or right side to avoid the poisoned dart trap in the middle. Then follow the underwater tunnel back to the ROOM WITH THE POOL AND FIRE-BREATHING STATUES. Just like before, be sure to swim along the bottom of the tunnel or one side to avoid being struck by the darts. (screenshots)
ALTERNATE ROUTE: If you don't care about getting the secrets, there's no need to backtrack from the movable blocks to the blade pit. Instead, just continue past block B (the one you pushed four times) to a cave with a sloping floor. Ahead is a boulder trap. To get past it, either run down the left side of the slope and jump over the blade-lined pit as the boulders roll down behind you, or stand in the middle of the ramp, walk forward carefully and backflip as soon as you hear the boulders drop. The boulders will then pass Lara on either side. Proceed to the bottom and take a running jump across the pit. Turn around, hang from the edge of the next pit, and drop down on the left side into flooded passageway below. Turn right and swim along the passageway, avoiding the poisoned darts. Climb out of the pool in the ROOM WITH POOL AND FIRE-BREATHING STATUES. (screenshots)
ROOM WITH THE POOL AND FIRE-BREATHING STATUES (again): Climb out of the pool and go through the doorway into the next room.
ROOM WITH POOL AND LEVER (again): Now that you've filled this pool with water, you can jump in and pull the lever on the right wall to open the gate on the left. (screenshot) Swim into the little alcove behind the gate and and collect the FIRST GANESHA KEY. Climb out of the pool and go through the doorway near the lever to get back to the room where you defeated the statue guardian earlier.
OBTAINING THE SECOND GANESHA KEY - ROOM WITH THE LARGE GATE AND TWO KEYHOLES (again): Cross the room and go through the small gate just beyond the trapdoor. (screenshot) When you enter the passage, the gate closes behind you. You must now wade through a pool of quicksand to reach the next area. To avoid injury, take a running jump from the hallway into the quicksand. Try to land close to the left corner. Then turn left and walk forward through the quicksand. Lara's head will disappear beneath the surface, but as long as you keep moving at a steady pace, she'll reach the other side before she drowns.
Climb out of the quicksand onto a hill of dirt. Take a standing jump up the first slope. Turn around, walk to the edge of the slope, hop back once to set up your jump, and then take a running jump to grab the ledge above the quicksand. (screenshot) Pull up into the hallway. Kill another monkey and pick up a small medi pack. It will be on the ground on the right side of the hallway. If the monkey gets to the health pack first and carries it off, look near its body.
TRAPPED HALLWAY ABOVE QUICKSAND POOL: Pull the switch to the right of the gate to open it. Ahead is a gauntlet of traps, including a knee-high horizontal slicing blade and spiked walls that close in from both sides. This bit is made more difficult because the camera shifts to point toward Lara as you run. You can tap Look to cancel the weird camera angle, but it's probably not necessary if you use this strategy. To get through with little or no damage, start one floor tile from the doorway. Save the game here if possible. Then, when the slicing blade closes (i.e., immediately after it makes the "sching" sound), start sprinting forward without jumping. Lara should then sprint straight through the traps. (screenshots)
NOTE: To Sprint or Dash, while running forward, hold either slash (/) on the PC/Mac or R2 on the PlayStation. You'll then see the green stamina bar at the top right corner of the screen. When this meter runs out, you must let it refill before you're able to sprint again. For this short sequence, you won't need more than one full bar.
ROOM WITH GOLDEN LATTICES AND CENTRAL STRUCTURE ABOVE POOL: Kill 2 monkeys in the next room. Go around to the right side of the central structure and locate the movable block in the second square pillar. Pull the block away from the wall once. Then pull it once to the right (toward the entrance). Climb on top of the block and jump to grab the ledge above the left side of the golden lattice. Pull up. (screenshots)
Walk around to the far side of the ledge and take a standing jump to grab the ladder recessed into the ceiling. Climb up into a small room with some shotgun shells and MP5 clips. This is SECRET #3. If you don't already have the SHOTGUN, you'll get it here instead of the ammo. (screenshots)
In the small room with the secret, there's also a switch. Pull it to unlatch an underwater gate in another room. (You must do this now in order to get secret #4 later on. Once you leave this area, it's not possible to return.) To get down, position Lara with the switch on her left and the hole in the floor behind her. Then drop back and grab the edge of the hole. Climb down the ladder as far as possible before letting go. If you do this, she'll take only minimal damage from the fall. (screenshots)
Now go around to the back of the central structure (i.e., the side farthest from where you entered). Pull the switch in the alcove with the gold lattice to open a small gate directly above. Climb onto the block you moved earlier. This time jump to grab the ledge on the right side of the central structure. Pull up onto the ledge. Then drop down through the gate you just opened into the pool below. (screenshots)
POOL BELOW STRUCTURE WITH GOLD LATTICES: Swim down and pull the underwater lever to open the gate in one corner of the pool. Surface for air if you need it. Then swim through the gate and follow the passageway. Just before this passageway ends, there's a grate on the ceiling. It's closed now, but make a mental note of its location as you continue forward into the low-ceilinged room ahead. There are 2 more levers here, directly opposite each other on the side walls. Swim to either lever, pull it, roll, and swim straight across the room to the other lever. Pull it, roll, and swim back into the passageway you came from. Using both levers opened the grate in the ceiling so you can now swim up through it and climb out of the water. (screenshots)
ROOM WITH POOL AND INVISIBLE PLATFORMS: In the next room is a large, shallow pool with wide staircases on two sides. In the pool are 3 underwater levers and a small gate. Hop into the pool, turn around, and pull the lever just below the steps to open the gate. It is timed to close quickly, so roll and swim for it. The gate closes behind you, but it reopens as soon as you swim a little farther in and the chime sounds for SECRET #4. So if you're running out of air, you can swim back out, take a breath, and then return for the items—grenades, flares and a large medi pack. (screenshots)
NOTES: You will not be able to get this secret if you didn't use the switch in the room with secret #3. You can pull the underwater lever, but unless you used that switch earlier the gate won't open. There is no way to get back to the third secret from here. So if you missed the switch, you can either go on without this secret, reload an earlier save and play through that section again, or download a save file that includes both secrets.
Also, note that each grenade pickup is actually a pair of grenades. If you don't yet have the GRENADE LAUNCHER, it's counted as '1' pair of grenades in your inventory. Later, when you obtain the launcher, the number of grenades in your inventory will appear to double, but actually the game starts counting individual grenades instead of pairs. For details on how ammo is tracked in your inventory, see the TR3 Controls page.
PlayStation gamers may want to get the save/power-up crystal on the other side of the pool and use it before attempting to get the key. If you're playing on the PC or Mac, you'll probably want to save the crystal until afterwards in case you lose some health in the process. Don't worry about the statue near the crystal. It doesn't come to life.
Now pull the 2 levers on opposite sides of the pool to activate the fire-breathing statues above. In the firelight you will be able to discern 4 invisible platforms floating above the pool. (screenshot)
NOTE: Since you'll only be using the platforms on the right side of the pool, you can save time by only pulling the lever on the right. In fact, you don't have to fire up the statues to use the platforms. The light just makes them visible. A flare will also help illuminate the blocks.
Take a standing jump from the edge of the pool to grab the first invisible block on the right side; pull up. Jump to the invisible block just ahead and from there to the stone ledge with the switch. Pull the switch to open the gate at the top of the stairs to the left of the statue. This gate is timed, so as soon as you pull the switch, side flip to the left, run off the platform, and dash up the stairs through the gate as it closes behind you. (screenshots)
ROOM WITH MOVING SPIKED WALL AND SECOND GANESHA KEY: You can see the key through the grille on the left, but you can't reach it. Go to the right toward the wall of spikes and locate the switch on the left wall. Save the game here if possible. When you pull the switch, the grille at the other end of the hallway opens, and the wall of spikes begins moving toward you. Immediately turn left and start sprinting toward the key. Release the Sprint button a few steps before Lara reaches the key. This will prevent you from overshooting it and having to waste time backing up. Stop directly above the key and press Action to pick it up. (The sequence is shown in this series of screenshots and in this short video.)
When you take the key, the gate where you came in re-opens. Roll and start sprinting back the way you came. When you first start running, the camera will be pointing toward Lara awkwardly. If you like, you can press Look to get your perspective back. Release the Sprint button just before you reach the doorway on the right. This will give you more control as you veer into the opening. (screenshots)
Once you're standing safely in the doorway, wait for the spiked wall to pass. Then re-enter the room and head to the right end, where the wall of spikes originated, to find MP5 clips and a small medi pack. (screenshots)
NOTE: If you're having an especially difficult time outrunning the spiked wall, try this: Pick up the key then step forward so Lara is standing with her chest against the wall. Wait for the spiked wall to approach, and as soon as it touches Lara, backflip. She'll go through the wall, taking some damage, but if you start with full health, she should survive. You can also use a medi pack while passing through the wall. (The video also shows this alternate technique.)
ROOM WITH QUICKSAND AND MUD HILL (was ROOM WITH POOL AND INVISIBLE PLATFORMS): Return to the room with the pool, which has turned into a mud bath. As you approach the edge, the invisible platforms crumble away. Slog through the quicksand, keeping close to the right wall so Lara doesn't drown, and climb out on the other side. Climb/jump up the mudslide to the top right, where you'll find an opening in the wall. (screenshot)
TRAPPED HALLWAYS LEADING BACK TO THE ROOM WITH THE LARGE GATE: Climb up into a passageway and follow it to a T intersection. Pick up the flares on the left. The stairway contains a boulder trap. Turn so the stairs and boulder are behind Lara. Hop backwards up to the second step to trigger the boulder. Then run down into the doorway as the boulder rolls past.
Now go up the stairs. The two gates open as you approach. Choose your path. Both corridors end up in the same place, but the left path is more dangerous and the right includes an extra kill. Left Corridor: Jump over the blade, dash to the end of the hallway with a rolling boulder in hot pursuit, then duck and crawl through the low opening on the right. If you don't have time to evade the boulder, you can also squeeze Lara into the right corner near the crawlspace and the boulder should come to rest next to her without squashing her. Then you can take your time crawling through. (screenshot) Right Corridor: Follow the passage to the switch (you can hear the boulder rolling next door), kill the interfering monkey, and use the switch to open the gate so you can exit.
In the next room, kill 2 monkeys and pick up the small medi pack one of them drops. Get the save/power-up crystal. Then go through the side passage to a rectangular opening in the floor. Turn around, hop back, and grab the edge of the opening. Then climb down as far as you can before dropping into the room below.
NOTE: You should now have 2 GANESHA KEYS. If you're missing either key, check the walkthrough above. See here for the FIRST GANESHA KEY and here for the SECOND GANESHA KEY.
ROOM WITH THE LARGE GATE AND TWO KEYHOLES (again): Use the GANESHA KEYS in the 2 keyholes to open the large gate. Enter, jump over the shallow pit, and quickly run forward to the climbable wall. Jump straight up and grab on. Then climb into the room above as quickly as possible as the spiked ceiling descends. At the top, kill 2 monkeys and pick up a save/power-up crystal.
In an alcove on the other side of the room from the save crystal is a movable block. (screenshot) Pull the block once and climb on top of it. Take a running jump to grab the high ledge on the opposite side of the room and pull up. (screenshot) Use the switch. Then take a running jump across the gap in the ledge and use the second switch there. Both of them are needed to open the gate below.
Drop down to the floor. Then quickly run past the gate you just opened to trip the boulder trap inside. Two boulders drop from the ceiling and roll across the room into the hole where you climbed up earlier. (screenshot)
When the boulders have passed, go through the open gate and hop down into the shallow pit. The gate then closes behind you so you can climb back up. Move past either of the fire-breathing statues into the next room. If Lara crawls or stays close to the opposite wall, she won't get toasted.
ROOM WITH THREE SIX-ARMED STATUES: In the next room, there are 2 six-armed guardian statues, plus a third statue up on a ledge that does not animate. The statue on the left side of the room comes to life as you enter, the one on the right only activates when you climb onto the platform with the third statue. If you want to fight them up close, I'd suggest dealing with them one at a time. Activate the first and use the same strategies you did to fight the guardian you encountered earlier (above). Then climb onto the ledge to activate the second statue, drop down, and deal with it the same way. If things get rough, climb one of the two sets of steps opposite the entrance. The statues can't reach you on the topmost blocks, and you'll find some shotgun shells atop the block on the left. (screenshot) Or run back into the passageway with the fire-breathing statue. The statues won't follow. Just watch out for the flames. (screenshot)
If you prefer a more cautious approach, enter the room through the passageway on the right, since this puts you farthest from the first statue to animate. Move out into the room just far enough to bring the first statue to life. Immediately climb onto the ledge with the third statue. The second statue animates when you do this, but you'll be safe up here. You can then shoot both statues several times with your pistols before they cross their swords to guard themselves. When they do, holster your weapons, hang from the edge, and then immediately pull up. This will get the statutes moving so you can shoot them again. Repeat this until they fall and turn back to stone. (screenshots)
NOTE: The alternate strategies involving rockets, grenades, and harpoons described above also work on these guys, as well as on the statue in the final area.
When you've defeated both statues, take the golden SCIMITARS from their hands. Climb up to the third statue and and place the two swords in the statue's empty hands. The left and right swords are not interchangeable, so if Lara says "no" when you try to place one of the swords, choose the other sword from your inventory. Or just start with the hand on the right and the correct sword should be selected automatically. (screenshots)
Before leaving this room, be sure to pick up the shotgun shells at the top of the steps to the left of the gate (if you didn't get them during the fight) and a small medi pack in the pool below the ledge with the third statue. Then step through the gate, drop into the shallow pit, and pick up some Uzi clips. The gate closes behind you. Head to the left or right, climb through the raised crawlspace, and drop down into the next room.
STEPPED PLATFORM - THIRD GANESHA KEY: Go up the steps into the next room to find what's left of Randy and Rory, along with another six-armed statue. It animates when you stand on the second highest step of the tiered platform in the center. (screenshot) Defeat the statue as you've done the others. Again, the shotgun works well at close range, as long as you fire at the statue while it's moving and not guarding itself with its crossed swords. When it does this it is invulnerable.
If you need a safe spot to stand and shoot, climb onto the raised block with the flares directly below the second hanging corpse. You'll have to hop down and climb back up again occasionally to keep the statue moving so you can shoot it, but it won't bother Lara up there. (screenshot)
When the statue falls and reverts to stone, pick up the THIRD GANESHA KEY from the platform.
NOTE: If you really hate fighting these statues, wait to approach the pedestal. Get the other two keys first, as described below. Go into the next room, where the 3 locks that open the exit are. Unlock the left and middle ones. Then return to the larger room to get the last key. As the statue animates, run and unlock the exit, then leave without having to kill the guardian.
SPIKE ROOM - FOURTH GANESHA KEY: As you approach the doorway near the hole in the floor, the gate opens. Don't enter immediately. Instead, step back a few paces and light a flare. Save the game if you can. Then sprint straight across the room. As you run, the gate closes behind you, and the spiked ceiling begins to descend. You must now pull 2 switches to open the trapdoor so you can escape. Quickly pull the switch on the wall directly opposite the entrance. Immediately backflip. Then run to the right and pull the second switch. Turn right again and and run or sprint forward into the open trapdoor. When you pick up the FOURTH GANESHA KEY the gate directly ahead opens. Go through and climb back up into the big room. (This sequence is shown in a series of screenshots as well as a short video.)
NOTE: If you just can't manage the quick timing here, try this: After pulling the second switch, immediately side flip to the right into the trapdoor. Use a medi pack in flight to minimize the damage from the spikes.
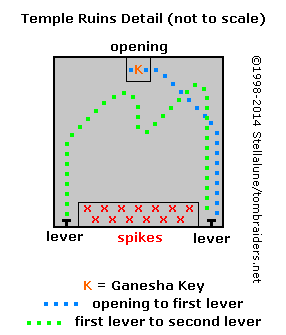
WATER ROOM - FIFTH GANESHA KEY: Go into the next room, where you'll find a save/power-up crystal, the level exit, and the 3 locks that open it. In order to get the third key, you'll need to take a swim. The following sequence is shown in the diagram at right, as well as in this series of screenshots and this video.
Stand facing the opening in the floor with the keyholes on Lara's right. Jump into the water and swim forward toward the wall. The current will drag Lara toward the spikes, but if you hold the Jump/Swim button and keep steering toward the far wall, you should be able to reach it. The current there is weaker. Follow the wall to the first lever and pull it. Now roll and swim back along the right wall. When you're nearly to the corner, swim to the left. Lara will once again be dragged toward the spikes, but if you swim against the current, you should be able to make it to the middle of the room where the drag isn't as powerful. When you reach the center, swim toward the low step below the opening where you jumped in. Then veer to the left and swim toward the other side wall. Again, the current will drag you toward the spikes, but if you keep heading forward, you can make it to the far wall before Lara gets skewered. Follow the wall to the corner and pull the second lever, which will turn off the current. Swim back to the hole in the ceiling and get air if you need it. Then retrieve the FIFTH GANESHA KEY from the low step below the opening and climb out of the pool. Whew!
BUG NOTE: A potential bug in the Steam version of the game makes it impossible to complete the water room in the normal way. Pulling both levers does not deactivate the current. If you encounter this issue, try pulling the right lever twice. This seems to solve the problem.
NOTE: If the bug fix above doesn't work, or if you just can't manage this sequence, you can use the level-skip cheat to go right to the end-of-level cut scene. You won't miss anything important, since this is the last room in the level.
Use the 3 GANESHA KEYS in the 3 keyholes to open the gate at the top of the steps. Climb up and exit the level.
A cut scene follows: Lara emerges from the temple and sees Tony, the psychotic blond explorer, rafting down the river. She draws her weapons and fires. He laughs and makes some dramatic gestures, and the temple begins to crumble around her. Lara dodges falling stone blocks as Tony gets away. She starts to follow on foot then notices a quad bike nearby.
NOTE: For more information about the celestial dancer carvings featured in this level, and other real-world items and locations featured in the games, check out the Arte-Factual series from Tomb Raider Horizons.
†UPDATE HISTORY: 3/28/14 - First major update since this walkthrough was created in 1998. This revision includes many new screenshots as well as various other corrections and clarifications. Included among these changes were switching the order for retrieving the first two Ganesha Keys. The new sequence makes it easier to handle the possible "invisible wall" bugs. It also means the 2nd, 3rd and 4th secrets are now obtained in a different order.
2/22/15 - Added the bug note for the water room (fifth Ganesha Key), thanks to a tip from Ryan L.
2/5/24 - Added VGCartography's level maps, with permission. Visit VGCartography on DeviantArt for high-res versions, and follow on Twitter/X and YouTube for more fantastic game maps.
ACKNOWLEDGEMENTS: Special thanks to participants in the alt.games.tombraider newsgroup, without whom some parts of this walkthrough could not have been written. Thanks also to Ankur for setting me straight about the significance of the guardian statues, to Hagix for suggesting the streamlined route for secret #2, to Sven and Terry for the 2nd Ganesha Key alternate strategy, to Jeff Reid for helping me suss secret #4, to Vesa and Peggy for alternate strategies for fighting the six-armed statues, to Vicki for the alternate tactics in the room with the 4th Ganesha Key, and to the following people for other suggestions and corrections: Carl, Danielle, Danny, Gecook, Gerald, Gyani, Kathy, Niels B., Janet, Jennifer B., John G., Jonathan B. and his kids, Jos, Martin P., Mats, Perusing Pixels, Ruud, Ryan, and Samar.
WAS THIS WALKTHROUGH HELPFUL? If not, I apologize and invite you to contact me with any questions. If you need help right away, I recommend the r/TombRaider subreddit. Other fan-run forums are listed at tombraiders.net/stella/community.html. If this site was useful, please consider supporting it financially or in other ways. For details, visit tombraiders.net/stella/support.html. As always, I welcome your corrections/suggestions. Thank you!
Copyright © 1998- - Stellalune (). Feel free to copy or print this walkthrough for personal use. By all means, share it with friends, but please include this credit line so people can send me their feedback. No part of this walkthrough may be reproduced on another site without permission. As an Amazon Associate I earn from qualifying purchases. Follow this link for details about this site's advertising and privacy policy.
Stella's Tomb Raider Site: tombraiders.net.