STELLA'S LARA CROFT GO WALKTHROUGH - Android, iOS, PS4 and Vita, Steam, and Windows Phone/PC/Tablet
MAZE OF SPIRITS - PART 8: THE QUEEN OF VENOM
Updated: 9/14/15(†)
Relic Fragments: 1
Gems: 2
Follow this link for my video walkthrough.
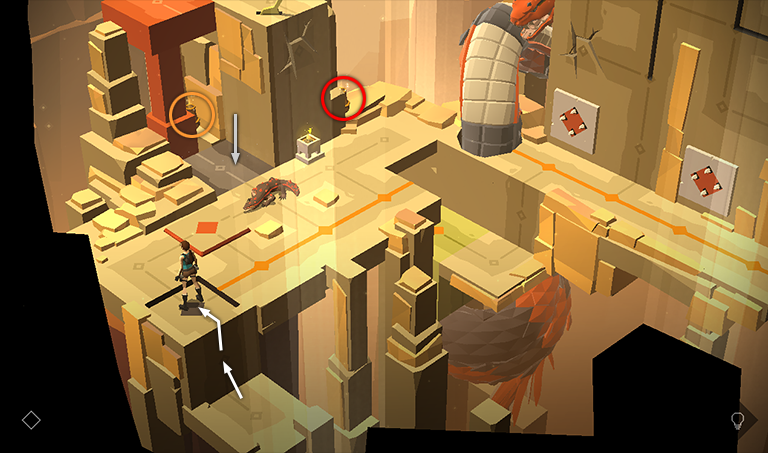
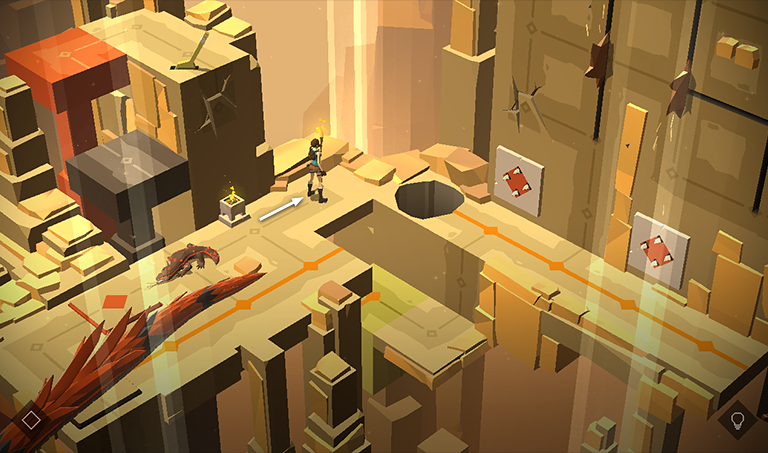
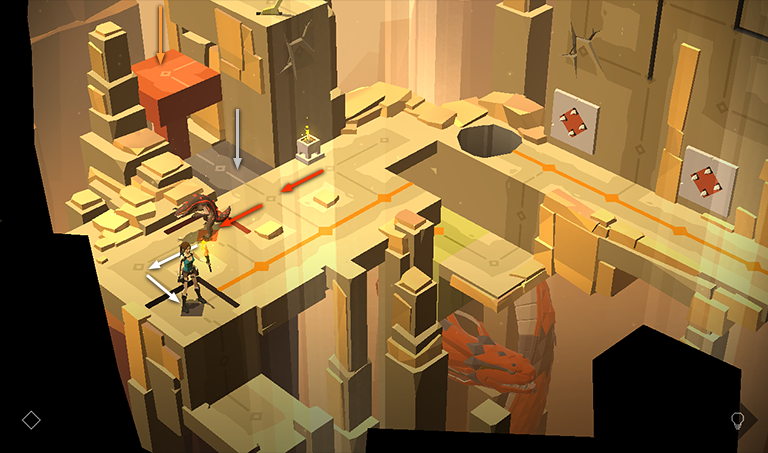
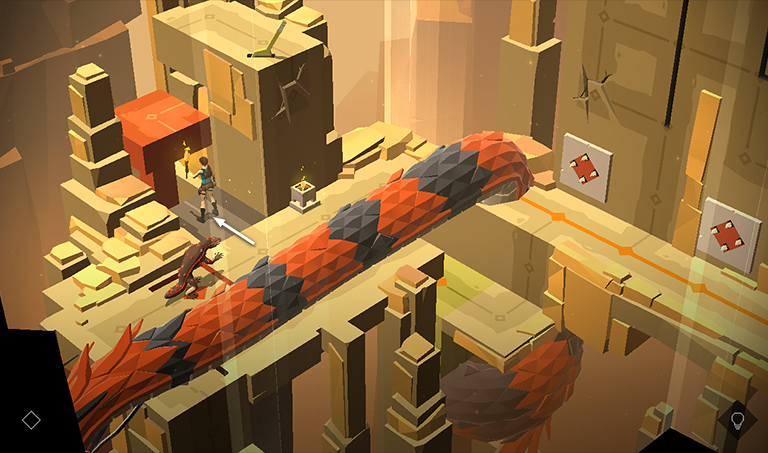
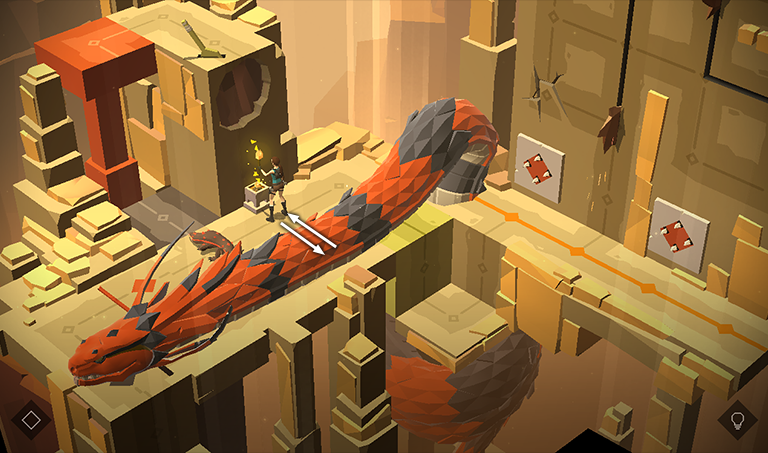
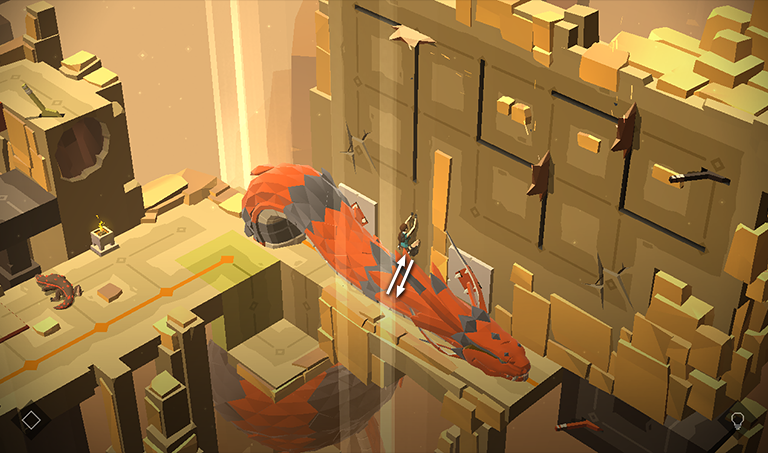
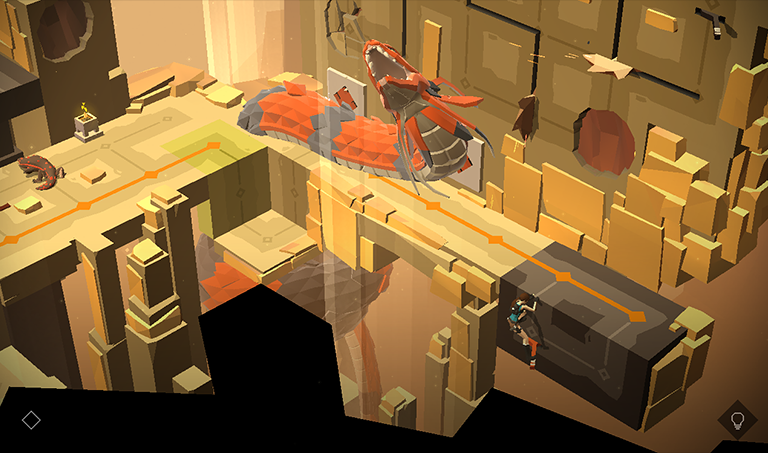
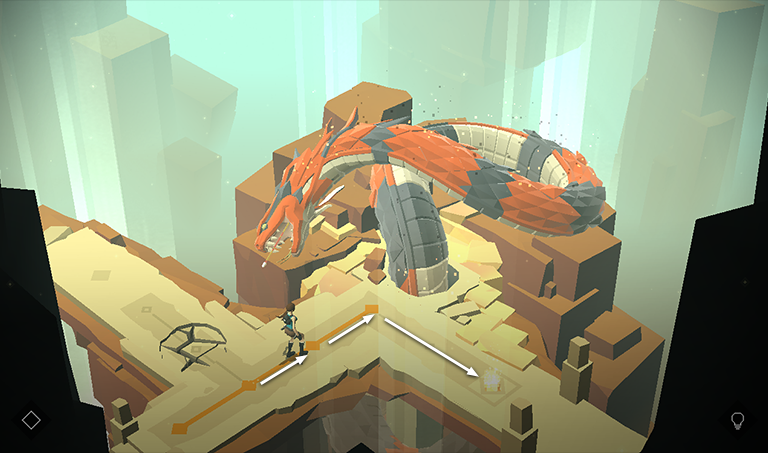
Climb onto the ledge with the orange line. In the process, Lara steps on the
pressure pad with the gray diamond, lowering the gray platform ahead and revealing vase. Smash it to collect another part of THE BLOOD SALAMANDER relic (7/7). If you've found all 12 pieces of this relic, you'll now unlock the WETSUIT OUTFIT. There is also another vase behind the wall to the right of the brazier. This contains a RUBY (16/17).
To change outfits, tap/click the diamond at the lower left corner of the screen. Then tap/click the back arrow repeatedly to move out into the main menu ring. Swipe to rotate the menu items until the watch (labeled "Outfits") is visible. Tap/click it to examine and equip any outfits you've purchased or unlocked.
If you missed any relic fragments, you can replay any previously completed level by selecting it from the journals in the main menu ring.
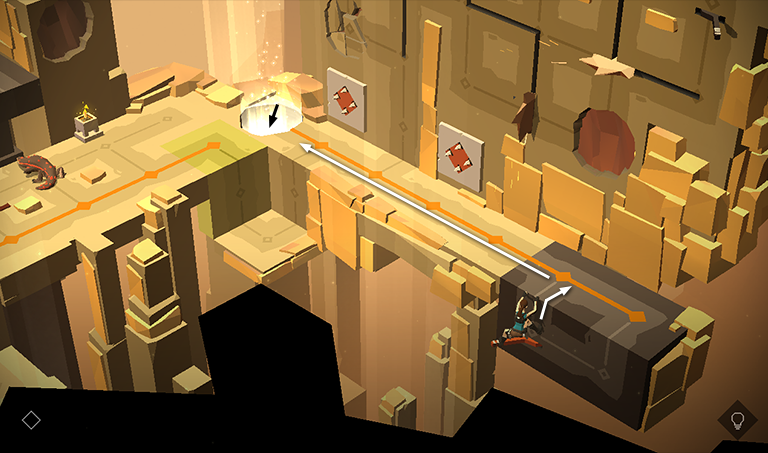
During the same turn, the QUEEN rears up, mouth wide open, indicating she's about to strike. Hop back down to the ledge where you started to get out of her way. Once she's moved, you can see a third vase below the hole from which she emerged. Tap it to get another RUBY (17/17).
Finding all the rubies doesn't unlock anything, but if you get all of the gems in all of the levels, you'll receive a special outfit.
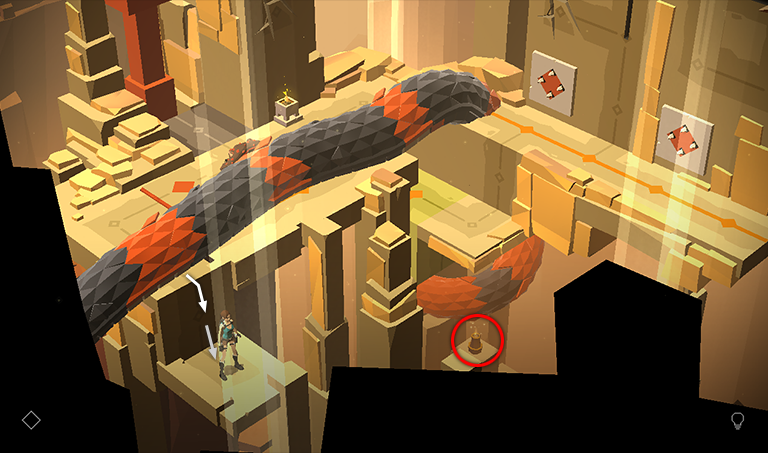
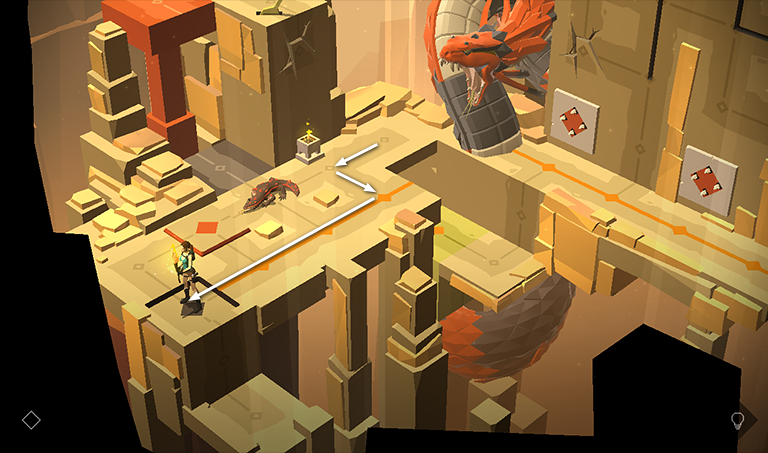
Climb onto the ledge again and follow the orange line to the right. Meanwhile, the QUEEN moves back into position for another attack.
Move off the orange line toward the brazier to dodge out of the way and grab a TORCH.
Step to the right, giving the QUEEN a turn to slither out of the way.
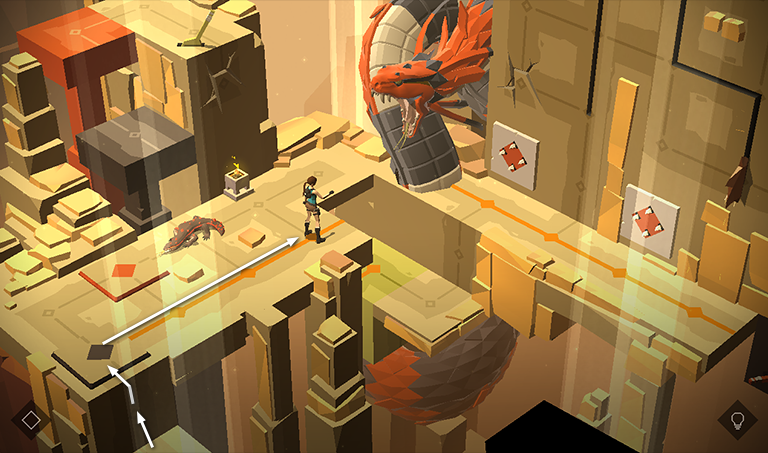
Now follow the orange line back to the pressure pad with the gray diamond. As you go, the QUEEN once again returns to her hole and prepares to strike.
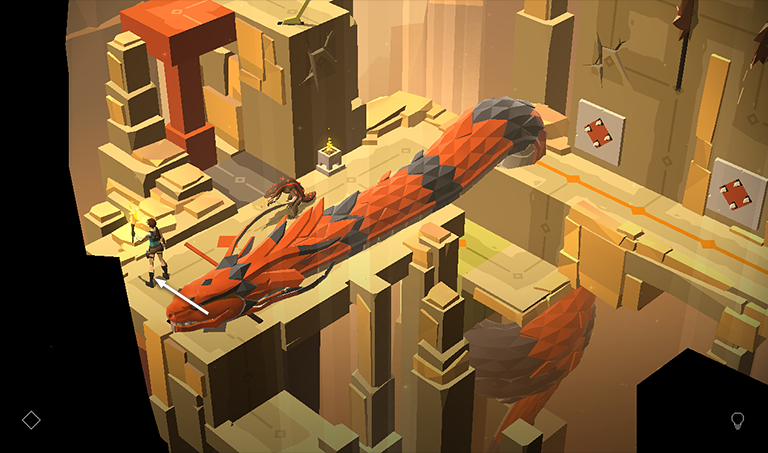
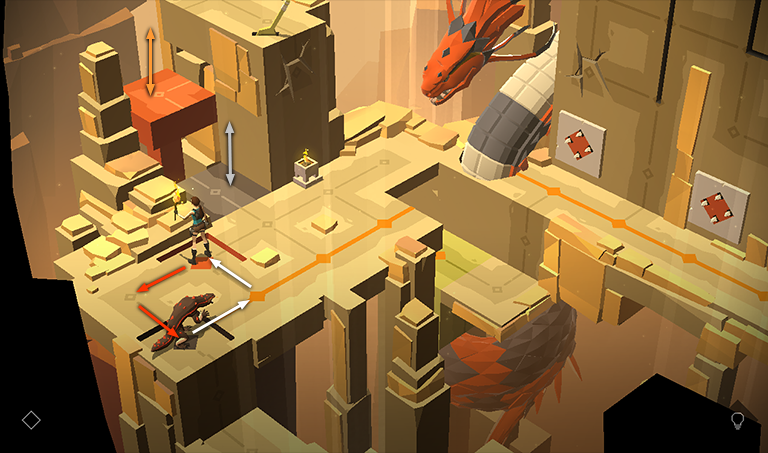
This time, move to the upper left to get out of her way. The lizard, who managed to sleep through the earlier ruckus, suddenly sits up and takes notice.
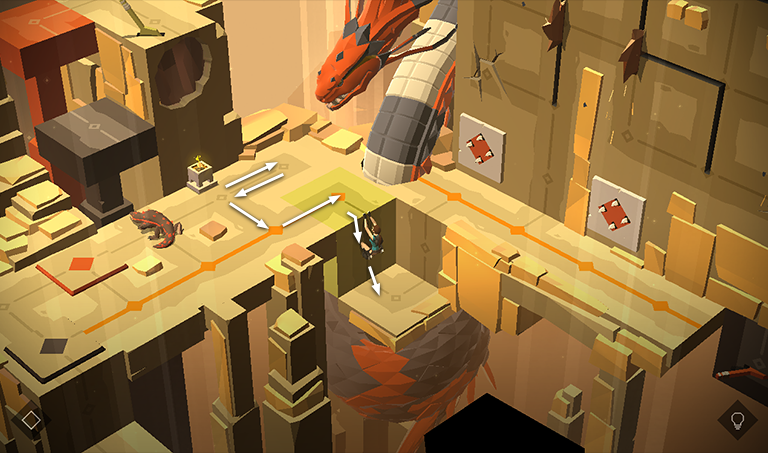
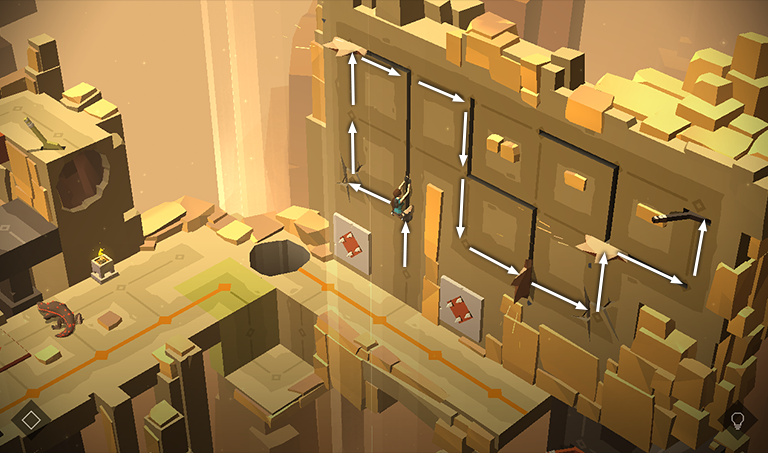
Now you need to trick the lizard into helping you with the pressure pads and platforms without either of you being devoured by Her Nastiness. Start by stepping to the right, onto the pressure pad with the orange diamond. This lowers the orange platform, but that's not important right now. Since Lara is holding a torch, it also drives the lizard back, giving you room to maneuver.
In the same turn, the QUEEN moves away, releasing the pressure pad with the gray diamond, which had been holding the gray platform down. Again, this is not important right now, but will be useful soon.
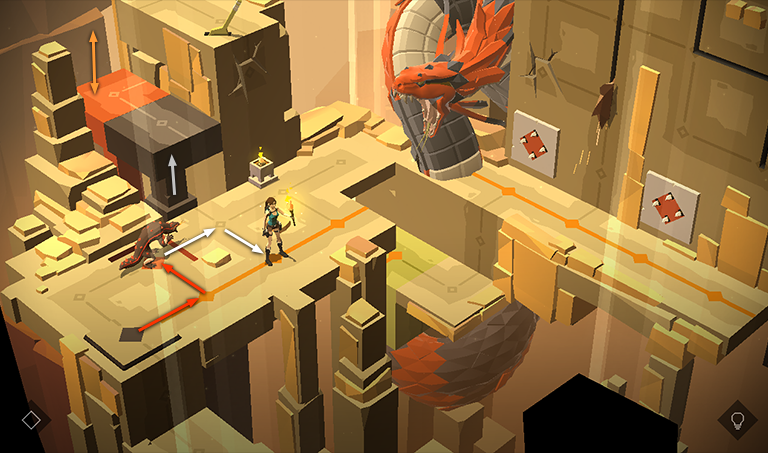
Move back to the left corner, then onto the pressure pad with the gray diamond. The lizard follows two spaces behind Lara, ending up on the pressure pad with the orange diamond. With both pads pressed, the gray platform sinks to the floor and the orange platform sinks halfway down. Again, this is not important now but will become useful shortly.
Move one space to the right onto
the orange line. Then move left onto the orange pressure pad. The lizard follows, ending up on the gray pressure pad. (Both platforms move up then down again as the pads are released and then pressed again.) Meanwhile, the QUEEN returns to her original position.
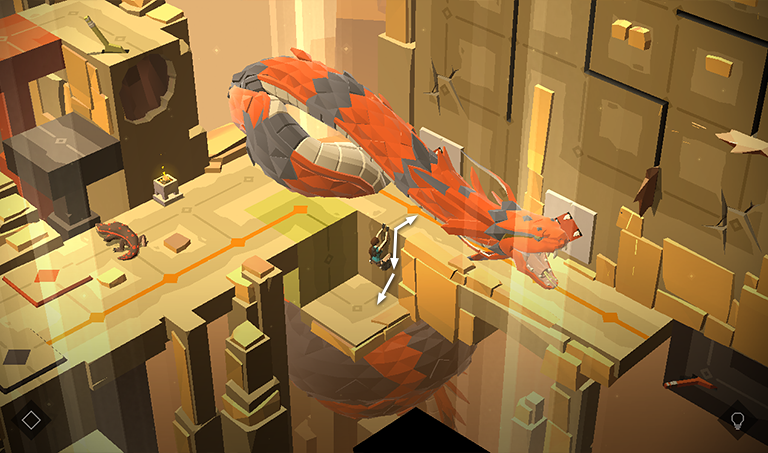
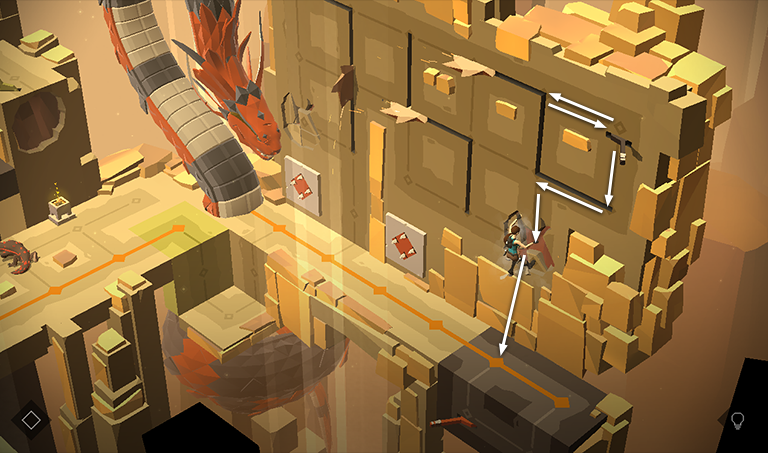
Move one space to the upper right, then one space to the lower right, onto the middle segment of the orange line. Meanwhile the lizard follows, moving off the gray pad and onto the orange pad. (The gray platform rises and the orange platform moves up then down again.) When Lara moves onto the orange line, the QUEEN sees her and prepares to strike.
Move back to the upper left to avoid the QUEEN's attack. At the end of this turn, the QUEEN is holding down the gray pressure pad, lowering the gray platform to floor level. Meanwhile, Lara's torch has driven the lizard back off the orange pad.
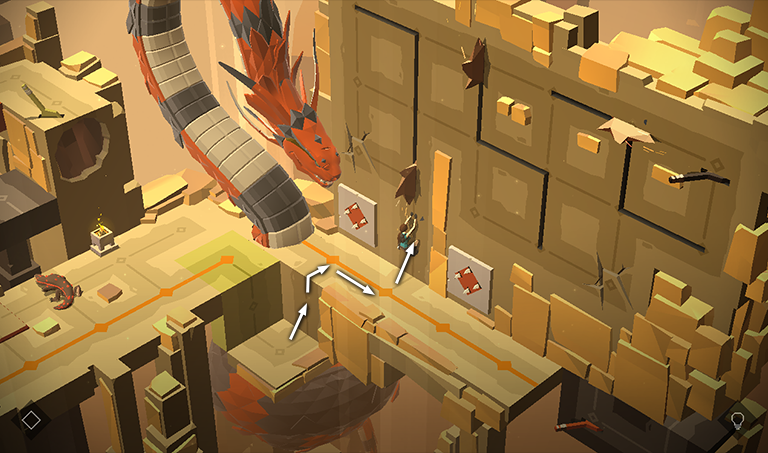
Step onto the gray platform.

As you do this, the QUEEN slithers off the gray pad and the gray platform rises with Lara standing on it. Meanwhile, the lizard moves onto the orange pad, lowering the orange platform so it's now level with the gray one. Step forward onto the orange platform.
The lizard then moves off the orange pad, and the orange platform returns to its original position.
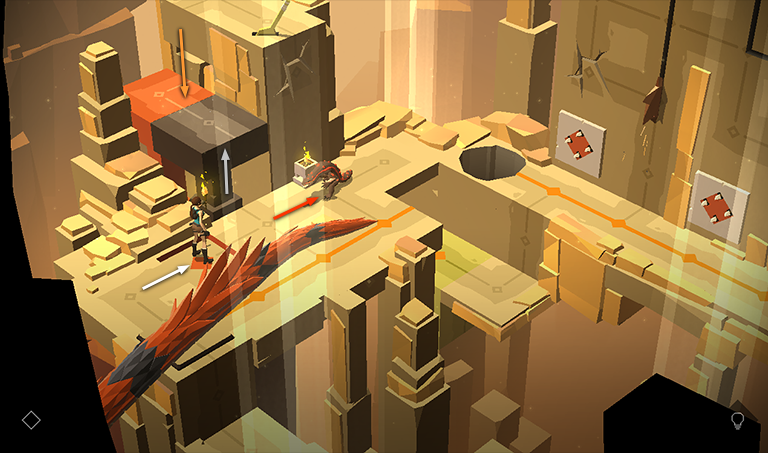
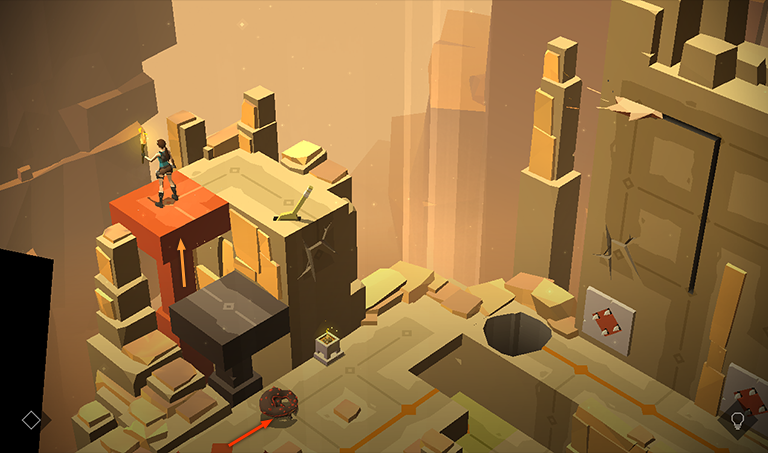
Move around to the yellow lever and pull it to raise the yellow block below.
Now hang from the ledge in front of the cracked wall, pull up, and hang again to break the wall and fall down next to the brazier. Lara drops one TORCH and lights another.
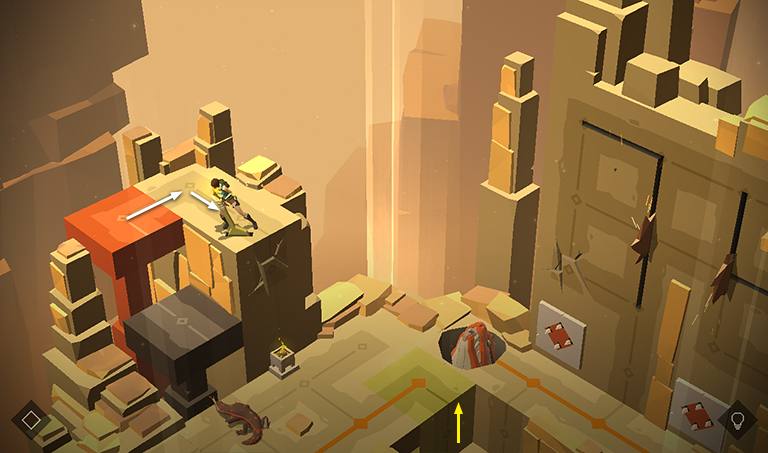
Step out to the orange line, then step back to the brazier to avoid the QUEEN's next attack.
Step to the right to allow the QUEEN a turn to move away. Then move around to the green block and drop down onto the small corner ledge.
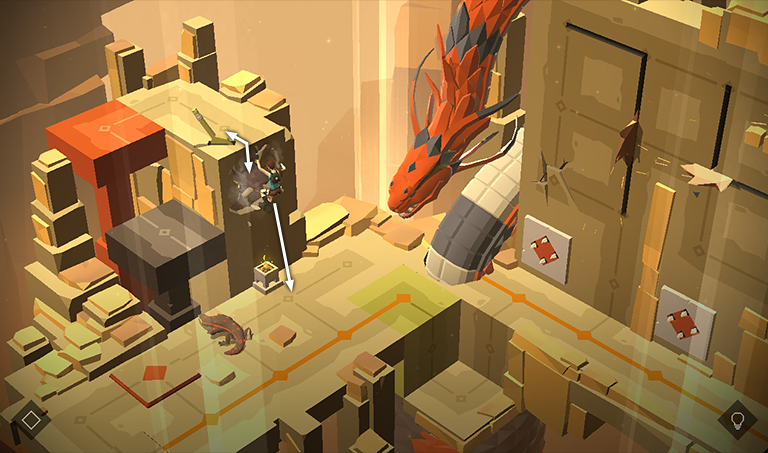
Climb up on the right and then drop back down again as the QUEEN attacks along the second orange line. Drop all the way down to the corner ledge to give the QUEEN a turn to move off the walkway.
Then climb back onto the ledge below the wall of blades. Move once to the right along the orange line. Then grab onto the wall between the 2 arrow traps as the QUEEN returns to her corner.
You can't climb any higher right now, since there's a spinning blade directly above, so drop back down. Then in the next turn, grab onto the wall again as the QUEEN strikes.
To navigate the wall of blades, climb up once, then left onto the cracked section above the left arrow trap, then up twice to the top left corner. From there, climb to the right twice, down twice, then right twice more onto the second cracked section. Finally, climb up once, right once, then up again to reach the lever in the top right corner.

Kick the lever to extend the gray block below. It then becomes part of the walkway with the orange line.
Climb to the left, back to the right, down, left, then down once more. When Lara climbs onto the cracked wall it gives way, depositing her on the gray block with the orange line.
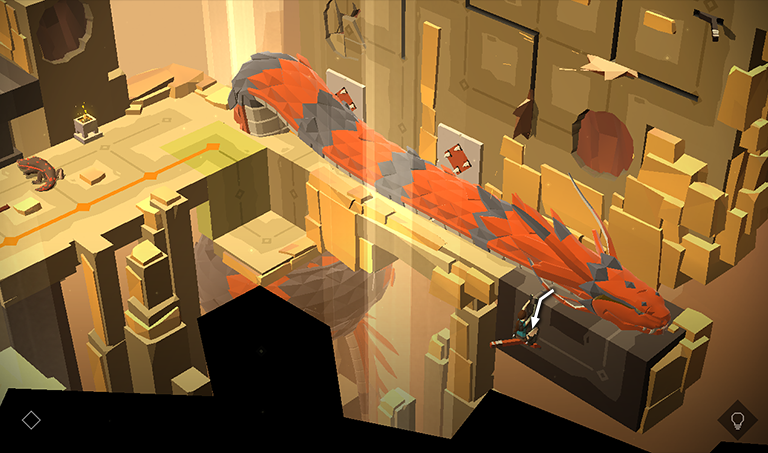
This is not a safe place to be, so drop back and hang from the gray block as the QUEEN lunges.
Now kick the orange lever to fire the 2 arrow traps. The wounded QUEEN retreats into her hole, which now becomes the exit.
The arrow traps are still active, so use the orange lever again to turn them off before proceeding to the hole.
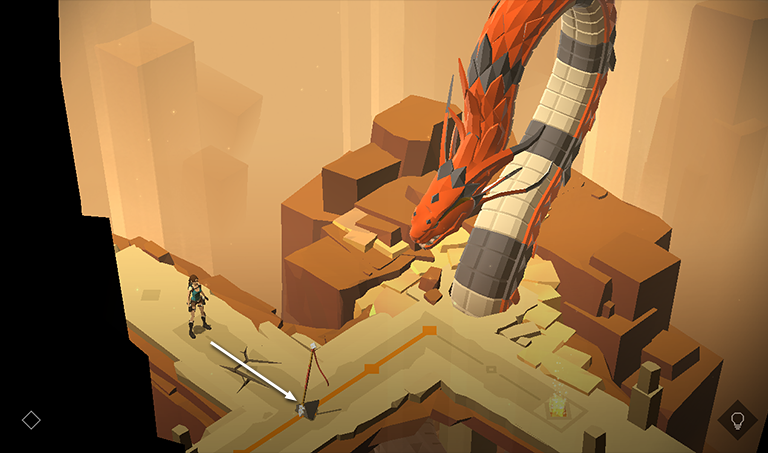
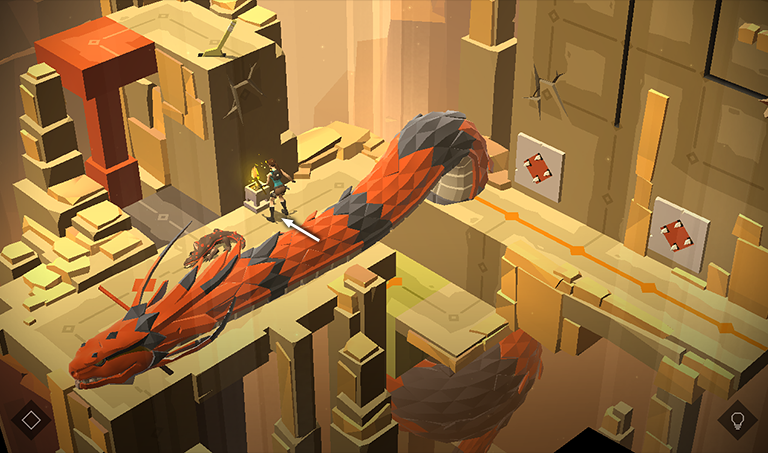
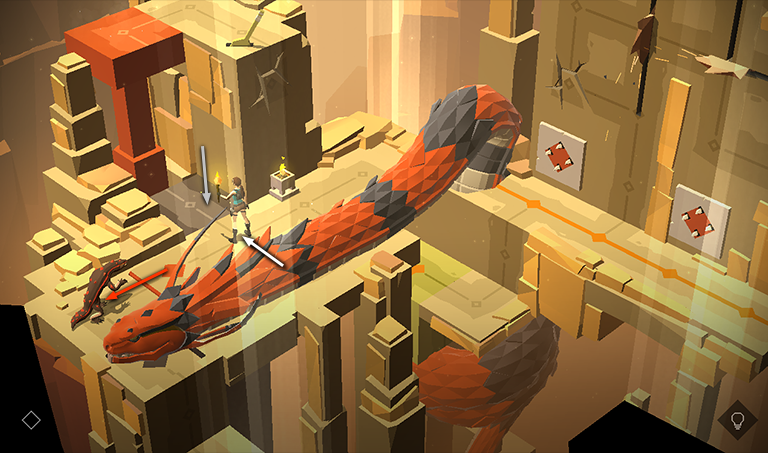
The final area in this level is quick and easy. Step forward across the cracked floor to grab the SPEAR.
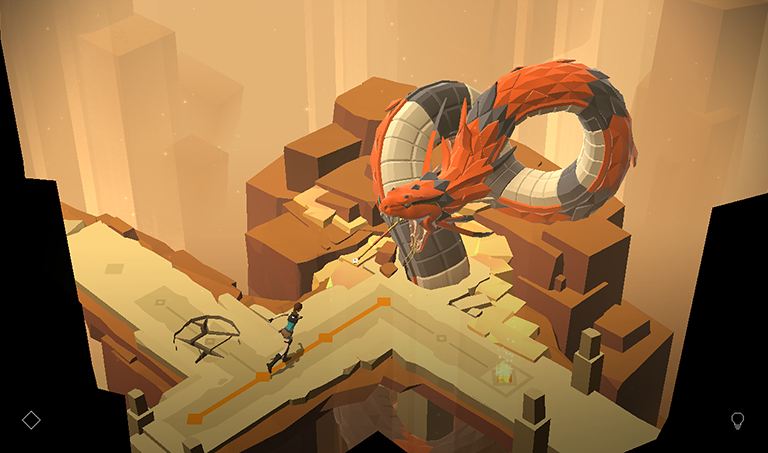
The QUEEN OF VENOM then sees Lara standing on the orange line and opens her mouth wide. Stupid move, right? Throw the spear into her open mouth to show her who's really the queen. Defeating her unlocks the Ophidiophobia achievement.
Then make your way to the exit on the right.
†UPDATE HISTORY: 9/14/15 - Walkthrough first posted, along with video.
ACKNOWLEDGEMENTS: Special thanks to Roli from Tombraider.hu, who showed me a more concise strategy for the first part of this level than the one I had originally worked out. Check out Roli's YouTube channel for more great Tomb Raider videos.
WAS THIS WALKTHROUGH HELPFUL? If not, I apologize and invite you to contact me with any questions. If you need help right away, I recommend the r/TombRaider subreddit. Other fan-run forums are listed at tombraiders.net/stella/community.html. If this site was useful, please consider supporting it financially or in other ways. For details, visit tombraiders.net/stella/support.html. As always, I welcome your corrections/suggestions. Thank you!
Copyright © - Stellalune ( ). Screenshots were made using the Andy Android emulator. Feel free to copy or print this walkthrough for personal use. Share it with friends if you like, but please include this credit line so people can send me their feedback. No part of this walkthrough may be reproduced on another site without permission. As an Amazon Associate I earn from qualifying purchases. Follow this link for details about this site's advertising and privacy policy.
Stella's Tomb Raider Site: tombraiders.net.