Stella's Walkthroughs - Tomb Raider: Underworld for Nintendo DS
This page includes the following levels (click the links to go directly to each section): Part Four: Xibalba (Mexico) |
|||
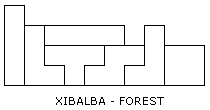
26 – XIBALBA – FOREST
Kills: 5 Artifacts: 3 Treasure Chest: 1
Go to the right. (CHECKPOINT) Pick up some automatic pistol ammo and continue forward. There's a poacher up on the ledge ahead. He'll start throwing grenades when Lara comes into range. Rather than risking damage by trying to pick him off from below, it may be better to climb up and confront him on his level. When he dies, he drops a grenade.
Continue to the right. Push over the boulder so it plugs up the hole in the ground ahead, forming a bridge. Go over it and continue up the grassy hill (CHECKPOINT) to the drop-off at the top. Hang from the edge and drop. Then go to the left and slide down several slopes into the pit below. Duck through the tunnel on the left.
Here the camera shifts to show the boulder lodged in the opening above begin to shift. The game then provides a tutorial in wall jumping or chimney jumping. Follow the instructions and jump to the ledge above on the left. (If you need a review, see the Controls page.) There's no hurry, but when you do reach the ledge, the boulder falls down, landing where Lara had been standing. (CHECKPOINT)
Move to the left side of the ledge and jump to grab the knotted rope. Slide down a bit and jump to the next rope. Slide to the bottom of the rope and then jump to grab one of the handholds on the left cave wall. Drop down to the narrow ledge below. Then hop down on the right to find a health pack. Continue right and slide down the slope.
NOTE: As you slide, you'll get a glimpse of a TREASURE CHEST on a platform above. You can't reach it from here, but don't worry; you'll come at it from the other side in a minute.
At the bottom of the slope, head to the right over the low hill. A jaguar charges out of the tunnel ahead. Try getting a lock on it and then back away while shooting. When it's dead, go through the tunnel to find an ARTIFACT (1/3) sitting near the right wall.
Chimney jump up to the green ledge on the left. (CHECKPOINT) Pick up the grenade if you can. Then slide down the slope. As Lara slides, jump to grab the knotted rope. Jump to the next rope, then the next, and from there to the dangling platform with the TREASURE CHEST. Pick it up and jump to the ledge on the left. (Click to click to show/hide treasure chest puzzle solution or click for all solutions on one page.)
Slide down the slope once more, head to the right, duck through the tunnel and repeat the wall jump back to the ledge above.
Jump from the grassy spot at the top of the slope to grab one of the handholds on the gray, stone column on the right. Climb to the upper handhold and jump to grab the knotted rope on the left. Climb up and jump from the rope to the top of the column, where you'll find some shotgun shells.
Jump off the right edge to grab the vine. Slide down the vine almost to the bottom. If you're low on health, you can jump over to the ledge on the right for a health pack. Then jump back to the vine. You'll have another chance to get the health later, though. Jump from the bottom of the vine to grab a handhold on the stone column, which is now on the left. Drop onto the slope and down to the ground. (CHECKPOINT)
There's another poacher on the low ledge on the right. Like his friend up above, he immediately starts chucking grenades at Lara. You may be able to hit him with a grenade of your own, or dodge his grenades while shooting him from below. Or, slide/roll under the ledge where he's standing. (There's shotgun ammo under there.) Then jump toward the right wall and jump again to spring back to the ledge where he's standing. (Keep in mind that Lara cannot wall jump while her weapons are drawn, so be sure to un-target the poacher by tapping R before trying that.) Then shoot him at close range or, kick him by pressing A repeatedly until he falls down.
When the poacher is dead, if you haven't already climbed up to the ledge where he was standing, do that now. Take the grenade he dropped and then hop up onto the low wall on the right side of the ledge. Jump from there to grab the dangling vine. Climb to the top of the vine and jump to the next vine on the right. Climb up and jump to the ledge on the left. Pick up the ARTIFACT (2/3).
Jump back to the vine, climb to the top and jump to the ledge on the right. (CHECKPOINT) Get the health pack and continue to the right.
You can't climb onto the ledge with the next ARTIFACT (3/3) from below. So grab the vine, climb up a bit and jump into the opening to claim the treasure.
Jump back to the vine, climb to the top and jump to grab the next vine on the left. Climb up a bit farther and jump to grab the vine on the right. Here a cut scene shows the vines below breaking off. You'll need to climb faster now to avoid falling. Tap A as you go to climb up quickly. Jump to the vine on the left. Then climb up that vine as fast as you can, just high enough so you can jump and reach the next vine on the right. Now Lara is safe. Climb up at your leisure and jump to the ledge on the right. (CHECKPOINT)
Go to the right, picking up a grenade if you have room in your inventory. Just ahead you'll meet a jaguar as well as another poacher. If you don't care about getting all the kills and pickups, just run and jump past them to the level exit. Otherwise, I recommend moving forward, getting a lock on the panther and stepping back shooting, preferably with the shotgun. Then, when the big cat is dead, switch to pistols or automatic pistols, target the poacher and shoot/grenade him while avoiding his grenades.
He drops one of his grenades when he dies. So you can replenish your supply. You might also go back for the one on the left if you didn't get it before.
Continue to the right to finish the level.
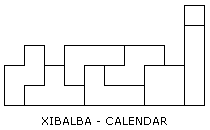
27 – XIBALBA – CALENDAR
Kills: 0 Artifacts: 3 Treasure Chest: 1
Head up the hill on the right to the carved stone calendar wheel. (CHECKPOINT) If you try to use it now, Lara says there are pieces missing, which she'll need to find in order to operate the device.
Continue to the right. Jump to grab the vine, slide to the bottom and then drop to grab the vine directly below. If you climb down this vine a little way and lean to the left, you can see an artifact behind a closed door. You'll be back for that shortly. Slide down the rest of the way and drop to the ground.
Run to the right across the ancient Mayan ball court. (Two CHECKPOINTS here.) Pick up a health pack near the big tree. Jump to grab the vine near the wall and climb up. At the top jump to the vine on the left. Climb up that vine and then jump to the one on the right. Climb up and jump from there to the ledge on the right, where there is another stone calendar wheel. (CHECKPOINT)
Go past the calendar to the right to find an ARTIFACT (1/3) and a TREASURE CHEST hidden in the undergrowth. (Click to click to show/hide treasure chest puzzle solution or click for all solutions on one page.) Then return to the calendar and press X to examine it. Lara notices that this calendar, though similar to the one on the other side of the ball court, has pieces locked in place preventing it from being used. However, she notes, its handle could be useful for manipulating the other calendar.
In the brief touch-screen sequence that follows, first tap the circle at the top right corner of the screen to open the item list. Then touch the crank at the bottom center of the screen to add it to Lara's tool kit.
After you take the MARS CRANK, a cut scene shows the door below opening. (CHECKPOINT)
Go to the left. Jump to grab the vine and slide to the bottom. Jump to the vine on the left and slide down to the level of the doorway. Jump from the vine into the room and pick up the ARTIFACT (2/3). Then go to the right and take the XIBALBA CARTOUCHE from the pedestal. When you take the cartouche, the pedestal recedes and the door on the opposite side of the ball court opens.
Jump back to the vine, slide to the bottom, jump to grab the vine on the right and slide down to the ground. Head to the right (CHECKPOINT) and cross the ball court to the tree on the other side (CHECKPOINT).
Grab the lowest vine and climb to the top. Jump to grab the next vine to the left, then the next. Climb up to the level of the doorway and jump over to it. Take the ARTIFACT (3/3) and then go to the pedestal and take the UAYEB CARTOUCHE.
Jump from the doorway back to the vine. Climb to the top and jump to the vine on the right. Climb to the top of it and jump to grab the higher vine on the left. Jump from there to the ledge with the calendar. Stand at the middle of it and press X.
DS Challenge – Entering Xibalba: First tap the blue circle at the top right to open the inventory. Touch the crank and drag it to the center of the circle. You'll see Lara placing the crank in the hole on the upper screen. Touch the blue circle to close the inventory panel. Then touch the crank handle with the stylus and draw circles on the screen to turn the crank. Turn clockwise until the dirt-encrusted niche on the lower of the two moving rings clicks into place between the bars at the top of the puzzle.
Open the inventory again. Touch the chisel to select it. Then tap the dirt-encrusted niche to clear out the debris. Tap the blue circle to put away the chisel. Then drag the lower of the two cartouches in the inventory into the empty niche. Close the inventory again.
Now touch the crank and draw circles on the screen to turn the crank until the dirt-encrusted niche on the upper rings clicks into place between the bars. Again use the chisel to clear out the dirt. Then drag the remaining cartouche into the empty niche. Close the inventory and turn the crank clockwise several times until the two key cartouches line up at the top of the puzzle wheel.
When you've done all this, an elaborate gate rises up out of the ball field, complete with massive, fire-breathing serpents carved out of stone.
Jump back to the vine on the left. Slide to the bottom and drop to grab the vine below. Slide down to the ground and run across the ball court (CHECKPOINT) to the exit.
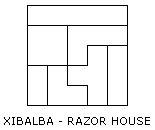
28 – XIBALBA – RAZOR HOUSE
Kills: 0 Artifacts: 3 Treasure Chest: 1
Go to the right down the ramp. (CHECKPOINT) Jump across the gap and take the health pack if you need it. You can't get past the spiked columns to the ARTIFACT, so you'll have to get it from the other side later on. Hang from the edge and drop down onto a ledge with a skeleton.
When the spikes on the column to the left retract, jump over to that ledge and quickly hop up onto the upper part of the ledge. (CHECKPOINT) Pick up some automatic pistol rounds as you step onto the slope to the left. Slide and jump to grab the chain ahead.
Climb to the bottom of the chain and look to the left. When the spikes protruding from the wall retract, jump to grab the handhold above them and quickly drop to the handhold below before Lara gets skewered. Drop down once more to the lowest handhold and then jump across a large spike pit to grab the ledge on the right. Press X to make a saving grab. Pull up but take care not to run on into the traps ahead.
Wait for the spikes on the short column to retract and move past it. Just ahead is a spinning blade on the ceiling and another spiked column. Watch the rhythm of the spikes and just as they are about to retract roll or slide under the blade and past the spikes. (CHECKPOINT)
Jump across the next spike-lined pit, making another saving grab on the other side, and pull up. Ahead is a more elaborate blade trap. The first stage consists of a spinning blade on the ceiling, followed by another spinning blade that moves along a track in the floor. There's an ARTIFACT (1/3) on the floor where the blade emerges and a small safe spot beyond that.
To get through, watch the lower blade. When it disappears into the floor in front of Lara, run forward. Jump over the lower blade as it emerges from the floor ahead. The blade on the ceiling won't touch Lara as long as she doesn't jump forward until after she passes it. Stop on the safe spot and turn left. Wait for the blade in the floor to rise up and move to the left before stepping out to get the artifact. Then quickly step back to the safe spot.
The next set of blades is easier to deal with, since the bottom blade only moves up and down, not back and forth along the track. So just wait for it to retract and run past it. Just don't jump, or Lara will hit the blade above. (CHECKPOINT)
Ahead is a pit with spinning blades. Jump to grab the chain and climb to the top. When the first set of spikes on the right wall retracts, jump to grab the handhold above them and quickly jump up to grab the handhold above. Wait for the spikes above to retract and then jump up twice to the next safe handhold. Now wait for the spikes behind Lara to retract and quickly jump to the left and pull up onto the ledge above, where you'll find a lovely health pack. (CHECKPOINT)
Stand at the edge of the ledge facing left (i.e., with Lara's back to the spikes). Jump toward the left wall and keep going to chimney jump between the two walls to grab the top of the wall on the right. Pull up.
Jump straight up to grab the chain. Climb to the top. Wait for the spikes on the left to retract and then jump to the ledge above them. Here you'll find the TREASURE CHEST, as well as the ARTIFACT (2/3) you saw at the start of the level but couldn't reach, thanks to the spiked columns. (Click to click to show/hide treasure chest puzzle solution or click for all solutions on one page.)
After getting the goodies, return to right and take a running jump over the spikes and past the first chain to grab the second chain. Press X to make a saving grab. Slide to the bottom of the chain and drop down onto a narrow ledge at the top of a ramp.
Step to the right. The brief cut scene makes this look very scary, but since the slope is not slippery, it's easy enough to make your way carefully down past the spiked columns. Pick up the ARTIFACT (3/3) and then just jump over the spinning blades to land on the slippery slope beyond. Slide safely to the floor below and proceed to the right to finish the level.
29 – XIBALBA – DARK HOUSE
Kills: 0 Artifacts: 3 Treasure Chest: 1
Head to the right. (CHECKPOINT) Pull the lever to raise the wall on the right; go through. Climb the ladder on the back wall. (Stand near it and press Control Pad Up. Tap A to climb faster.) At the top, jump to the right. Go to the right and climb the handholds to reach the top of the wall. Position Lara near the left side of the wall and then jump to grab the ladder on the right, or hang from the edge and jump to the ladder. (If you stand at the right edge and jump, Lara will overshoot the ladder and fall to her death.)
Climb down to the floor. (CHECKPOINT) Pick up an ARTIFACT (1/3) and grenade. Then pull this second lever to lower the wall you raised earlier. Climb back up the ladder. Jump onto the wall on the left. Drop down on the other side. Return to the left. Jump to grab the ladder but instead of climbing down, jump to the left again to land on top of the wall you just raised. Continue left past the third lever. Don't use it yet. (CHECKPOINT) If you pull the lever by mistake, don't worry. It' son a timer and the walls it raises will close again in a few seconds.
For now, climb the handholds to the left of the lever to find another ARTIFACT (2/3). Hang from the left edge of this ledge. Drop onto the slope below, slide just briefly and jump to grab the ledge on the left. Pull up and take the TREASURE CHEST. Jump back to the slope and slide down to the floor.(Click to click to show/hide treasure chest puzzle solution or click for all solutions on one page.)
Go to the right. (CHECKPOINT) Pull the first lever again to raise the wall ahead. Continue to the right. Climb onto the wall and jump carefully to grab the ladder. Climb down, pull the second lever again to lower the first wall. Climb back up, go left to the ladder and then jump left and continue to the third lever. (CHECKPOINT)
This time, pull the third lever to raise the two walls down below. These are on a timer, so you only have about 15 seconds to get through. As soon as you regain control of Lara, climb the handholds on the left. Run across the ledge, drop down onto the slope and slide to the floor. (Or, run and jump at the edge to grab the ledge where you found the treasure chest. Then drop to the floor, losing some health in the process.) Run to the right (CHECKPOINT) beneath the two raised walls and on past the skeleton of another explorer who didn't make it.
If you don't get through in time, try to stand between the two walls as they come down. Then you can climb the ladder and go to the right to repeat the process. If you get stuck on the left side, or if Lara gets crushed and the game reloads at the last checkpoint—just begin with the first lever and try again.
When you get past this trap, continue to the right, grab the last ARTIFACT (3/3) and slide down the ramp to end the level.
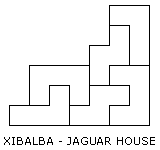
30 – XIBALBA – JAGUAR HOUSE
Kills: 4 Artifacts: 3 Treasure Chest: 1
Go to the right up the slope. (CHECKPOINT) A brief cut scene shows the toxic water below. Lara mentions trying to avoid it. Climb onto the low wall ahead. Jump to grab the light-colored handhold on the back wall. Climb to the right. Jump to the next handhold and then jump to the floor ahead.
Here you encounter your first jaguar thrall—an undead creature created from the corpse of a big cat. Like their living counterparts, jaguar thralls will try to pounce on Lara and knock her down. If she stands too close to the edge, this thrall can knock her into the blue pool. My strategy here is to equip the shotgun and get a lock on the thrall as quickly as possible. Shoot once, then, as it charges, jump over it and shoot it again from the other side. If you're out of shotgun ammo, you can do this with any weapon, though it may take a little longer and you'll have to jump back and forth over the thrall several times avoid the platform edges.
When it falls, jump over the stream of blue goo to the right. There's shotgun ammo to replenish your supply on this small island. Get it and jump the next gap to grab the handholds on the wall to the right. Climb to the top. Continue to the right, up the slope and across the flat ledge at the top. Slide down on the other side to land on a small ledge. (CHECKPOINT)
Jump to the left to grab one of the handholds on the back wall. Jump up to the handhold above. Then climb to the left and jump to grab the next handhold.
Drop down into the room below, right next to another jaguar thrall. Get a lock on it and if there's time, start shooting. Then, when it charges toward Lara, jump over it and start shooting from the other side. Repeat the process until it falls.
Pick up the ARTIFACT (1/3) on the left. Then go to the right wall and press X to push it down, forming a bridge over the pool. Cross over it and continue to the right, rolling through the low tunnel. (CHECKPOINT)
Chimney jump between the walls to reach the ledge above on the right. Hop over to the small niche on the left to get the TREASURE CHEST. Jump back to the right, drop into the next room and pick up another ARTIFACT (2/3).(Click to click to show/hide treasure chest puzzle solution or click for all solutions on one page.)
Climb the handholds on the right wall, duck through the narrow opening and drop into the room below with another jaguar thrall. Dodge back and forth as you fight, but watch out for the toxic pool on the right. When you've taken care of the thrall, jump across the gap to the flat ledge on the right.
Alternatively, if you don't care about getting all the kills, run and jump past the thrall and continue to the right.
In the ensuing cut scene Lara examines the carved mural above. "The Midgard Serpent, Jörmungandr, that lies on the bottom of the ocean, encircling all the world," she explains. "The coming of Ragnarök. . . . Jörmungandr thrashes beneath the sea, flooding the land and vomiting its deadly poison into the air."
At the other end of the mural we see a figure with a huge war hammer battling the serpent. "The final battle of the gods. Thor kills Jörmungandr with his hammer, Mjolnir, but then he retreats only nine steps before he succumbs to the serpent's venom."
When the cut scene finishes, climb up on the right to find a health pack. (CHECKPOINT) Drop down into the next room and take down another jaguar thrall. Continue to the right, picking up the third ARTIFACT (3/3). Then climb onto the low wall and jump across the water to grab the ledge ahead. Or, instead of fighting the thrall, slide past it, hop up onto the low wall on the right and jump across the blue water to the grab the handhold beyond. Pull up and shoot the thrall from there. Once it's dead you can jump back across the water to get ARTIFACT #3 if you like. (Thanks to Cas for the alternate strategy.)
After jumping across the water, climb onto the ledge above. Take a take a running jump across the next pool to grab one of the handholds on the right wall. Climb to the top and continue to the right to end the level.
31 – XIBALBA – MEGINGJORD
Kills: 0 Artifacts: 0 Treasure Chest: 0
You begin on a platform floating in the blue pool. Jump over to the small platform on the right. Just ahead another small platform rises and sinks below the surface periodically. When it rises up, jump onto it and quickly jump to the next stepping stone, which is safe. (The camera shifts, making this looks like a diagonal jump, but just press Control Pad Right + B.) Repeat the process, hopping across the next intermittent platform to reach the safe ledge beyond. Approach the huge statue of Thor.
An in-game cut scene shows a compartment inside the statue's chest. This is followed by a more elaborate cinematic sequence: Lara reaches for the belt, Megingjord, only to have it disintegrate in her hand, leaving a similar device to the ones that powered the gauntlets. As she examines the belt device she notices a blue glow emanating from the gauntlets in her pack. So she tries on all three artifacts together and, voilà, nearly a complete set.
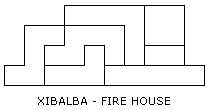
32 – XIBALBA – FIRE HOUSE
Kills: 0 Artifacts: 3 Treasure Chest: 1
Go to the right. (CHECKPOINT) Grab the huge, carved block and push it to the right until it falls into a hole and plummets to a level far below. Take a running jump across the gap. Pull up and continue to the right.
Step off the ledge to grab one of the handholds on the back wall. Drop down twice. Jump to the right, past the flame-spewing gargoyle to grab onto the handhold below on the right. Drop down twice to the floor. Go to the left and slide down the slope onto a ledge just above the carved block you pushed earlier. Climb the handholds on the back and left walls to reach the ledge above on the left. (CHECKPOINT)
Climb up to the ledge on the left. Cross over and hang from the other side. Drop down twice, so Lara is hanging from the lowest handhold on the back wall with a fire-breathing gargoyle to her left. Climb to the left, wait for the flames to go out and then jump past the gargoyle to grab the next handhold. Climb to the left and drop onto the health pack.
Slide down the slope on the left and jump near the end of the slope to grab one of the handholds on the left wall. Drop to the ledge below. (CHECKPOINT)
Climb down to the ledge below on the right. Take a running jump to grab the horizontal pole above the lava pool. Follow the instructions in the tutorial and press Control Pad Up + B to perch on top of the pole. Then jump to the right to grab the handhold above. Climb right then jump over to the ledge.
Go to the right, grab the carved block and pull it to the left to open up the passage behind it. Jump back to the handhold on the left. Jump straight up to grab the pole above. Jump up to perch on the pole and then jump to the right onto the ledge with the ARTIFACT (1/3).
Go to the right, through the short, sloping tunnel. Slide down on the right to grab one of the handholds on the back wall. Now that you've moved the carved block to the left, you can drop all the way down the shaft to the floor below.
The door on the left is closed. So go to the right. (CHECKPOINT) Jump across the gap and climb over the large, irregularly shaped carved block. There's another the ARTIFACT (2/3) just beyond it. Return to the carved block and push it to the left. Climb on top of it and jump to the ledge on the left. Jump to grab the pole above on the right. Perch on top of it and jump to the ledge on the right.
Wait for the flame trap ahead to go out and then move past it to the right. Jump over the next small gap. Don't drop down here. Instead hop onto the tall, narrow carved block ahead. Jump from there to grab the ledge on the right. Pull up to find a TREASURE CHEST. Get it and jump back onto the carved block.(Click to click to show/hide treasure chest puzzle solution or click for all solutions on one page.)
Hop down on the left side of the carved block and push it off the edge to the right. Drop down onto it and then jump to grab one of the handholds on the right wall. Drop down to the floor to find a health pack. Now push the block to the left until it falls off the edge.
Jump across the gap to the left. Continue left to the big, irregular carved block. Climb over it and drop down on the other side. Take a running jump across the gap to the left. (Here's that closed door again.) Hang from the edge of the floor and drop down to the ledge below.
Jump across the lava pit to the ledge on the right with the ARTIFACT (3/3). Jump the next pit and continue to the right. (CHECKPOINT)
Step on the pressure pad to activate the fire-breathing gargoyles you just passed and open the door you saw earlier above on the left. When Lara steps off the pad, the door closes. So drag the tall, carved block onto the pad to keep it depressed.
Return to the left, waiting for each of the flaming gargoyles to go out, so you can jump across the lava pits without falling in. Climb the ledges on the left (CHECKPOINT) and go through the door you just opened.
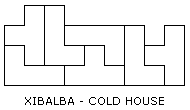
33 – XIBALBA – COLD HOUSE
Kills: 0 Artifacts: 3 Treasure Chest: 1
Throughout the level the cold gradually depletes Lara's health. But, as Lara explains, you can replenish it by doing acrobatics. Repeatedly tap A while running to the left and right, and Lara will do rolls and flips to warm up.
From the start, head to the left (CHECKPOINT) and up the slope. Slide or roll through the low tunnel. Take a running jump across the gap. Pull up and use the lever. This is one of three needed to open the exit.
Jump back across the gap to grab the right edge of the shaft. Don't pull up; just drop down the handholds to the floor, where you'll find a health pack.
Go to the left to get the first ARTIFACT (1/3). This is a good spot to run back and forth, tapping A to do acrobatics and restore Lara's health. When she's good to go, run to the left and jump onto the steep slope. Keep jumping, as you would for a chimney jump, to reach the slope above on the right and ultimately grab one of the handholds on the wall above and to the right of that slope.
NOTE: If you can't manage this, you can take the longer alternate route. From the room with the first artifact, return to the right and climb the handholds on the wall. Jump to the ledge on the left, where the first lever is, and then slide down the slope on the left and jump to grab a handhold on the wall ahead. This puts you in the same spot that chimney jumping up the two slopes would.
Climb to the highest handhold on this wall and then jump to the right to grab the ledge above. Pull up and take the ARTIFACT (2/3) and pistol ammo. Jump to the narrow ledge on the left (i.e., the top of the wall where you just climbed up). Jump to grab the handhold on the left wall. Press X for a saving grab. Then jump to the right to grab a handhold on the opposite wall and drop down to the floor.
Pull the lever. This is the second of three needed to open the exit.
Turn right and jump onto the slope. Keep jumping back and forth between wall and slope until Lara grabs the lowest handhold on the wall on the right. Climb these handholds and jump to the ledge on the left. (CHECKPOINT)
Roll or slide through the low opening on the left and drop down into the next room. This is another good, long stretch for doing acrobatics. Run back and forth, tapping A continuously to recharge Lara's health. In the process, pick up another health pack and an ARTIFACT (3/3).
When Lara's health is maxed out, return to the right side of the room. Climb onto the ledge. Take a running jump to the left and grapple the ring above. Swing to the left, jump and grapple the next metal ring. Swing to the left and jump to land on the slope ahead.
NOTE: When attempting multiple grapple swings it helps to swing high, jump and then wait for Lara to fall until she's level with or just slightly below the next grapple point before pressing X to grapple it.
After landing on the slope on the left, slide just a little and then jump to grab one of the handholds on the wall ahead. Drop down into the room below, where you'll find shotgun ammo and a TREASURE CHEST. (Click to click to show/hide treasure chest puzzle solution or click for all solutions on one page.) Do some more acrobatics to recharge Lara's health. Then climb back up the handholds on the left wall.
When you reach the highest handhold, jump to the right to grab a handhold on that wall. Climb up, jump back to the left, climb up, jump back to the right, climb up to the highest handhold and finally jump back to the left to land on the ledge. Pull the third lever to open the exit, which is just to the left. Run through to finish the level.
34 – XIBALBA – BAT HOUSE
Kills: 0 Artifacts: 0 Treasure Chest: 0
Go to the left. (CHECKPOINT)
DS Challenge – Bat Attack 1: Approach the hole with bats swarming out of it to start a touch-screen sequence, in which you must tap the bats with the stylus to shoot them. Each time a bat gets through your defenses and manages to reach Lara, she'll lose a little heath. If her health bar is completely depleted, she'll die and you'll have to retry the sequence. Naturally, the bats come more quickly as time goes by. Keep it up for about 50 seconds to complete the sequence.
Continue to the left and roll through the tunnel. (CHECKPOINT) Chimney jump between the two walls to reach the ledge above eon the right. Here it helps to jump toward the right wall first. Then just keep jumping until Lara lands on the ledge.
Grab the health pack and then climb to the top of the chain. Jump to the ledge on the left and climb the next chain. Jump to grab a handhold on the right will. Jump up to the next handhold. Then jump back to grab a handhold on the left wall. Climb to the ledge above. (CHECKPOINT)
DS Challenge – Bat Attack 2: Step forward to begin another bat-killing touch-screen sequence, which is basically the same as the first.
Afterwards slide down the slope on the left to finish the level.
Although you are a fearsome bat slayer, these do not count as official "kills" in the stats screen at the end.
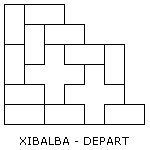
35 – XIBALBA – DEPART
Kills: 4 Artifacts: 3 Treasure Chest: 1 Weapons: Semiautomatic Rifle
Hop down off the ledge and go to the left. (CHECKPOINT) Jump to grab the vine and jump from there to the ledge on the left. Slide down the slope to the health pack. Jump to grab the next vine. Slide to the bottom of the vine and then jump to grab the narrow ledge on the big, square column on the left. Let go and slide to the ground.
Go to the right to find a TREASURE CHEST. Then roll or slide under the ledge where the poacher was standing in the earlier level. Use the right wall as a springboard to get onto the ledge with the ARTIFACT (1/3). (Click to click to show/hide treasure chest puzzle solution or click for all solutions on one page.)
Then cross to the left side of the ledge (CHECKPOINT) and hope up onto the low wall. Jump from there to grab the dangling vine. Climb up and jump to grab the next vine on the right. Climb up that vine and jump back to the ledge on the left.
Once again, slide down the slope to the left and jump to grab the vine ahead. This time climb up the vine and jump onto the top of the big, square column. (CHECKPOINT)
Jump to grab the rope on the right. Slide to the bottom and drop onto the grassy ledge below. Pick up a grenade here if you can carry it. Slide down the slope to the left and jump to grab the knotted rope ahead. Jump from rope to rope to reach the dangling metal platform on the left. Then take a running jump off the left side of this platform to reach the ledge beyond without sliding down the slope.
There's automatic pistol ammo here, as well as a health pack just up the hill to the left. (CHECKPOINT)
When Lara is well equipped, slide down the slope on the right and get ready to confront a mercenary. When you've taken care of him, pick up the ARTIFACT (2/3) on the left and some shotgun shells on the low hill in the middle of this area.
Go to the right, roll or slide through the tunnel and then chimney jump up the shaft to reach the grassy ledge where you found the grenade earlier. Slide down the slope and jump to grab the knotted rope to the left. Then jump back across the ropes to the metal platform and from there to the rocky ledge on the left.
Climb the handholds on the left wall and jump to the right to grab the next knotted rope. Climb up a bit and jump to grab the next rope. Climb to the top and jump to the ledge on the right, where you'll find the SEMIAUTOMATIC RIFLE, at last. (CHECKPOINT)
Take a take a running jump to grab the lowest handhold on the right wall. Climb to the highest one and then jump back to grab a handhold on the left wall. Climb up through the shaft opening and take out the mercenary on the left.
Then backtrack to the right, jump over the shaft opening and continue to the top of the grassy hill. Hang from the edge and drop onto the ledge below, where you'll find the third ARTIFACT (3/3).
Step off the left edge and slide down a series of slopes to land in a tunnel at the bottom of the shaft. (CHECKPOINT) Remember this area from the earlier level when the boulder fell down? Roll through to the left and then chimney jump up the shaft to the ledge on the left. (CHECKPOINT) Climb the handholds to the opening at the top once more.
This time, continue downhill to the left. Pick up some rifle ammo at the edge of the ledge. Then drop down.
A short cut scene shows a pair of soldiers near Lara's bike. Lara says she'll have to get the motorcycle parts back from them before she can leave.
Head to the left and confront the 2 mercenaries. You may want to use your new weapon here to make short work of them. When they've fallen, take back the BATTERY and SPARK PLUG (or whatever these items are; the inventory screen doesn't say). Then approach the motorbike and press X to end the level.
Cinematic: Lara emerges through the Xibalba gate and it begins to close behind her. She stops to phone Zip and report on her progress and have him send the hammer's coordinates to her PDA. Lara also asks if he's made any progress on his "other project." Zip says he hasn't tracked them down yet, though it's not clear at this point to what or whom he is referring. Lara says she'll call again when she reaches her next destination, Jan Mayen Island, in the North Atlantic between Norway, Iceland and Greenland.
†UPDATE HISTORY: 1/15/09 - Walkthrough first posted.
WAS THIS WALKTHROUGH HELPFUL? If not, I apologize and invite you to contact me with any questions. If you need help right away, I recommend the r/TombRaider subreddit. Other fan-run forums are listed at tombraiders.net/stella/community.html. If this site was useful, please consider supporting it financially or in other ways. For details, visit tombraiders.net/stella/support.html. As always, I welcome your corrections/suggestions. Thank you!
Copyright © 2007- Stellalune (). All rights reserved. Feel free to copy or print this walkthrough for personal use. By all means, share it with friends, but please include this credit line so people can send me their feedback. No part of this walkthrough may be reproduced on another site without permission. As an Amazon Associate I earn from qualifying purchases. Follow this link for details about this site's advertising and privacy policy.
Stella's Tomb Raider Site: tombraiders.net.
